TPU Flexible Filament Guide: Settings Tips & Best Practices
TPU Flexible Filament Guide: Settings Tips & Best Practices
TPU (thermoplastic polyurethane) is the go-to flexible filament when you need prints that bend, stretch, and absorb impact without cracking. The primary reason to choose TPU over stiffer flexibles is its rubber-like elasticity combined with surprisingly manageable printability on most direct-drive printers. You can print phone cases, drone bumpers, gaskets, and wearable parts that survive repeated flexing. The trade-off is that TPU punishes loose extruder paths, high speeds, and wet filament more harshly than PLA or PETG ever will.
If your printer runs a Bowden extruder, you can still print TPU—but you'll need to slow down significantly and accept a narrower margin for error. The settings below assume a direct-drive setup as the baseline, with Bowden-specific adjustments noted where they matter.
What Print Temperature Works for TPU?
TPU typically prints between 220°C and 250°C on the nozzle, with 230°C as a reliable starting point for most brands. Bed temperature should sit between 30°C and 60°C—many printers don't even need a heated bed for TPU, but a warm bed at 40–50°C improves first-layer adhesion on PEI and glass surfaces.
Brand-specific ranges that matter:
- NinjaTek NinjaFlex (85A): 225–240°C nozzle, 30–40°C bed
- eSun TPU 95A: 210–230°C nozzle, 30–50°C bed
- Overture TPU 95A: 210–230°C nozzle, 30–50°C bed
- Sainsmart TPU 95A: 210–230°C nozzle, 40–60°C bed
- Polymaker PolyFlex TPU95: 210–230°C nozzle, 30–50°C bed
Start at the low end of your filament's range and print a temperature tower. TPU stringing gets worse as temperature climbs, so the lowest temperature that still produces strong layer adhesion is your sweet spot. If layers delaminate when you flex the print, bump up by 5°C increments until the part holds together under bending.
How Fast Should You Print TPU?
Speed is the single setting that makes or breaks a TPU print. Start at 20–30 mm/s for all print moves, including infill and inner walls. Outer walls can drop to 15–20 mm/s for clean surface finish.
The reason speed kills TPU prints comes down to the filament's elasticity. When your extruder pushes on it, the filament compresses slightly before it exits the nozzle. At high speeds, this compression-delay effect causes under-extrusion, skipped steps, or the filament buckling and wrapping around the extruder gear. You'll hear a clicking sound from the extruder—that's the gear grinding against filament it can't push fast enough.
If you're running a Bowden tube, drop to 15–20 mm/s maximum and disable retraction entirely as a first test. The long filament path adds friction and compression points that amplify every speed-related problem. Some Bowden users succeed only after capping speed at 10–15 mm/s for the entire print.
Travel moves can run faster—up to 100–120 mm/s—since no extrusion is happening. But keep acceleration low at 500–800 mm/s² to avoid shaking flexible prints off the bed.
Retraction Settings That Actually Reduce TPU Stringing
TPU stringing is persistent because the filament stretches rather than snapping cleanly during retraction. The standard PLA retraction formula fails here.
For direct-drive setups, start with a retraction distance of 1–2 mm and a retraction speed of 20–30 mm/s. Disable z-hop if possible and don't add extra restart distance. For Bowden setups, start with a retraction distance of 3–5 mm and a retraction speed of 15–25 mm/s. Expect more stringing than direct-drive—accept some and clean post-print.
The failure mode to catch early is the difference between thin and thick stringing. Thin, hair-like stringing across small gaps is normal and easily removed with a heat gun. It's usually caused by mild oozing, slightly high temperature, or low retraction. Thick, branch-like strings that connect multiple points indicate your temperature is too high or retraction distance is too short. If you see thick strings, drop nozzle temperature by 5°C before touching retraction settings. Temperature fixes ooze; retraction fixes stretch.
A common mistake is increasing retraction distance aggressively. Beyond 2–3 mm on direct-drive, you risk pulling soft TPU into the cold zone of the hotend, where it solidifies and causes a partial clog mid-print. If stringing persists after reasonable retraction tuning, dry your filament and lower temperature—don't keep cranking retraction. Choose a retraction distance that allows the nozzle to retract further but still gives the filament enough time to resume your print without gaps.
Bed Adhesion: What Surface Works and What Doesn't
TPU sticks aggressively to most surfaces—sometimes too aggressively. The real risk isn't poor adhesion; it's tearing your build surface when removing a print.
Best surfaces ranked:
- PEI (smooth or textured): Excellent adhesion at 40–50°C. Let the bed cool completely before removal to avoid tearing the PEI coating.
- Blue painter's tape: Reliable, cheap, and sacrificial. TPU bonds to tape well, and you can replace tape if it tears.
- Glass with glue stick: Works, but the glue stick acts as a release agent as much as an adhesion promoter. Without it, TPU can fuse to bare glass and take chips out during removal.
- Garolite (G10): Strong adhesion, easy release when cooled. Less common but effective.
Surfaces to avoid or use with caution include bare glass without an interface layer, which risks glass damage during removal, and BuildTak or similar sheets where TPU can bond permanently if printed too hot and too close to the bed.
A first-layer nozzle temperature bump of 5°C helps initial stick. Nozzle height should be slightly higher than PLA—TPU doesn't need to be squished as hard. If your first layer looks translucent or the nozzle is dragging through it, raise your z-offset by 0.02–0.05 mm.
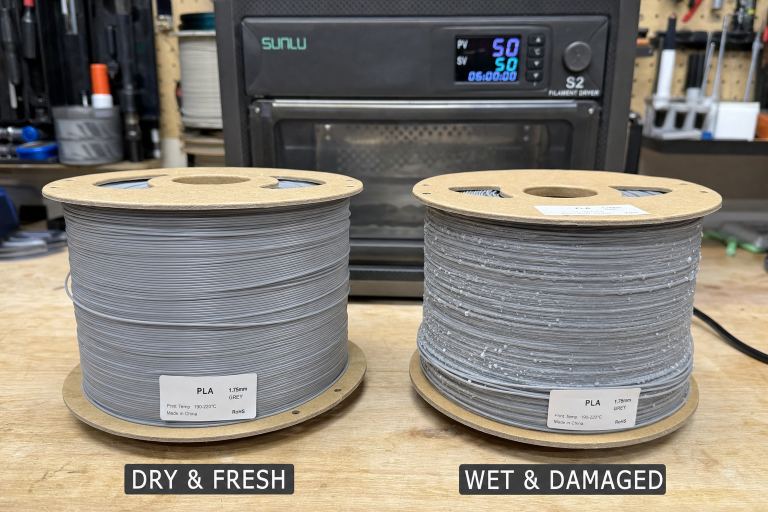
Drying TPU: Non-Negotiable Before Every Print
TPU is hygroscopic. It absorbs moisture from the air within hours of exposure, and wet TPU prints with popping sounds, surface bubbles, and severe stringing that no slicer setting can fix.
Drying requirements:
- Temperature: 50–55°C (do not exceed 60°C or the filament may fuse on the spool)
- Duration: 4–6 hours for mildly wet filament, 8+ hours if the spool has been exposed for days
- Equipment: Filament dryer with temperature control, or a food dehydrator that can hold 50–55°C
To know whether your TPU is wet before you waste a print, extrude 50 mm of filament into the air at printing temperature. If you hear popping, crackling, or see steam wisps and tiny bubbles in the extruded strand, the filament is wet. Dry it. A freshly dried spool extrudes silently and produces a smooth, consistent strand.
Store TPU in a sealed container with desiccant when not printing. Even a few days of ambient humidity in a 50%+ RH environment is enough to degrade print quality. Some users print directly from a dry box with a PTFE tube running to the extruder—this is ideal for long prints in humid climates.
Extruder Tension and Filament Path: The Mechanical Side
TPU's flexibility means it can buckle anywhere there's an unsupported gap between the extruder gear and the hotend entry. This is the most overlooked cause of failed TPU prints.
Check these mechanical points before starting:
- Extruder tension: Loosen it. TPU needs less gripping force than PLA. If the extruder gear deforms the filament visibly, it's too tight and will cause inconsistent extrusion.
- Filament path gap: On many direct-drive setups, there's a small gap between the extruder drive gear and the heatbreak entry. TPU can squirm out through this gap instead of going down into the hotend. A printed filament guide that narrows this gap is a common fix.
- Spool resistance: TPU on a tight spool holder creates drag that stretches the filament unevenly. Use a bearing-based spool holder or reposition the spool so the filament enters the extruder in as straight a line as possible.
Shore Hardness: Choosing the Right TPU for Your Part
TPU comes in different hardness ratings measured on the Shore scale. The number changes how the filament prints and what the finished part can do.
| Shore Hardness | Flexibility Feel | Print Difficulty | Typical Uses |
|---|---|---|---|
| 85A | Very soft, rubber-band stretchy | Advanced | Gaskets, tires, wearable straps |
| 95A | Firm flex, bends under pressure | Intermediate | Phone cases, drone parts, bumpers |
| 98A–64D | Stiff flex, minimal stretch | Beginner-friendly | Hinges, snap-fit parts, structural flex |
95A is the sweet spot for most users. It prints reliably on direct-drive printers with the settings above, and the parts are durable without being floppy. 85A filaments like NinjaFlex demand slower speeds at 10–15 mm/s, near-zero retraction, and a perfectly constrained filament path—expect a learning curve.
If you're new to flexibles, start with a 98A or 64D TPU. These print almost like PETG and let you dial in your extruder path and speed expectations before moving to softer grades.
When These Settings Won't Apply to Your Printer
The recommendations above assume a standard direct-drive extruder with a PTFE-lined hotend capable of reaching 230°C minimum. If your printer falls outside that profile, the baseline shifts significantly. All-metal hotends, particularly those with rough internal bores or sharp transitions in the heatbreak, create enough friction that even 95A TPU can jam at speeds that work fine on a PTFE-lined setup. In that case, drop speed to 10–15 mm/s, disable retraction, and consider polishing the heatbreak bore or switching to a PTFE-lined hotend if jams persist.
Printers with remote direct-drive systems—where the motor sits offset from the hotend but still counts as direct-drive—often have a longer filament path with a small unsupported section. You'll need to print a guide tube insert to bridge that gap, or the filament will buckle there before it ever reaches the melt zone. Bowden users on printers with long tube runs over 400 mm should treat 85A TPU as effectively unprintable without a conversion kit; the compression lag across that distance makes consistent extrusion nearly impossible regardless of speed.
How to Verify Your Extruder Can Handle TPU Before a Full Print
Run a quick extrusion test before committing to a multi-hour print. Heat the nozzle to 230°C, mark the filament 100 mm above the extruder entry with a marker, then command the printer to extrude 50 mm at 15 mm/s. Watch the filament at the extruder gear. If it feeds smoothly without clicking, grinding, or visible buckling, and the mark moves exactly 50 mm toward the extruder, your path is constrained well enough. If the filament bows outward between the gear and the hotend entry, you have a gap that needs a guide. If the extruder clicks but the filament doesn't move, back off tension and retest. This 30-second check catches the mechanical problems that ruin TPU prints before you waste filament on a failed first layer.
When to Stop Troubleshooting and Check Your Hardware
Some TPU problems aren't settings problems at all. Stop adjusting slicer values and inspect hardware if any of these conditions apply:
- Extruder clicking persists at 15 mm/s with low tension: Your hotend may have a partial clog, or the PTFE liner inside the hotend is worn and creating excess friction. Disassemble and inspect.
- Prints consistently under-extrude on one side of the bed: This is usually a leveling or gantry alignment issue, not a TPU-specific problem. TPU amplifies existing mechanical inconsistencies.
- Filament consistently wraps around the extruder gear: The filament path gap is too large, or you're using an all-metal hotend with a rough internal bore that catches the soft filament. A PTFE-lined hotend or a polished titanium heatbreak helps.
- Layer adhesion is poor even at the top of the temperature range: The filament is likely wet, or the brand's formulation simply doesn't bond well. Try a different brand before assuming your printer is at fault.
Success Check: Is Your TPU Print Dialed In?
After applying these settings, run a small test print—a 20 mm calibration cube or a thin-walled cylinder—and check the following:
- Surface finish: Smooth, consistent layers without gaps or blobs.
- Stringing: Fine hairs are acceptable and removable. Thick strings mean more tuning needed.
- Layer adhesion: Squeeze the print hard. Layers should not separate. Flex it; it should bend and return without cracking along layer lines.
- Dimensional accuracy: TPU shrinks minimally, so a 20 mm cube should measure within ±0.2 mm if extrusion multiplier is calibrated.
If all four checks pass, you're ready to print functional parts. If not, revisit temperature and speed before touching anything else—those two settings fix more TPU problems than all other adjustments combined.
Ryan has been operating FDM 3D printers since 2017. He runs a 12-machine print farm. His daily drivers include a Bambu Lab X1 Carbon, Prusa MK4s, and Creality Ender-3 V3s that have logged over 15000 print hours. He started 3D Printer Nerd to provide structured troubleshooting guides with diagnostic order, material-specific parameters, and clear stop points.