How to Store 3D Printer Filament & Keep It Dry
Most print-quality problems that get blamed on a bad nozzle or slicer settings actually trace back to wet filament. The fix is straightforward: store every spool in a sealed container with fresh desiccant, and dry filament before you print if it has been sitting out for more than a few days in average humidity. The rest of this guide covers what actually works, which materials demand the strictest storage, and how to spot moisture damage before it ruins a 12-hour print.
One Failure Mode That Wastes Spools—and How to Catch It Early
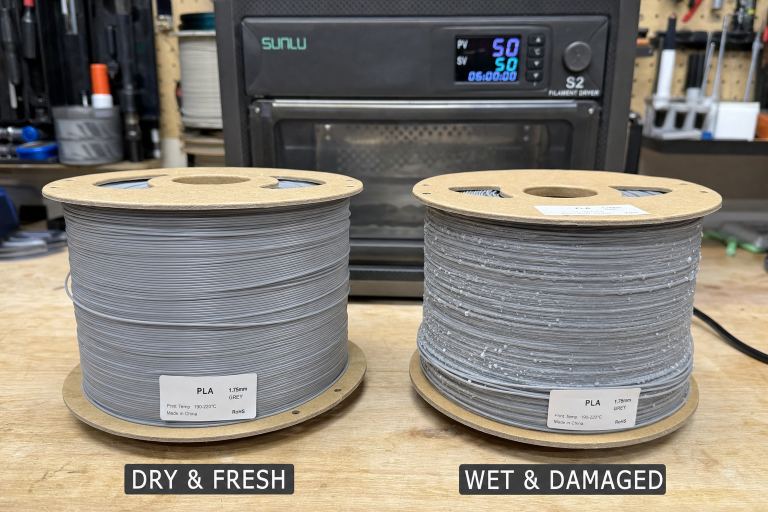
The failure mode that catches beginners off guard is partial moisture saturation in PLA that hasn’t reached the popping-and-hissing stage yet. The spool looks fine. It doesn’t snap. It doesn’t steam at the nozzle. But the prints come out with a faint, consistent surface roughness that looks like subtle over-extrusion or inconsistent layer lines.
Run a short test print with a long, straight wall—a 20 mm calibration cube with no infill works well. If the surface shows tiny random pockmarks or a “sandy” texture that disappears when you switch to a known-dry spool of the same material, moisture is the cause. The fix is drying the filament, not adjusting flow rate or retraction.
This matters because chasing slicer settings on damp filament wastes days. If a spool has been open for two weeks in a room above 40% relative humidity, assume it needs drying before troubleshooting anything else.
Quick Check: Is Your Filament Wet Right Now?
Before you reorganize your storage setup, confirm whether moisture is actually causing your current print problems. Run through these checks in order:
1. Listen at the nozzle during a purge or skirt print. A crackling, popping, or hissing sound means water is boiling inside the hotend. This is the most definitive wet-filament signal for PETG, TPU, and Nylon. PLA may not pop audibly even when damp.
2. Examine a freshly printed wall under angled light. Look for random tiny pits, a sandpaper-like texture, or inconsistent gloss patches. These are moisture artifacts, not extrusion problems.
3. Bend a short length of filament sharply. Dry PLA snaps cleanly. Wet PLA often bends farther before breaking. Brittle PLA that shatters with almost no bending is likely degraded from age or UV, not moisture.
4. Check your hygrometer inside the storage container. If it reads above 25% RH, your desiccant is exhausted or the seal is compromised. Any filament stored in that container is suspect.
If you hit a “yes” on any of these, dry the spool before you change a single slicer setting.
Which Filaments Demand Dry Storage and Which Are Forgiving
Not all materials absorb moisture equally. The table below sorts them by how aggressively they take on water and what failure looks like.
| Material | Hygroscopic Risk | Storage Requirement | Drying Needed? | Print Difficulty |
|---|---|---|---|---|
| PLA | Low-moderate | Sealed bin with desiccant; room storage tolerable in dry climates for short periods | Yes, after weeks of open air | Beginner |
| PLA+ / Tough PLA | Moderate | Same as PLA but degrades faster when wet | Yes, more frequently than standard PLA | Beginner |
| PETG | High | Dry box required; never store open in humid rooms | Yes, dry before first use and after any extended open-air exposure | Intermediate |
| TPU (flexible) | Very high | Vacuum-sealed or active dry box; desiccant alone often insufficient | Yes, dry before every print session | Intermediate-advanced |
| Nylon (PA6, PA12) | Extremely high | Active dry box or printing from a sealed enclosure; vacuum storage mandatory | Yes, dry for 6–12 hours before printing even when stored correctly | Advanced |
| PVA (support material) | Extremely high | Vacuum-sealed with desiccant; discard if left open for days | Yes, but PVA degrades permanently if saturated too long | Advanced |
| ABS / ASA | Low | Sealed bin with desiccant; moisture causes surface defects but less aggressively than PETG or Nylon | Yes, if popping or surface defects appear | Intermediate |
| Polycarbonate (PC) | High | Dry box mandatory; print directly from a sealed dry enclosure | Yes, dry thoroughly before printing | Advanced |
PLA is forgiving. PETG and TPU are not. Nylon and PVA will fail spectacularly without disciplined storage. If you only print PLA in a climate-controlled room, a simple sealed tote with desiccant is enough. If you print PETG, TPU, or Nylon, you need a dry-box system and a filament dryer.
What You Need Before You Start
Gather these items before reorganizing your filament storage. You don’t need everything on day one, but each piece solves a specific failure point.
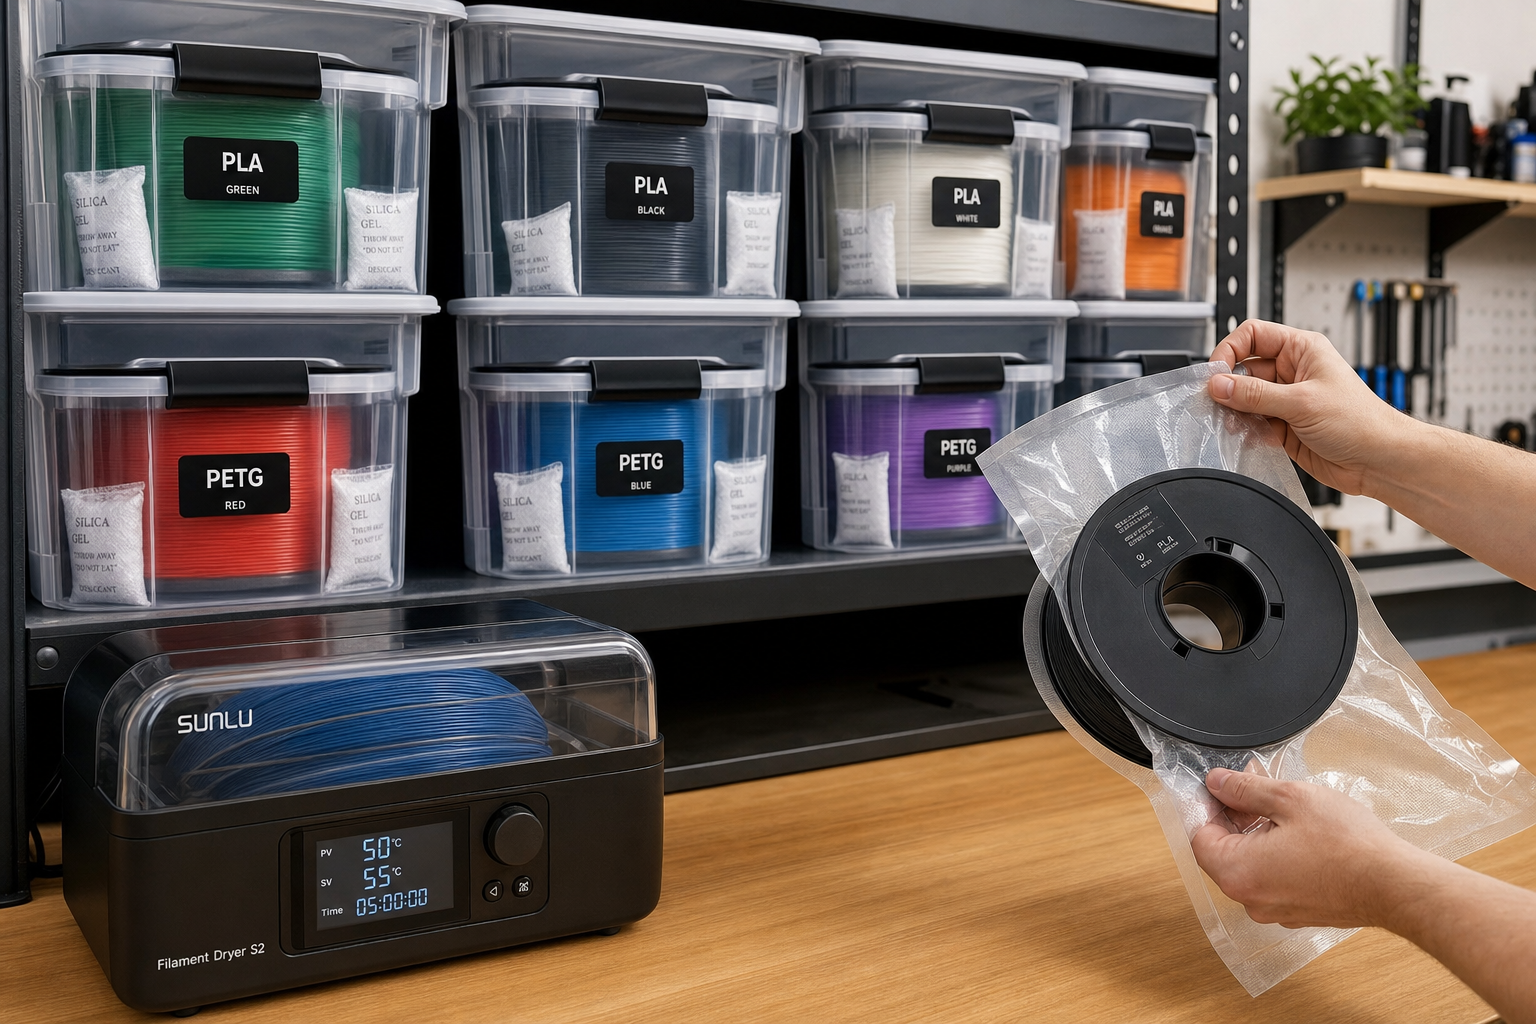
- Sealed containers: Gasketed plastic totes for bulk storage, or cereal containers with snap-lock lids and silicone seals for individual spools. A single 1 kg spool fits in most 4-liter cereal containers, which cost under $10 each.
- Indicating silica gel desiccant: 50–100 grams per container holding 4–5 spools. Color-indicating beads—orange-to-green or blue-to-pink—show saturation at a glance without opening the lid.
- Digital hygrometer: A small unit that fits inside each storage container. Target below 20% RH. If readings climb above 25%, the desiccant needs recharging or the seal is failing.
- Filament dryer: A dedicated unit like the EIBOS, Sunlu, or PrintDry series. For Nylon and PC, verify the dryer reaches at least 70°C before buying—some budget models top out at 50°C and won’t dry engineering materials.
- PTFE tubing and pneumatic fittings: Needed if you build a dry box that feeds filament directly to the extruder. This keeps high-risk materials sealed during the entire print.
Step by Step: How to Store Filament So It Stays Dry
1. Choose a Container That Actually Seals
A storage bin with a foam gasket in the lid works. Cereal containers with snap-lock lids and a silicone seal are popular because they fit a single 1 kg spool and cost under $10 each. Large gasketed totes hold multiple spools but expose the whole batch every time you open the lid.
What doesn’t work: unsealed drawers, open shelving, the cardboard box the spool shipped in, or a plastic bag with a twist tie. Those slow moisture ingress by a day or two at most. If you can smell the filament when you open a drawer, the container isn’t sealed.
2. Add Enough Desiccant—and Recharge It
Use 50–100 grams of indicating desiccant per sealed container holding 4–5 spools. For single-spool cereal containers, 20–30 grams is sufficient. Spread the beads across the bottom of the container rather than bagging them, so they have maximum air contact.
To recharge desiccant, spread beads on a baking sheet and heat at 120°C (250°F) for 2–3 hours, or follow the manufacturer’s instructions. Do this whenever the indicator color shifts. In humid seasons, that might be every 2–4 weeks. If you live in a coastal or tropical climate, check every week.
3. Place a Hygrometer Inside and Check It
A small digital hygrometer inside the storage bin tells you whether your system is working. Position it where you can read it without opening the lid—some containers have a transparent section, or you can mount the hygrometer facing outward. If the RH creeps above 25%, the desiccant needs recharging or the container seal is compromised. Don’t guess.
4. Print from a Dry Box for High-Risk Materials
For PETG, TPU, Nylon, and PC, a passive storage bin isn’t enough. You need a dry box that feeds filament directly to the printer through a PTFE tube, with desiccant inside and a sealed lid. This keeps the filament dry during the print itself, which matters for Nylon and PVA that can absorb enough moisture mid-print to cause defects on long jobs.
A DIY dry box using a sealed cereal container, a pneumatic fitting, and a short length of PTFE tube works for most setups. Drill a hole in the lid, install the fitting, run the PTFE tube to your extruder, and keep desiccant in the bottom. For Nylon, add a small heater inside the box or use a commercial heated dry box that maintains 60–70°C during printing.
How to Dry Filament That Has Already Absorbed Moisture
Storage prevents moisture. Drying removes moisture that’s already in the filament. The two are separate steps, and storage alone won’t fix a spool that’s already wet.
| Material | Drying Temperature | Minimum Drying Time | Notes |
|---|---|---|---|
| PLA | 40–50°C (104–122°F) | 4–6 hours | Do not exceed 50°C or spool may soften and fuse |
| PETG | 60–65°C (140–149°F) | 4–6 hours | Can go longer if heavily saturated |
| TPU | 50–55°C (122–131°F) | 5–8 hours | Flexible filaments hold moisture deep; longer dry times help |
| Nylon (PA6) | 70–80°C (158–176°F) | 8–12 hours | Nylon needs aggressive drying; use a dedicated filament dryer or oven that holds temperature accurately |
| ABS / ASA | 60–70°C (140–158°F) | 4–6 hours | Dry if popping sounds or surface defects appear |
| PVA | 45–55°C (113–131°F) | 6–8 hours | PVA degrades if overheated; stay below 60°C |
| Polycarbonate | 70–80°C (158–176°F) | 6–12 hours | Requires high heat; not all filament dryers reach this range |
Drying methods ranked by reliability:
1. Dedicated filament dryer: Devices like the EIBOS, Sunlu, or PrintDry are designed for the job, hold temperature accurately, and often include a fan for even heat distribution. This is the safest and most consistent option.
2. Food dehydrator with adjustable temperature: Works well if the trays are modified to fit a spool. Verify temperature with a separate thermometer—many dehydrators run hotter than the dial indicates.
3. Oven: Only if your oven can hold a steady low temperature. Many ovens swing ±15°C at low settings, which can soften a PLA spool or fail to dry Nylon. Use a separate oven thermometer and preheat thoroughly. Never use a gas oven with a pilot light for filament drying.
4. Heated print bed with a box: Place the spool on the bed, cover with a cardboard box with a few small vent holes, and set the bed to drying temperature. It works in a pinch but is slow and uneven.
If your oven can’t hold within ±5°C of the target temperature, don’t use it. A temperature spike can fuse an entire spool into a solid brick. Buy a dedicated dryer instead.
How to Confirm the Drying Worked
Don’t assume the spool is dry just because the timer went off. Verify before you commit to a long print.
1. Print a single-wall test cube or cylinder. Use the same material profile you plan to print with. A 20 mm cube with one perimeter and no infill prints in under 10 minutes on most machines.
2. Inspect the surface under angled light. A properly dried spool produces a smooth, consistent surface with no random pits, no sandpaper texture, and no intermittent rough patches. Gloss should be uniform across the entire wall.
3. Listen during the test print. Zero popping or crackling at the nozzle. If you hear even occasional pops, the filament needs more drying time—add 2–3 hours and test again.
4. Compare against a known-dry spool. If you have a fresh, vacuum-sealed spool of the same material, print the same test file with both. The surfaces should be indistinguishable. If the dried spool still shows defects and the fresh spool doesn’t, the drying cycle was insufficient or the filament is degraded beyond recovery.
If a spool fails this check after two full drying cycles at the correct temperature, the filament may be permanently damaged. Nylon and PVA that have been saturated for months can hydrolyze—the polymer chains break down and no amount of drying restores print quality. Retire the spool.
When Dry Storage Isn’t the Problem
Moisture isn’t the only thing that ruins filament. If you’ve dried a spool and still see print defects, check these before assuming the drying failed:
- Dust and debris on the filament: Filament sitting out collects airborne dust, which burns in the nozzle and causes intermittent clogs or surface specks. Wipe filament with a dry lint-free cloth or use a filament cleaner with a foam insert before it enters the extruder.
- Brittle PLA that snaps even when dry: This is often age-related degradation from UV exposure or poor-quality PLA, not moisture. Some PLAs become brittle after 12–18 months regardless of storage. If it snaps during handling but prints fine after loading, use it quickly. If it snaps mid-print, retire the spool.
- Tangled spools: A tangle looks like an extrusion problem but is purely mechanical. Never let the filament end go free; always secure it in the spool’s edge holes or clip it. If a spool is already tangled, unspool 10–15 meters, carefully untangle, and respool under tension.
- Inconsistent filament diameter: Cheap filament with diameter swings of ±0.05 mm or more causes extrusion variation that looks like moisture defects. Measure with calipers at several points along a meter of filament. If diameter varies by more than ±0.03 mm, the filament itself is the problem, not the storage.
When to Stop Troubleshooting and Replace the Spool
Some spools aren’t worth saving. Stop drying and retire the filament if:
- You’ve run two full drying cycles at the correct temperature and the test print still shows defects. The polymer may be hydrolyzed or the filament was poorly manufactured.
- The filament snaps repeatedly during printing despite being dry. This indicates age-related embrittlement, especially in PLA. The spool will cause constant print failures.
- The filament diameter varies by more than ±0.05 mm across multiple measurements. No amount of drying fixes dimensional inconsistency.
- PVA or Nylon has been left unsealed in a humid environment for weeks. These materials degrade permanently. The cost of failed prints and clogged nozzles exceeds the cost of a new spool.
A $25 spool isn’t worth a week of failed prints and disassembled hotends. If the signs point to bad filament, move on.
FAQ
Can I store filament in a refrigerator or freezer?
No. Refrigerators are high-humidity environments. Condensation forms on cold filament when you bring it back to room temperature, making moisture problems worse. Store filament at room temperature in a sealed dry container instead.
How long does dried filament stay dry after removing it from storage?
It depends on the material and ambient humidity. PLA in a 40% RH room picks up enough moisture to affect print quality in 3–5 days. Nylon and PVA can show defects within hours. For high-risk materials, print directly from a dry box and never leave spools sitting out overnight.
Is vacuum-sealing with desiccant better than a dry box?
Vacuum-sealing with desiccant is excellent for long-term storage of spools you don’t use frequently. For spools in active rotation, a dry box is more practical because you don’t need to re-vacuum every time you print. The best setup combines both: vacuum-seal backup spools and use a dry box for active spools.
Do I need to dry brand-new filament out of the package?
Sometimes. Manufacturers vacuum-seal filament with a desiccant packet, but quality control varies. PETG, TPU, and Nylon often benefit from drying even when new, especially if the vacuum seal was imperfect or the spool sat in a warehouse for months. If a new spool pops, hisses, or produces rough surfaces on the first print, dry it.
Can I use rice instead of silica gel?
No. Rice is not an effective desiccant at the low humidity levels filament requires. It absorbs moisture slowly and releases it back as temperature changes. Use indicating silica gel beads or molecular sieve desiccant designed for the purpose.
Explore This Topic
- Back to Storage & Handling
- Back to Complete 3D Printer Filament & Material Guide
Related guides in this cluster:
- Wet vs Dry Filament: How to Tell & How to Fix It
- Bambu Lab A1 Review: Best Beginner 3D Printer?
- How to Level Your 3D Printer Bed Perfectly
Ryan has been operating FDM 3D printers since 2017. He runs a 12-machine print farm. His daily drivers include a Bambu Lab X1 Carbon, Prusa MK4s, and Creality Ender-3 V3s that have logged over 15000 print hours. He started 3D Printer Nerd to provide structured troubleshooting guides with diagnostic order, material-specific parameters, and clear stop points.