3D Print Lifting Off Bed at Corners? Complete Fix Guide
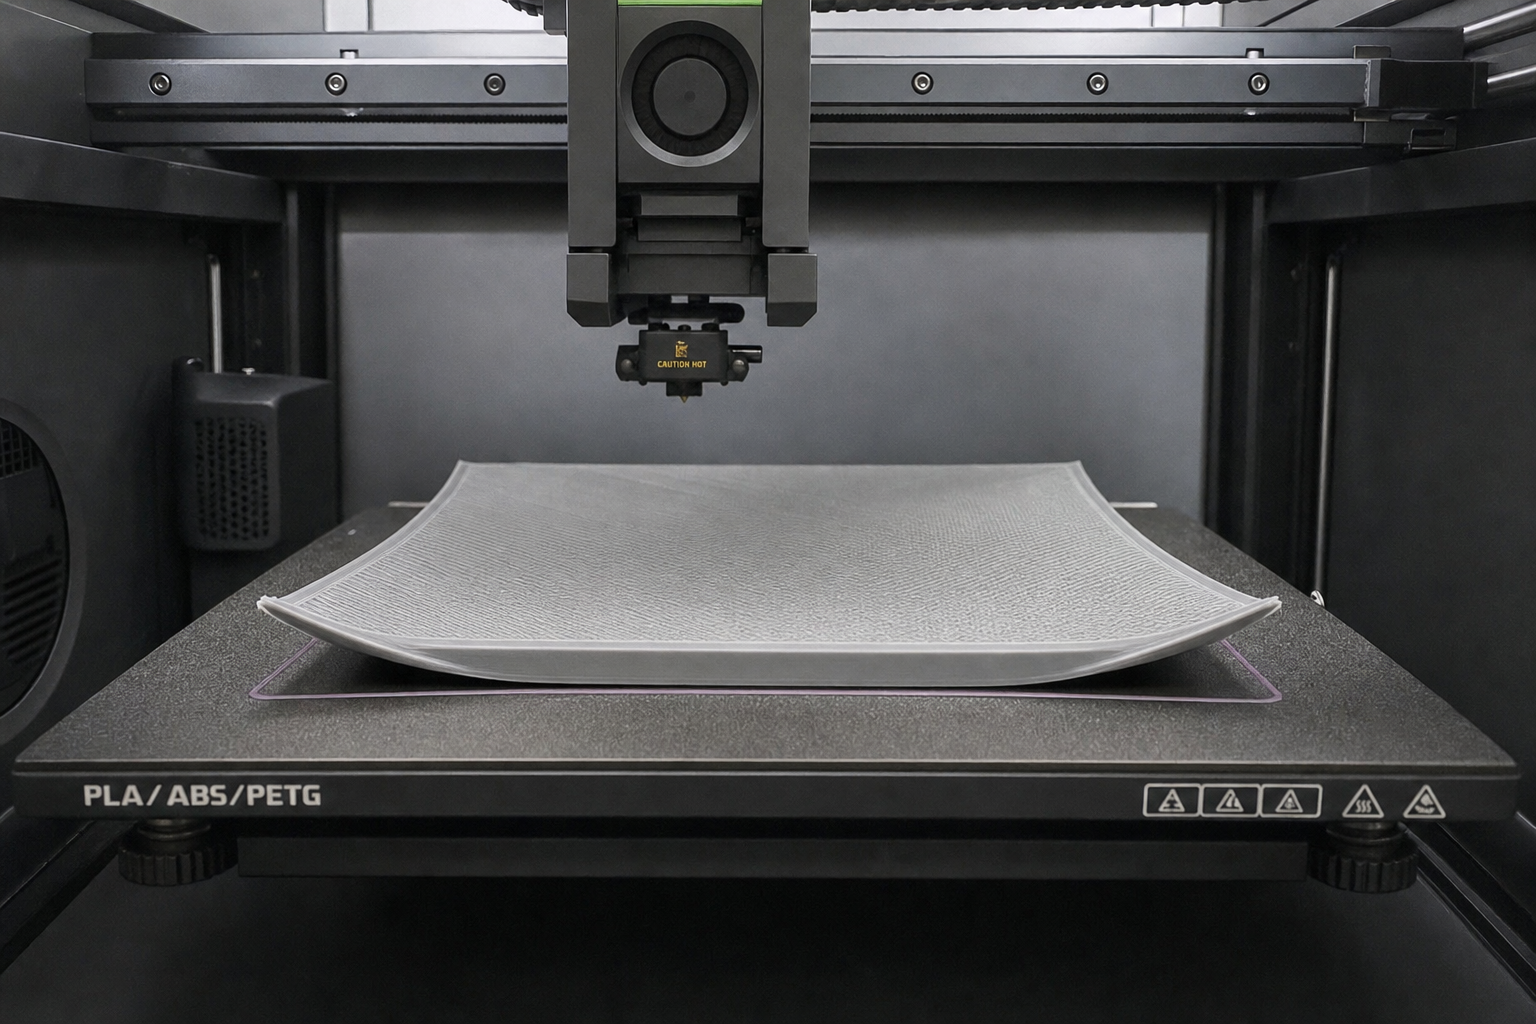
When a 3D print lifts off the bed at the corners, you are dealing with warping—a specific adhesion failure where the edges of your part curl upward during printing. The plastic cools unevenly, contracts, and peels the first layer away from the build surface. The fix is rarely one thing; it is a sequence of checks starting with Z-offset and bed cleanliness, then moving through temperature tuning, surface preparation, and—only if needed—adhesion aids like a brim. You can stop this problem, and the steps below will show you exactly how to verify each fix worked.
Is It Actually Corner Lifting, or a Different Adhesion Problem?
Before you change any settings, confirm you are seeing corner warping and not a different failure. The fix path changes depending on what is happening at the bed.
Corner lifting looks like this: the print starts with a solid first layer, but as more layers go down, one or more corners curl up off the build plate. The bottom of the finished part will have a curved or raised edge rather than sitting flat. This is thermal contraction at work—the upper layers cool and shrink, pulling the still-warm lower layers with them.
This is different from complete non-stick, where nothing adheres at all and filament just trails behind the nozzle. It is also different from mid-print detachment, where the entire part breaks free from the bed in one piece, usually because of a nozzle collision or a single weak spot that propagates. If your first layer never sticks anywhere, skip ahead to Z-offset and bed cleaning first. If the whole part pops off mid-print, check for over-extrusion causing nozzle strikes before chasing warping fixes.
Start Here: Z-Offset and Bed Cleanliness
Most corner lifting is blamed on temperature, but the two biggest contributors are actually a Z-offset that is slightly too high and a build surface that is not truly clean. Address these first because they are free, fast, and fix more warping problems than any other single change.
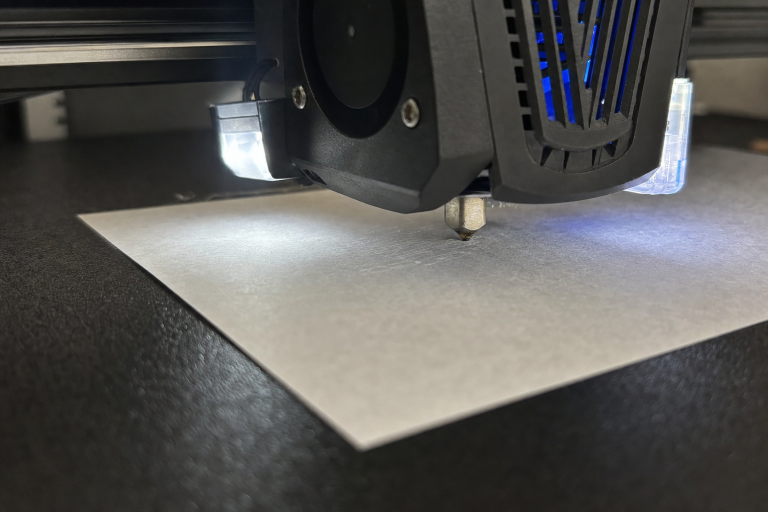
Dial In the Z-Offset
If your first layer is not getting enough squish, the filament sits on top of the bed rather than being pressed into it. That weak mechanical bond fails the moment thermal stress pulls on the corners.
Print a single-layer 50mm square or a first-layer calibration pattern. Watch the lines as they go down. You want adjacent lines to merge smoothly with no gaps between them and no ridges pushing up. Run a fingertip over the cooled first layer. If you can feel distinct lines like corduroy, the nozzle is too high. If the surface feels rough with a texture like sandpaper and has thin, translucent spots, the nozzle is too low and scraping.
Adjust Z-offset in 0.02mm increments. On most printers, a more negative value moves the nozzle closer to the bed. Re-run the test square after each adjustment until the surface feels smooth and the lines are fully joined with no gaps. This alone resolves corner lifting for many printers that were close but not quite dialed in.
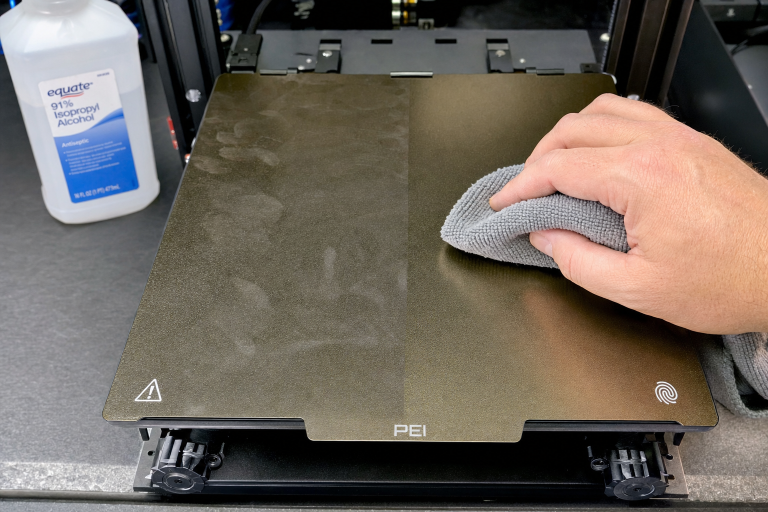
Clean the Bed Properly
Finger oils, dust, and residual filament sugars kill adhesion at the corners first because corners have the least surface area in contact with the bed. The center of a part might hold on while edges let go.
For PEI sheets, glass, and most textured surfaces, the most reliable protocol is hot water and plain dish soap. Remove the build plate, wash it with a clean sponge and unscented dish soap, rinse thoroughly, and dry with a lint-free cloth. Avoid touching the surface after drying—handle by the edges.
Isopropyl alcohol (IPA) is useful for between-print wipedowns but does not remove oils; it just spreads them thinner. Use 90% or higher concentration. Lower concentrations contain more water and leave residue. If you have been relying on IPA alone and corners are lifting, do a full soap-and-water wash before trying anything else. You may find the problem disappears immediately.
Temperature Tuning That Actually Reduces Warping
Once the first layer is physically bonded, temperature management keeps it bonded. Corner warping is driven by temperature differential: the upper layers cool and contract while the bed keeps the bottom layers warm and expanded. Reducing that differential is the goal.
Bed Temperature by Material
The right bed temperature depends on both the material and the surface type. Generic recommendations often miss the surface-specific sweet spot.
| Material | PEI Smooth | PEI Textured | Glass | Notes |
|---|---|---|---|---|
| PLA | 50–60°C | 55–65°C | 55–65°C | Too hot on PEI can cause elephant’s foot and make corners lift from over-softening |
| PETG | 70–80°C | 75–85°C | 70–80°C | PETG bonds aggressively to clean glass; use a release agent, not higher heat |
| ABS/ASA | 100–110°C | 100–115°C | 100–110°C | Enclosure required; bed temp alone will not fix corner lifting on these materials |
| TPU | 40–50°C | 45–55°C | 40–50°C | Flexible filaments warp less but can still lift on tall, thin parts |
For PLA corner lifting, the most common mistake is running the bed too hot. A bed at 70°C keeps PLA above its glass transition temperature, which sounds good for adhesion but actually lets the bottom layers stay soft enough to deform when upper layers contract. If your corners lift and your bed is above 60°C for PLA, drop it to 55°C and test again.
Nozzle Temperature and Cooling Fan Timing
The first few layers need to cool slowly and evenly. If your part cooling fan kicks on at full speed from layer two, the upper layers contract rapidly while the bed-heated bottom layers are still expanded. That is the exact recipe for corner lift.
Set your slicer to keep the part cooling fan off for the first 2–3 layers, then ramp it up gradually over the next 2–3 layers. Most slicers have a “regular fan speed at layer” or “fan speed at height” setting. Starting the fan at layer 4 or 5 and reaching full speed by layer 8–10 gives the bottom of the print time to develop strength before thermal stress hits.
Lowering nozzle temperature slightly can also help. Printing PLA at 215°C when the filament works fine at 200°C means more thermal contraction as it cools. Run a temperature tower for your specific filament and use the lowest temperature that still gives good layer adhesion. Less heat going in means less contraction coming out.
Surface-Specific Fixes for Corner Adhesion
Different build surfaces fail at corners for different reasons. Match your fix to your surface type.
PEI Smooth
Smooth PEI gives excellent adhesion when clean, but it is sensitive to surface contamination and can lose grip gradually over time. If soap and water cleaning did not restore adhesion, lightly scuff the surface with 0000 steel wool or a Scotch-Brite pad, then clean again. This refreshes the surface without damaging it.
A common failure mode on smooth PEI: the center of the bed gets cleaned more often than the edges because that is where most prints sit. If you recently moved a print to a corner of the bed and it lifted there, the fix is simply cleaning the whole surface evenly.
PEI Textured
Textured PEI relies on the filament filling the texture for a mechanical grip. If Z-offset is even slightly too high, the filament bridges across the peaks of the texture without filling the valleys, and corners lift. The fix is almost always a Z-offset adjustment, not more heat or glue.
Glass
Glass needs to be absolutely clean for PLA and PETG. Any residue creates a weak spot that corners exploit. For PLA on glass, a thin layer of standard glue stick applied to a warm bed and then wiped nearly dry with a damp cloth creates a uniform adhesion layer. For PETG on glass, use glue stick or hairspray as a release layer—PETG can bond so strongly to clean glass that it chips the glass during removal. The goal is controlled adhesion, not maximum adhesion.
Garolite (G10/FR4)
Garolite gives excellent PLA and PETG adhesion without treatments when clean and lightly scuffed. If corners lift, sand the surface with 600-grit wet/dry paper, clean with soap and water, and try again. Garolite does not need glue stick for most materials, and adding it can actually reduce adhesion by creating an uneven surface.
When the Room Itself Is Causing the Problem
A draft across the print bed cools one side of the part faster than the other. The corner facing the draft contracts first and lifts. This is especially common near windows, air conditioning vents, or in rooms where people walk past the printer frequently.
Test for drafts by holding a tissue near the printer while it runs. If the tissue moves, you have airflow hitting the bed. The fix can be as simple as rotating the printer 90 degrees or placing a cardboard shield between the printer and the draft source. For ABS and ASA, an enclosure is non-negotiable—without one, corners will lift regardless of bed temperature or surface preparation. A basic photo tent or a cardboard box over the printer works for occasional ABS prints if you do not want a permanent enclosure.
Adhesion Aids: When to Use Them and When They Mask Problems
Brims, rafts, glue stick, and hairspray all have their place. They also hide underlying issues that will cause other print quality problems later.
Brim vs. Raft Decision
A brim adds a single-layer perimeter attached to the outside of your part, increasing the surface area in contact with the bed. It is the right choice when the part has small contact patches or sharp corners that concentrate stress. A 5–8mm brim resolves most corner lifting on PLA and PETG parts without changing any other settings.
A raft builds a disposable platform under the entire part. It is the right choice when the bed surface is damaged or uneven, or when printing ABS without a perfectly flat bed. Rafts waste material and leave a rough bottom surface, so use them only when a brim fails.
Skip both if your first layer is not properly squished. Adding a brim to a bad Z-offset just gives you a brim that also lifts at the corners.
Glue Stick and Hairspray
Glue stick and hairspray are legitimate tools, but they should come after Z-offset, cleaning, and temperature tuning. Applying glue to a dirty bed gives poor results. Applying glue when Z-offset is too high still leaves gaps under the filament.
When you do use glue stick, apply a thin, even layer to a warm bed. Too much glue creates a lumpy surface that reduces contact area. For hairspray, apply a light mist to a room-temperature bed and let it dry before heating. Extra-hold formulations work better than flexible-hold ones.
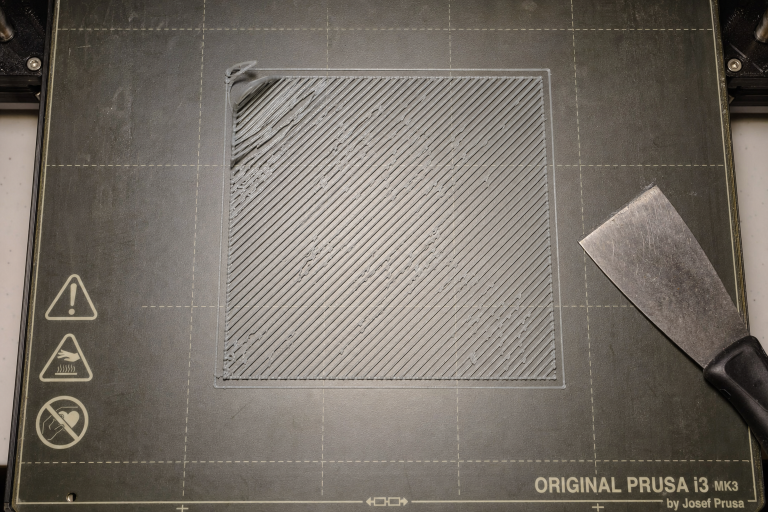
How to Know the Fix Worked
After each change, run the same test print: a 50mm square, 5–10mm tall, with sharp corners. Watch the corners as it prints. They should stay flat against the bed through the entire print. When the part cools and you remove it, the bottom should be flat across the entire surface with no visible curve at the edges.
If corners stay down but you notice a new problem—like the first layer being too rough or the nozzle dragging—you have over-corrected. Back off slightly and test again.
When to Stop Troubleshooting and Escalate
Some problems are not fixable through slicer settings or cleaning alone. Stop and investigate hardware issues if you see these specific signs.
Corners lift in the exact same spot every time, even after you have dialed in Z-offset, thoroughly cleaned the bed, tuned temperatures, and added a brim. This points to a warped bed or a cold spot in the heated bed. Check with a straightedge and feeler gauge. Run a bed mesh calibration if your firmware supports it—this can compensate for minor unevenness. If the deviation exceeds 0.2mm across the bed surface, the bed itself likely needs replacement.
You are printing ABS or ASA without an enclosure and corners lift on every attempt. No amount of bed temperature adjustment or glue stick will fix this. These materials require an ambient temperature above roughly 40°C around the print to prevent warping. If you cannot improvise an enclosure with a cardboard box or photo tent, switch to a material that does not require one, such as PLA or PETG, until you can add an enclosure.
The first layer looks perfect on one side of the bed but consistently fails on the other, even after manual leveling and Z-offset adjustment. This can indicate a gantry misalignment or a bent Z-axis leadscrew rather than a bed adhesion problem. Check that the X-axis gantry is square to the frame and that both Z-axis motors are synchronized. If your printer has only one Z-axis leadscrew, sag on the unsupported side can cause exactly this pattern.
You hear popping or see inconsistent extrusion during the first layer, and corners lift alongside visible gaps in the extrusion lines. This suggests a partial nozzle clog or heat creep rather than an adhesion problem. The filament is not laying down consistently, so corners get weak spots that lift. Perform a cold pull to clear the nozzle, check that the hotend cooling fan is running at full speed, and verify the heatbreak is properly seated before returning to adhesion troubleshooting.
If you have worked through Z-offset, cleaning, temperature tuning, surface preparation, and a brim, and corners still lift consistently, the issue is likely mechanical rather than a settings problem. Continuing to adjust slicer settings at that point wastes filament and time. Inspect the hardware or contact your printer manufacturer’s support if the machine is under warranty.
Frequently Asked Questions
Why do only some corners lift while others stay down?
Uneven cooling is the most common cause. The corner closest to a draft, a cold wall, or the printer’s own electronics fan will cool faster and lift first. Check for directional airflow and consider an enclosure or draft shield.
Can wet filament cause corner lifting?
Wet filament primarily causes stringing, popping, and poor surface finish. It does not directly cause corner lifting, but the inconsistent extrusion from wet filament can create weak spots in the first layer that corners exploit. Dry your filament if you are also seeing surface quality issues alongside the lifting.
Should I increase bed temperature if corners keep lifting?
Not automatically. For PLA, increasing bed temperature above 60°C often makes corner lifting worse by keeping the bottom layers too soft. For ABS and ASA, higher bed temperatures help only if an enclosure is already in place. Try lowering bed temperature by 5°C for PLA before raising it.
How do I print large flat parts without corner lifting?
Large flat parts concentrate thermal stress at the corners because the long straight edges have more material contracting. Use a brim of at least 8mm, reduce infill density to minimize internal stress, and consider adding “mouse ears”—small single-layer discs at the corners in your slicer—to increase corner adhesion without a full brim.
Explore This Topic
Related guides in this cluster:
- 3D Printer Bed Temperature Guide by Material
- How to Clean a 3D Printer Bed: PEI Glass & Textured
- PLA vs PETG vs ABS vs TPU: Complete Filament Comparison
Ryan has been operating FDM 3D printers since 2017. He runs a 12-machine print farm. His daily drivers include a Bambu Lab X1 Carbon, Prusa MK4s, and Creality Ender-3 V3s that have logged over 15000 print hours. He started 3D Printer Nerd to provide structured troubleshooting guides with diagnostic order, material-specific parameters, and clear stop points.