First Layer Not Sticking? Complete Diagnostic Flowchart
A first layer that won’t stick is almost always one of four failure patterns: the filament never grabs the bed at all, the initial lines go down but peel up immediately, corners and edges lift mid-print, or the whole print breaks free partway through. Each pattern points to a different root cause, and guessing wrong wastes filament and time. This diagnostic flowchart walks you through the exact checks in the right order, starting with the fastest fixes that solve most cases, and tells you when to stop troubleshooting and look at hardware or environmental problems instead.
Diagnose the Failure Pattern First
Before adjusting anything, watch the first 30 seconds of a print. What you see determines which branch of the flowchart you follow.
Pattern A: Filament never grabs the bed. The extruded plastic curls up behind the nozzle, balls on the nozzle tip, or drags loosely across the surface without forming a flat line. This is a Z-offset or severe contamination problem.
Pattern B: Lines go down but peel up immediately. The nozzle lays plastic that looks round on top instead of flat, and the extruded line lifts off the bed as the nozzle moves away. This is almost always Z-offset too high, combined with insufficient squish.
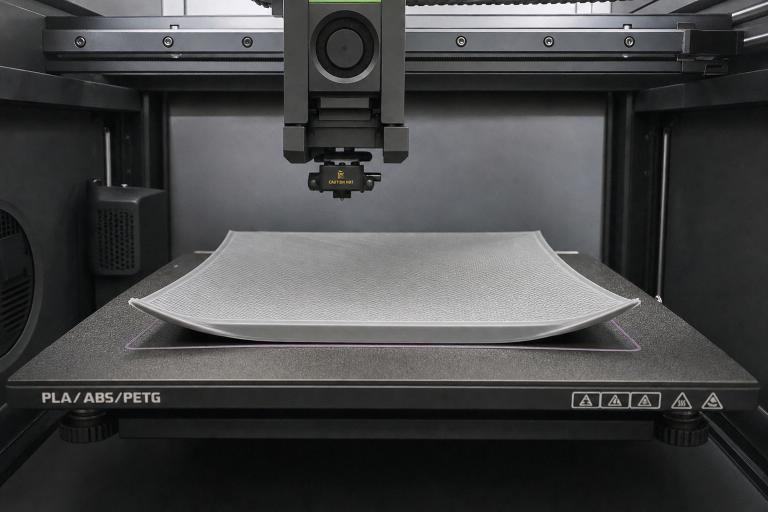
Pattern C: Corners or edges lift after several layers. The first layer looked fine, but an hour in, corners have curled upward. This is a bed temperature, ambient temperature, or surface-adhesion problem, not a Z-offset problem.
Pattern D: Mid-print detachment. The entire print breaks free from the bed well after the first few layers. This is typically a bed temperature drop, a dirty spot on the bed, or a nozzle collision with curled-up material.
Identify your pattern, then follow the corresponding branch below. If you see a mix, fix the earliest pattern first.
Z-Offset: The First Check for Patterns A and B
Z-offset controls how close the nozzle sits to the bed during the first layer. Too high, and filament lays on top of the surface without bonding. Too low, and the nozzle scrapes or blocks extrusion entirely.
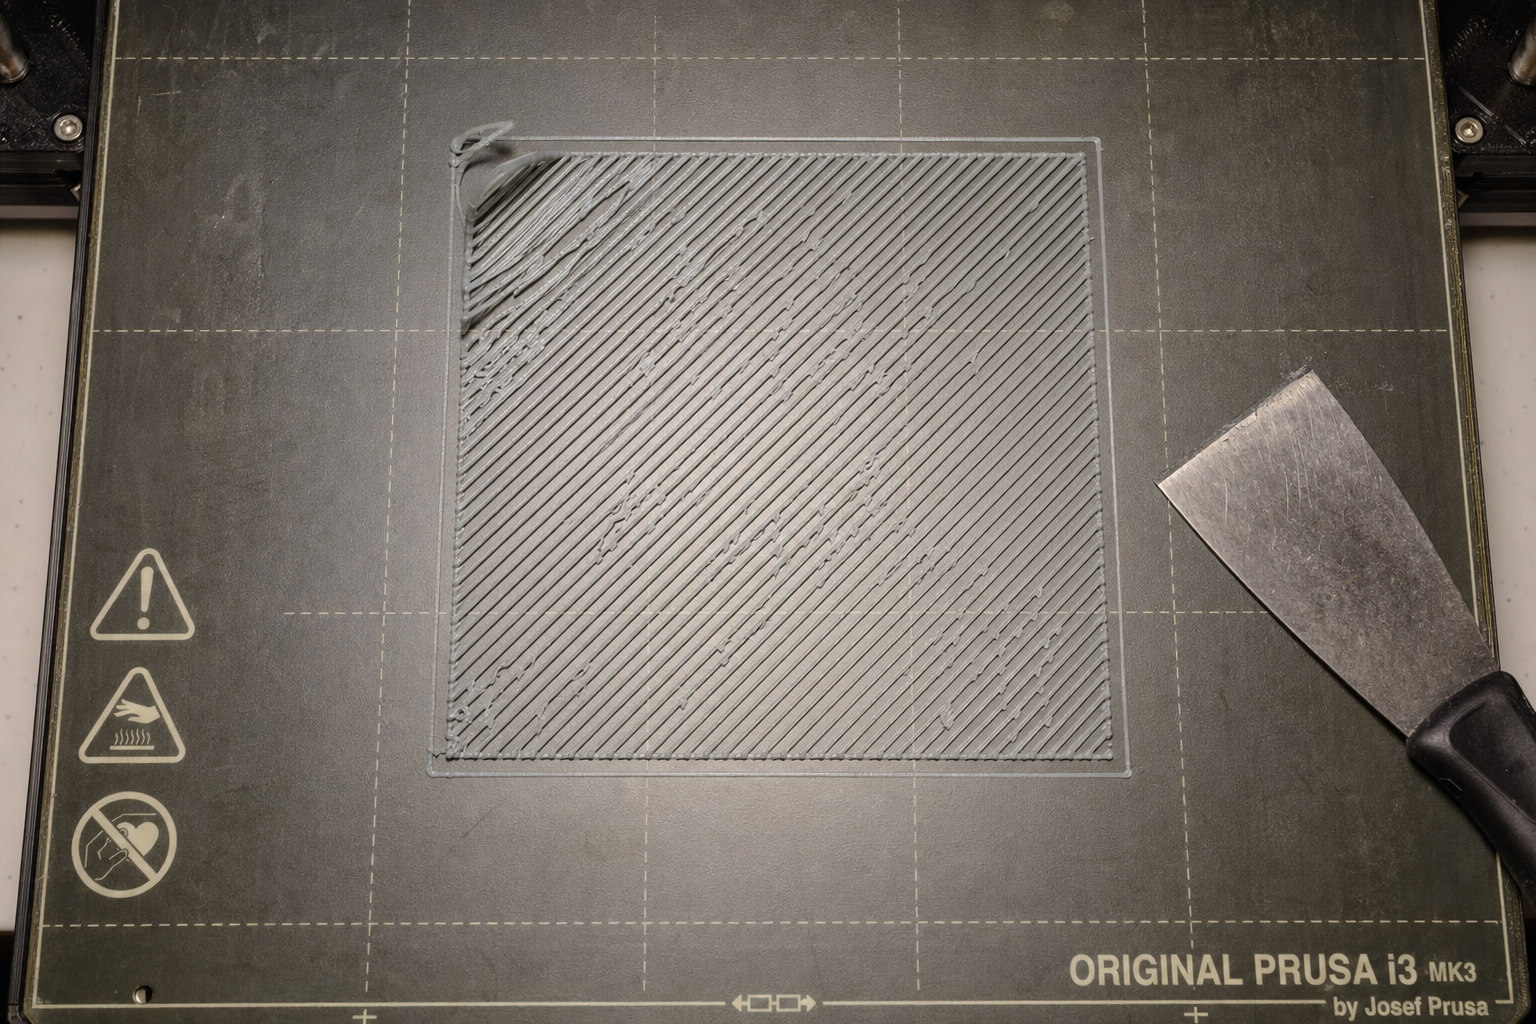
How to check without special tools: Print a single-layer 50 mm square or five small discs one layer thick. While it prints, run a fingertip lightly over the extruded lines. A correct first layer feels smooth and flat, with lines fused side-by-side. If you can feel individual rounded ridges, the nozzle is too high. If the surface feels rough, scraped, or has ridges pushed up between lines, the nozzle is too low.
Adjustment sequence:
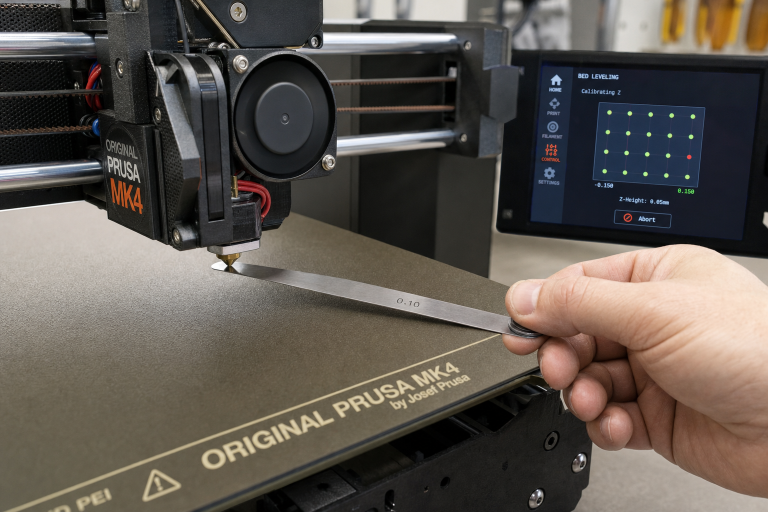
1. Home the printer and preheat the bed and nozzle to your filament’s printing temperature.
2. Place a sheet of standard copy paper under the nozzle.
3. Lower the Z-axis until the paper drags with noticeable resistance when you pull it, but still moves without tearing.
4. Start a bed-leveling print (concentric squares or five-point discs) and live-adjust the Z-offset in 0.02 mm increments while watching the lines.
5. Stop when extruded lines are flat, fused, and opaque, not translucent or scraped thin.
PLA on PEI or glass: A properly squished first layer will look slightly wider than the nozzle diameter and feel smooth. PETG on PEI: PETG can over-adhere and tear PEI if squished too hard. Reduce squish slightly compared to PLA, and consider a release agent if you hear cracking sounds during removal.
When Z-offset is not the problem: If you’ve dialed in Z-offset and Pattern A or B persists, move to bed cleanliness next. Do not keep lowering Z-offset to compensate for a contaminated surface.
Bed Cleaning Protocol: When Z-Offset Is Right but Adhesion Still Fails
A bed that looks clean often isn’t. Finger oils, dust, and filament residue create invisible low-adhesion spots that cause Pattern D detachments or Pattern A failures in specific areas.
Quick clean (between prints): Wipe the bed with 90%+ isopropyl alcohol and a lint-free cloth while the bed is cold or warm, not hot. Lower concentrations leave water residue that hurts adhesion. Do this before every print on PEI and glass.
Deep clean (when IPA stops working): Wash the bed with warm water and plain dish soap, scrubbing with a clean sponge that has never touched food grease. Rinse thoroughly and dry with a fresh paper towel. Avoid touching the surface afterward. This removes the residue buildup that IPA alone cannot dissolve.
Surface-specific notes:
- Smooth PEI: IPA between prints, soap and water every 10–20 prints or when adhesion fades. Light scuffing with 0000 steel wool or fine Scotch-Brite restores grip on older sheets.
- Textured PEI: Soap and water works better than IPA because texture traps residue. Scrub in circular motions.
- Glass: Soap and water, then a final wipe with IPA. Glass shows contamination as hazy patches; if you see them, reclean.
- Garolite (G10): IPA only. Soap can leave a film that reduces adhesion. Light sanding with 600-grit wet/dry paper refreshes the surface.
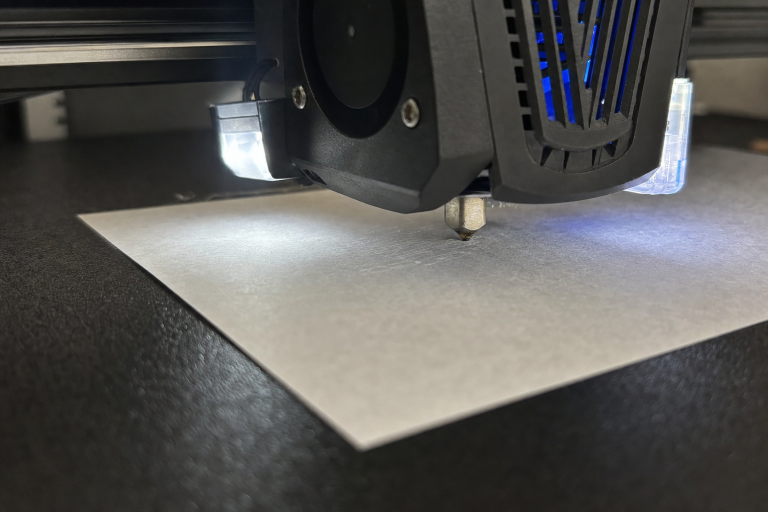
Test after cleaning: Print a single-layer patch in the center and corners. If adhesion is uniform, the bed is clean. If one spot still fails, you may have a warped bed or uneven heating, not a contamination problem.
Bed Temperature Tuning by Material and Surface
Bed temperature requirements change with both the filament type and the bed surface. Using the wrong temperature for your surface causes Pattern C lifting even when Z-offset is perfect.
| Material | PEI (Smooth/Textured) | Glass | Garolite (G10) |
|---|---|---|---|
| PLA | 50–60°C | 55–65°C | 40–55°C |
| PETG | 70–80°C | 75–85°C | 65–75°C |
| ABS/ASA | 100–110°C | 100–110°C | 100–110°C |
| TPU | 40–55°C | 45–60°C | 35–50°C |
| Nylon | 80–100°C | 80–100°C | 70–90°C (with glue) |
PLA on PEI: Start at 60°C for the first layer, then drop to 55°C for remaining layers to reduce elephant’s foot without losing adhesion. PLA on glass: 60°C first layer, 55°C after. If corners still lift, increase to 65°C first layer. PETG on PEI: 75°C first layer, 80°C after. PETG needs sustained heat to prevent mid-print release. ABS/ASA: Enclosure required. Without one, bed temperature alone won’t stop warping, no matter how high you set it.
How to test bed temperature: Print a 25 mm cube with sharp corners. If the bottom corners curl up, increase bed temperature in 5°C increments. If the bottom edge bulges outward (elephant’s foot), decrease by 5°C. The sweet spot is the lowest temperature that prevents lifting.
Surface-Specific Solutions for Stubborn Adhesion
When Z-offset, cleaning, and temperature are correct but adhesion still fails, the problem is a mismatch between your filament and bed surface.
PEI is losing grip: PEI sheets degrade over time. If the surface looks glossy instead of matte, adhesion drops. Restore it by wet-sanding with 1000-grit sandpaper, then cleaning thoroughly. If the sheet is more than a year old with heavy use, replacement may be the only fix.
Glass won’t hold PETG or ABS: Clean glass offers poor adhesion for these materials without help. Apply a thin layer of PVA-based glue stick or a dedicated bed adhesive. For ABS, an ABS slurry (ABS dissolved in acetone) painted on glass creates a strong bond. Never print PETG directly on bare glass without a release agent; it can chip the glass during removal.
Garolite works for nylon but not PLA: Garolite grips nylon exceptionally well when heated but PLA adhesion is inconsistent. If you print PLA on Garolite, use a glue stick layer and increase bed temperature to 60°C.
Smooth vs textured surfaces: Smooth surfaces produce glossy bottom finishes but amplify any bed imperfection. Textured surfaces hide minor scratches and provide more surface area for adhesion, but first-layer squish must be dialed in more precisely to fill the texture.
When to Use Adhesion Aids (and When They Mask a Real Problem)
Adhesion aids solve specific problems but should not be your default setting. Using them before fixing Z-offset and cleaning hides the root cause and creates removal problems later.
Glue stick (PVA): Use for PETG on PEI as a release agent, not an adhesion booster. Use for ABS on glass when enclosure temperature is marginal. Do not use for PLA on clean PEI; if PLA needs glue on PEI, your Z-offset or cleaning protocol is wrong.
Blue painter’s tape: Use for TPU on any surface to prevent permanent bonding. Use for nylon on glass when Garolite isn’t available. Do not use as a general-purpose adhesion fix; tape lifts at high bed temperatures and leaves a textured bottom finish.
Magigoo or dedicated bed adhesives: Use for challenging materials like polycarbonate or nylon on glass. These are formulated for specific temperature ranges and release cleanly. They’re worth the cost if you regularly print engineering filaments.
Hairspray: Works on glass for PLA and PETG but leaves residue that builds up and requires frequent deep cleaning. A properly tuned PEI sheet makes hairspray unnecessary for most users.
When an adhesion aid is masking a real problem: If you need glue for PLA on PEI, stop and recheck Z-offset, bed cleanliness, and bed temperature. The glue is compensating for a correctable issue, and your prints will eventually fail even with glue as the underlying problem worsens.
Brim vs Raft: Decision Framework for Pattern C and D
When corners lift or prints detach mid-job despite correct settings, adding a brim or raft can save the print. Choose based on the part geometry, not as a permanent crutch.
Use a brim when: The part has sharp corners, a small contact patch, or tall thin features. A brim adds a single-layer perimeter that increases surface area and fights corner lifting. Start with 5–8 mm width for PLA, 10–15 mm for ABS. Brims peel away cleanly and leave minimal post-processing.
Use a raft when: The bed surface is uneven, the part has many small disconnected footprints, or you’re printing ABS without a perfectly flat bed. A raft builds a thick sacrificial base that compensates for bed irregularities. Rafts waste filament and leave a rough bottom finish; they’re a last resort, not a default.
When to skip both: If the part has a large flat base and you’re seeing mid-print detachment, a brim won’t help. The problem is bed temperature drop, a dirty spot, or a nozzle collision. Adding a brim in this case adds false confidence without fixing the real issue.
Ambient Temperature and Drafts: The Hidden Adhesion Killer
A cold room or nearby draft causes ABS and PETG prints to warp even when bed temperature is correct. The upper layers cool and contract, pulling the bottom layer off the bed.
Check for drafts: Walk around the printer during the first 10 layers. Feel for air movement from windows, HVAC vents, fans, or foot traffic. Even a ceiling fan on low can create enough airflow to cause corner lifting on ABS.
Enclosure threshold: ABS and ASA require an enclosure that maintains at least 40–45°C internal temperature. If you don’t have an enclosure, a cardboard box placed over the printer is a functional temporary solution. PLA and PETG tolerate open-air printing down to about 18°C room temperature. Below that, even PLA corners may lift.
Quick test: Print the same gcode file with a large cardboard box covering the printer. If adhesion improves, you have an ambient temperature or draft problem. Permanent fix: build or buy an enclosure, or relocate the printer to a draft-free space.
How to Know the First Layer Is Perfect
After making adjustments, verify with a repeatable test. Print a single-layer 75 mm square with a 0.2 mm layer height. Examine it under good light:
- Lines are fused: No gaps between adjacent extrusions. You cannot pull the square apart along extrusion lines.
- Surface is smooth: Running a fingernail across the lines produces a consistent sound, not a zipper-like rattle.
- Bottom is uniform: Peel the square off and look at the underside. On smooth PEI or glass, it should be glossy and mirror the bed surface with no visible extrusion lines. On textured PEI, the texture should transfer evenly.
- Corners are sharp: No rounding or lifting at the corners. The square should lie perfectly flat on a table with no curl.
- Thickness is consistent: Measure with calipers at multiple points. A 0.2 mm first layer should measure 0.18–0.22 mm across the entire square.
If your test square passes all five checks, your first layer adhesion is dialed in. If not, revisit the branch of the flowchart that matches your failure pattern.
When to Stop Troubleshooting and Escalate
Some adhesion problems are not fixable with settings or cleaning. Stop and investigate hardware if:
- Adhesion fails in the same spot every time, regardless of cleaning or Z-offset. Your bed is warped or your gantry is skewed. A straightedge and feeler gauge check across the bed surface will confirm. Mesh bed leveling can compensate for minor warping, but a severely warped bed needs replacement.
- Bed temperature fluctuates more than ±3°C during a print. Your bed thermistor or heater is failing. Watch the temperature readout during a print; if it oscillates, the PID tune may be off or the heater cartridge is dying.
- Nozzle height changes between prints without any adjustment. Your Z-axis leadscrew is binding, your Z-endstop is inconsistent, or your bed springs are losing tension. Check for mechanical play by gently pushing down on the gantry or bed; any movement means something is loose.
- Filament curls consistently to one side of the nozzle during purge. You have a partial nozzle clog or damaged nozzle tip. Replace the nozzle and recheck Z-offset.
When you hit these hardware-level problems, continued software or settings adjustments will only frustrate you. Fix the mechanical issue, then return to the top of the diagnostic flowchart.
FAQ
Why does my first layer stick on one side of the bed but not the other?
This is almost always a bed leveling or warping issue. Even with automatic bed leveling, a severely unlevel bed can exceed the probe’s compensation range. Manually level the bed corners with the paper method, then rerun mesh leveling if your printer supports it.
Can a dirty nozzle cause first-layer adhesion problems?
Yes. Filament residue baked onto the nozzle exterior can drag across the first layer and pull it up. Clean the nozzle with a brass brush while hot before starting a print, and check that no filament is curling upward and sticking to the nozzle during the purge line.
Should I increase first-layer flow rate to fix adhesion?
Increasing first-layer flow rate to 105–110% can help fill gaps on textured beds or compensate for slight under-extrusion, but it is not a fix for Z-offset or cleanliness problems. If you need more than 110% flow for adhesion, stop and recheck the fundamentals.
How do I print PETG on PEI without damaging the bed?
Let the bed cool completely to room temperature before removing the print. PETG bonds more strongly as it cools, and pulling it off a hot bed can tear PEI. For extra protection, apply a thin layer of glue stick as a release barrier, or use a textured PEI sheet, which handles PETG better than smooth PEI.
Explore This Topic
- Back to Bed Leveling & Z-Offset
- Back to 3D Printing First Layer & Bed Adhesion Guide
Related guides in this cluster:
- Layer Shift: Causes & Complete Fix Guide for 3D Printing
- Under-Extrusion: Symptom → Cause → Complete Fix Guide
- Extruder Clicking & Skipping: Complete Diagnosis Guide
Ryan has been operating FDM 3D printers since 2017. He runs a 12-machine print farm. His daily drivers include a Bambu Lab X1 Carbon, Prusa MK4s, and Creality Ender-3 V3s that have logged over 15000 print hours. He started 3D Printer Nerd to provide structured troubleshooting guides with diagnostic order, material-specific parameters, and clear stop points.