3D Printer Bed Temperature Guide by Material
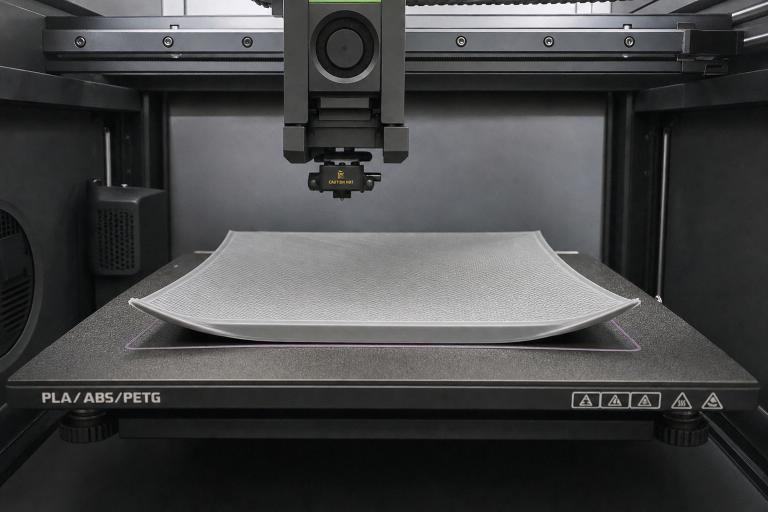
If your first layer won’t stick at all, curls up at the edges, or breaks loose halfway through a print, the bed temperature is often the first setting you’ll want to revisit—but only after you’ve ruled out Z-offset and cleanliness problems. The right bed temperature keeps the first layer bonded until the part cools, and the exact number depends on both the filament and the build surface you’re using.
Below is a quick-reference table that matches common materials to their recommended bed temperature ranges, with surface-specific notes. Use it as your starting point, then fine-tune based on the first-layer test described later.
| Material | Recommended bed temp range | Surface notes | Adhesion aid (only if needed) |
|---|---|---|---|
| PLA | 50–60 °C (smooth PEI), 55–65 °C (textured PEI), 60–70 °C (glass) | PLA often sticks well even with the bed off on clean PEI; heat helps with large flat parts to prevent corner lift. On glass, a thin layer of PVA glue or hairspray is common. | PVA glue stick on glass; brim for wide, thin parts |
| PETG | 70–80 °C (smooth PEI), 75–85 °C (textured PEI), 70–80 °C (glass with glue stick) | PETG can bond too aggressively to bare glass or smooth PEI and tear the surface. Always use a release agent (glue stick, Windex, or dedicated PETG sheet) on those surfaces. Textured PEI usually releases cleanly. | Glue stick as a release barrier, not for adhesion; brim for tall narrow parts |
| ABS / ASA | 90–110 °C (smooth PEI), 100–110 °C (textured PEI), 90–105 °C (glass with ABS slurry or Kapton tape) | Enclosure strongly recommended. Without it, even correct bed temp won’t prevent warping. On glass, an ABS/acetone slurry or dedicated ABS juice is the traditional solution. | ABS slurry, Kapton tape, or PEI sheet; brim almost always needed without enclosure |
| TPU (flexible) | 40–60 °C (smooth PEI), 50–60 °C (textured PEI), 40–50 °C (glass with glue stick) | TPU sticks aggressively to many surfaces. Lower temps reduce over-bonding. A glue stick layer on glass or smooth PEI acts as a release interface. |
| Glue stick as release layer; rarely needs brim |
| Nylon (PA) | 70–90 °C (garolite/G10), 80–100 °C (glass with PVA glue), 70–80 °C (textured PEI with glue stick) | Nylon is hygroscopic and warps easily. Garolite (G10/FR4) is the most reliable surface; PVA glue on glass works but requires a perfectly dry filament. | PVA glue stick on glass; brim or raft on garolite for large parts |
| Polycarbonate (PC) | 100–115 °C (smooth PEI), 105–120 °C (textured PEI), 100–110 °C (glass with PC-compatible adhesive) | PC demands high bed temps and an enclosure. Without both, layer separation is almost guaranteed. Use a dedicated PC build plate or a thick glue stick layer on glass. | Glue stick or Magigoo PC; brim always |
| Polypropylene (PP) | 80–100 °C (PP-specific build plate or packaging tape), 85–100 °C (glass with PP tape) | PP only sticks to itself. Use a PP sheet or clear packing tape on glass. Bed temp alone won’t create adhesion without the right surface. | PP tape or dedicated PP bed; brim for large parts |
| ASA/ABS blends (e.g., ASA-CF) | 95–110 °C (textured PEI), 100–110 °C (smooth PEI with glue stick) | Same enclosure needs as ABS. Carbon-fiber-filled variants may tolerate slightly lower bed temps but still warp without a warm chamber. | Glue stick on smooth PEI; brim |
A note on the ranges: The lower end of each range is usually safe for small parts; go higher for large, flat prints that are prone to warping. If your printer’s bed surface is a coated glass (like Creality’s Carborundum), treat it as glass with a textured finish—start at the middle of the glass range and adjust.
Before you touch the temperature dial: Z-offset and cleanliness
Bed temperature can’t fix a nozzle that’s too far from the build plate or a surface contaminated with fingerprints and dust. Always check these two things first.
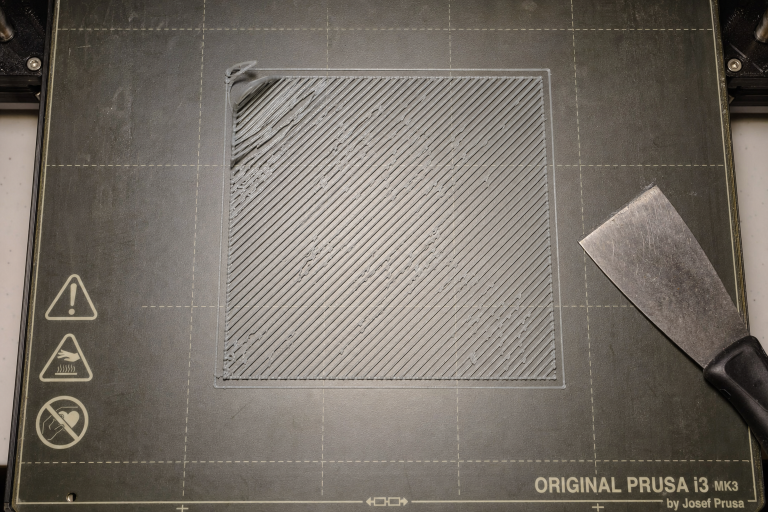
Z-offset quick check: Print a single-layer 50×50 mm square. If the individual extrusions don’t merge into a smooth sheet, or you see gaps between lines, the nozzle is too high. If the surface feels rough and ridged like a ploughed field, the nozzle is too low. Adjust your Z-offset in 0.02 mm increments until the square comes out smooth and fully fused, with no gaps and no ploughing.
Verification that your Z-offset is correct: Hold the peeled square up to a light source. A correctly squished first layer should show no pinholes of light between the extrusion lines. If you can see light through gaps, you’re still too high. If the square feels sharp and raised along each line ridge, you’re too low and the nozzle is dragging through the plastic. The bottom surface should feel like one continuous film with the texture of your build plate evenly transferred across the entire square.
Bed cleaning protocol:
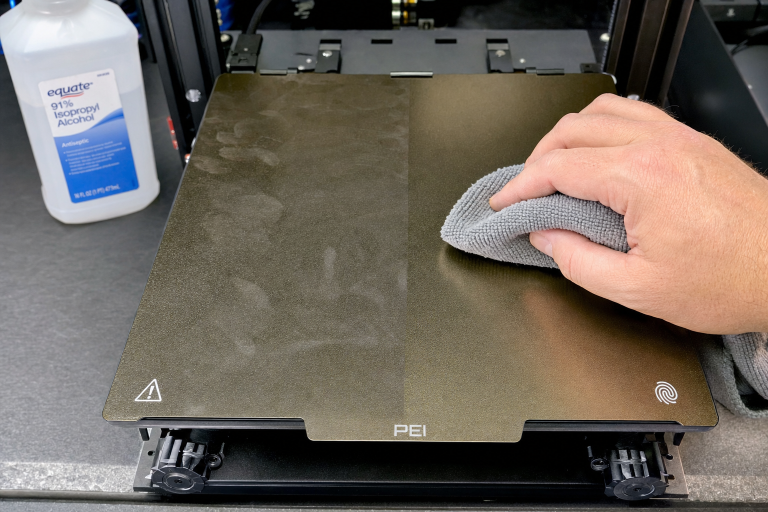
- For PLA and PETG on PEI: wipe with 90%+ isopropyl alcohol (IPA) and a lint-free cloth between prints. If adhesion still fails, wash the sheet with warm water and plain dish soap, rinse thoroughly, and dry with a clean paper towel. Finger oils are invisible adhesion killers.
- For glass: IPA is often enough, but after several prints a soap-and-water wash restores grip. If you use glue stick, remove the old layer completely with water before applying fresh glue.
- For garolite or PP tape: avoid IPA on garolite—it can degrade the surface. Use soap and water. PP tape should be replaced when it loses tack.
If you skip this step and jump straight to raising the bed temperature, you’ll mask the real issue and likely create new problems like elephant’s foot or excessive stringing.
How to choose the right bed temperature for your material and surface
Once your Z-offset and bed are clean, use the table above to set a starting temperature. But the number alone isn’t enough—you need to match it to your specific surface type.
Smooth PEI gives the strongest bond for most materials at the lower end of the temperature range. For PLA, 50 °C is often plenty; for PETG, 70 °C works but always use a release layer to avoid tearing the PEI. Textured PEI needs 5–10 °C more for the same material because the reduced contact area lowers effective adhesion. That extra heat helps the filament flow into the texture, but it also increases the risk of warping on large parts if the enclosure isn’t warm.
Glass acts as an insulator—the top surface is often 5–10 °C cooler than what the thermistor reports. Compensate by setting the bed 5 °C higher than you would on PEI, and always use an adhesion promoter (glue stick, hairspray, or ABS slurry). Never print PETG on bare glass without a release layer; it can chip the glass during removal.
Garolite (G10/FR4) is the go-to for nylon and works well for PETG and TPU without any adhesive. It holds heat evenly, but its surface texture is smoother than PEI, so you may need the upper end of the temperature range for the first layer to grip.
The failure mode that tricks even experienced printers: surface mismatch
A common failure pattern goes like this: you look up the bed temperature for PETG, see 80 °C, set it, and the print still detaches mid-way. The problem isn’t the number—it’s that you’re using a smooth PEI sheet at a temperature that works on textured PEI. On smooth PEI, PETG at 80 °C can soften the surface just enough to lose grip after the first few layers, especially on tall parts where leverage increases.
How to detect it early: Watch the first layer go down. If the lines look fully squished and fused but you notice the corners of a large rectangle starting to lift by layer 3 or 4, you’re likely in a surface-mismatch scenario. The bed temperature is high enough to start the print but not high enough to maintain a thermal lock on that specific surface. Raise the temperature by 5 °C and try again. If the corners still lift, the surface itself may need a different treatment (e.g., a glue stick release layer on smooth PEI for PETG, or switching to textured PEI).
Another variant: printing ABS on glass with a generic bed temp of 100 °C but no enclosure. The glass surface temperature may read 100 °C, but the ambient air cools the part unevenly, causing mid-print detachment. The early sign is a popping sound as the part separates from the bed, often around layer 10–20. The fix isn’t more heat—it’s an enclosure.
When to use a brim, raft, or glue stick (and when they mask the real problem)
Adhesion aids are legitimate tools, but they should come after you’ve verified Z-offset, cleanliness, and surface-matched bed temperature.
- Brim: Adds a single-layer perimeter attached to the part. Use it when you’ve got the bed temperature right but the part has sharp corners or a small footprint that concentrates warp forces. A 5–8 mm brim often eliminates corner lift on ABS and PETG without changing temperatures.
- Raft: Builds a thick sacrificial platform under the entire print. It’s a last resort for materials that warp severely (nylon, PC) or when your bed surface is uneven. Rafts waste filament and leave a rough bottom finish; only use them when a brim and correct temperature still fail.
- Glue stick / hairspray / dedicated adhesives: On glass, these are often mandatory. On PEI, they’re a red flag that something else is off. If you need glue on PEI for PLA, your bed is either dirty or your Z-offset is wrong. For PETG on smooth PEI, glue stick acts as a release layer, not an adhesion booster—that’s the one exception.
Decision framework: If your print fails at the first layer, fix Z-offset and cleaning. If it fails after 10+ layers with corners lifting, add a brim before you raise the bed temperature further. If the entire part breaks loose mid-print and you’ve already got a brim and correct temperature, check for drafts or an enclosure gap.
How to test that your first layer is perfect
Print a 60×60 mm single-layer square at your chosen bed temperature. Let it cool, then peel it off.
- Perfect first layer: The square feels smooth on top, with no gaps between lines. The bottom is an exact mirror of your build plate texture. The square peels off cleanly without tearing (except for materials that naturally bond hard, like PETG on bare PEI—use a release layer).
- Too hot: The square has a glossy, over-melted top surface, and the edges may show “elephant’s foot” (a widened base). Lower the bed by 5 °C.
- Too cold: The square separates into individual strands when you flex it, or it lifts during printing. Raise the bed by 5 °C and check cleanliness.
- Corners lifting on the square: The temperature is close but not locked in for your surface. Add 5 °C or a small brim.
Run this test whenever you switch materials or build surfaces. It takes five minutes and prevents hours of failed prints.
When to stop troubleshooting and check your printer’s hardware
If you’ve dialled in Z-offset, cleaned the bed, matched the temperature to your material and surface, and added a brim where appropriate—and you’re still seeing consistent first-layer failures—the problem may be mechanical, not thermal.
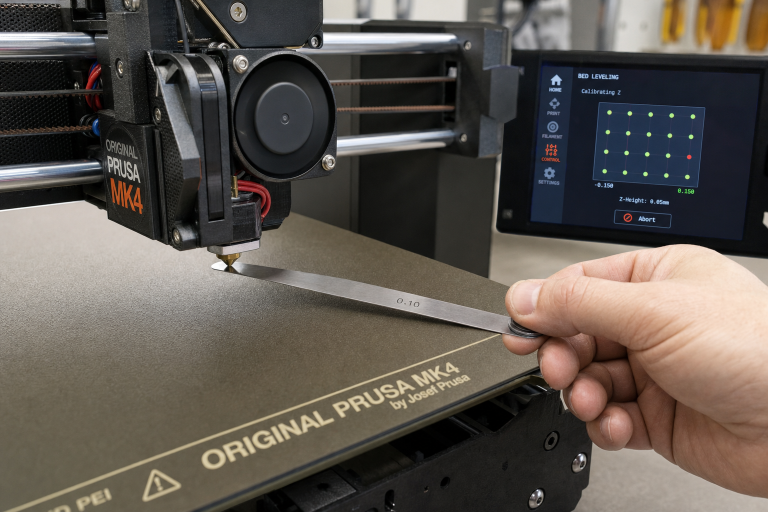
- Warped bed or uneven surface: Use a straightedge and feeler gauge to check for dips or humps. Mesh bed levelling can compensate, but a severely warped plate needs replacement.
- Thermistor reading inaccuracy: If the bed feels noticeably cooler than the set temperature, verify with an infrared thermometer. A 10 °C offset can ruin adhesion. Run a PID tune on the bed and check the thermistor mounting.
- Z-axis binding or inconsistent movement: If the first layer is perfect on one side of the bed and terrible on the other, your gantry or Z-rods may be binding. Re-check mechanical alignment before chasing temperatures.
At this stage, stop self-troubleshooting and consult your printer’s manual or manufacturer support. A bed temperature guide can’t fix a bent leadscrew.
Explore This Topic
Related guides in this cluster:
- How to Clean a 3D Printer Bed: PEI Glass & Textured
- 3D Print Lifting Off Bed at Corners? Complete Fix Guide
- Brim vs Raft vs Skirt: When to Use Each for 3D Printing
Ryan has been operating FDM 3D printers since 2017. He runs a 12-machine print farm. His daily drivers include a Bambu Lab X1 Carbon, Prusa MK4s, and Creality Ender-3 V3s that have logged over 15000 print hours. He started 3D Printer Nerd to provide structured troubleshooting guides with diagnostic order, material-specific parameters, and clear stop points.