3D Printer Stringing: All Causes & How to Fix It
Stringing is almost always caused by filament oozing out of the nozzle during travel moves—when the print head moves between two points without extruding. The plastic leaks, stretches into a thin strand, and solidifies across your print. The single most common trigger is incorrect retraction settings, but wet filament runs a very close second and is the cause most people skip past too quickly.
You can fix most stringing in under 30 minutes of calibration. The fixes below move from the quickest checks to the deeper adjustments, so you can stop as soon as the problem disappears.
What Stringing Actually Looks Like (and Why It Matters for Your Fix)
Stringing takes two distinct forms, and they point toward different causes:
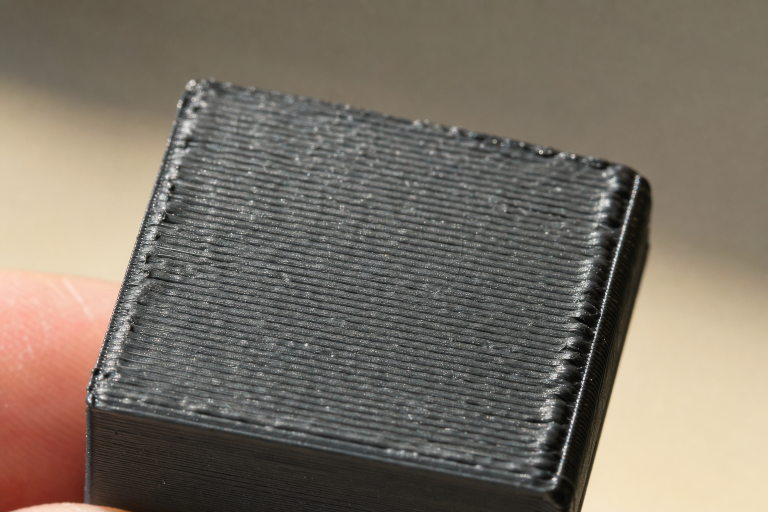
Thin, wispy hairs that look like cobwebs or fine spider silk. These are almost always a mild oozing problem: your nozzle temperature is slightly too high for the filament, or your retraction distance is just a bit too short. If you’re seeing only thin hairs, you probably don’t have a mechanical problem—you need a small slicer adjustment.
Thick, branch-like strings that look more like plastic twigs or antennae. These signal a more serious oozing issue: severely insufficient retraction, filament that’s absorbed significant moisture, or a partial clog creating backpressure. Thick strings often leave small blobs at the attachment points too.
Why this distinction matters: If you jump straight to aggressive retraction settings for thin hairs, you risk introducing filament grinding or heat creep. If you only tweak temperature for thick strings, you’ll chase the problem without solving it. Match the fix to the symptom.
Quick Diagnostic Check: What to Test Before Changing Any Settings
Before you touch a single slicer setting, run through these checks in order. They’ll catch the most common causes fast.
1. Is Your Filament Wet? (Check This First)
This is the counter-intuitive one most generic guides skip: wet filament causes far more stringing than most people realize, and it can look exactly like bad retraction settings.
Moisture absorbed by filament turns to steam inside the hotend. That steam creates internal pressure that forces plastic out of the nozzle even when the extruder isn’t pushing. The result is constant oozing during travel moves—and stringing that no retraction setting can fully fix.
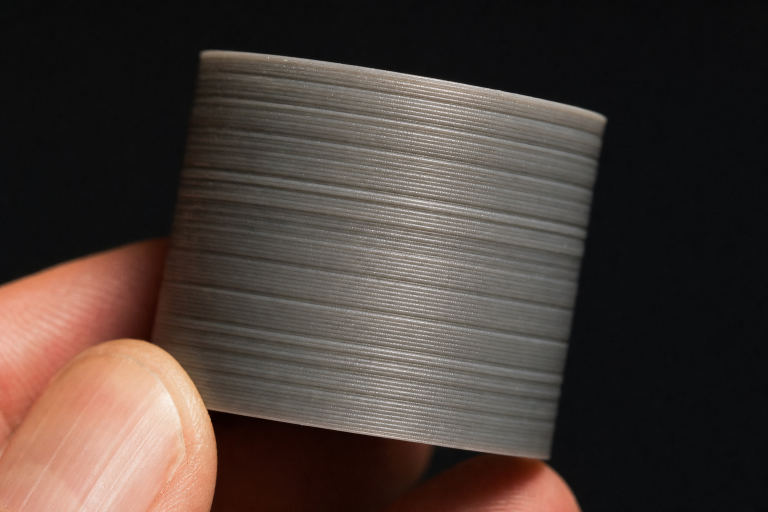
Quick test: Listen to your printer during the first layer. If you hear faint popping, crackling, or hissing sounds from the nozzle, your filament is wet. You may also see tiny gaps or pits on the surface of printed walls.
Fix: Dry your filament. PLA typically needs 4–6 hours at 45–50°C in a filament dryer or food dehydrator. PETG often needs 6–8 hours at 60–65°C. Nylon can require 12+ hours at 70°C or higher. After drying, store filament in a sealed container with desiccant.
Verification: If the popping sounds disappear and stringing reduces significantly without any slicer changes, wet filament was your primary cause.
What if drying doesn’t help? If you’ve dried the filament properly and the popping continues—or if stringing remains unchanged—don’t assume the filament is still wet. A persistent crackling sound combined with no stringing improvement can point to filament that’s been degraded by heat cycling or UV exposure. Some filaments, especially older PLA that’s sat in direct sunlight, develop micro-fractures that mimic wet-filament symptoms. In that case, try a fresh, sealed spool of the same material before chasing slicer settings. If the new spool prints cleanly, retire the old one.
2. Print a Stringing Test Model
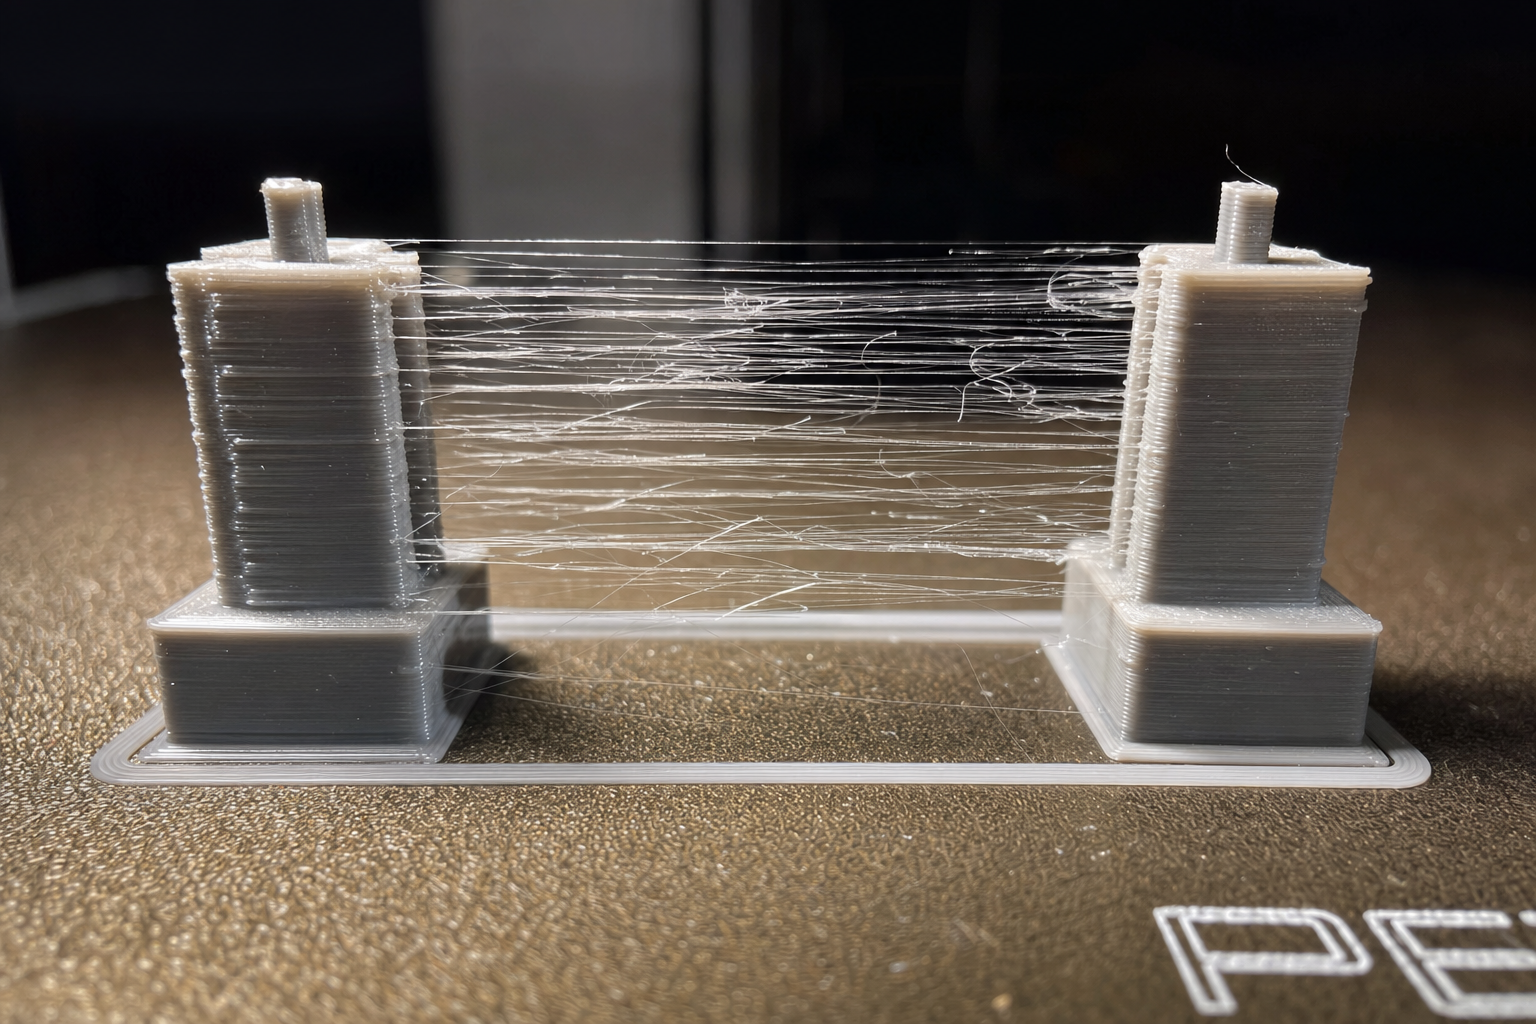
Don’t try to diagnose stringing on a complex print. Download a dedicated stringing test—two thin towers spaced apart—that forces the printer to make repeated travel moves. This takes 10–15 minutes to print and gives you a clean, repeatable baseline.
Popular options include the “Stringing Test” on Printables or the classic two-pillar test on Thingiverse. Print it with your current settings, save the result, and use it as your before/after comparison for every adjustment you make.
3. Check Your Nozzle for Partial Clogs
A partial clog creates backpressure that mimics wet filament or bad retraction. The extruder has to push harder to force plastic through, and that pressure keeps oozing after extrusion stops.
Quick check: Heat the nozzle to printing temperature and manually extrude 50mm of filament. Watch the extruded strand as it falls. It should drop straight down. If it curls sharply to one side, coils up on itself, or comes out significantly thinner than expected, you likely have a partial clog.
Fix: Perform a cold pull (atomic pull) or use a cleaning needle. For a cold pull, heat the nozzle to ~160°C for PLA, insert filament, let it cool to ~90°C, then firmly pull it out. The tip should come out with debris embedded in it.
When the cold pull fails: If you’ve performed two or three cold pulls and the extruded strand still curls or comes out thin, the clog may be carbonized material baked onto the nozzle’s internal walls—common with PETG or ABS that’s sat at high temperature too long. At that point, a cleaning needle may dislodge some debris, but the most reliable fix is replacing the nozzle. Brass nozzles are inexpensive, and a fresh nozzle eliminates the variable entirely. If stringing disappears with a new nozzle, the old one was the problem.
Slicer Fixes: What to Adjust and in What Order
If your filament is dry and your nozzle is clear, the problem is in your slicer settings. Adjust these in order, testing with a stringing test print after each change.
Retraction Distance: Start Here
Retraction pulls filament back into the nozzle during travel moves, relieving pressure so plastic can’t ooze out.
| Printer Type | Starting Range | Increment | Maximum Before Risk |
|---|---|---|---|
| Direct drive | 0.5–2.0 mm | 0.5 mm | 4.0 mm |
| Bowden setup | 4.0–7.0 mm | 1.0 mm | 10.0 mm |
How to adjust: Increase retraction distance in small increments. For a direct drive printer, start at 1.0mm and add 0.5mm at a time. For Bowden, start at 5.0mm and add 1.0mm at a time. Print the stringing test after each change.
Stop signal: If you reach the maximum range for your printer type and stringing hasn’t improved, stop increasing retraction. Excessive retraction pulls molten filament too far into the cold zone, causing heat creep and jams. At that point, the problem is elsewhere.
Retraction Speed: The Second Lever
Retraction speed controls how fast the filament is pulled back. Too slow, and plastic still oozes. Too fast, and the extruder gear can grind the filament or skip steps.
| Printer Type | Starting Range | Increment | Maximum |
|---|---|---|---|
| Direct drive | 25–45 mm/s | 5 mm/s | 60 mm/s |
| Bowden setup | 40–60 mm/s | 5 mm/s | 80 mm/s |
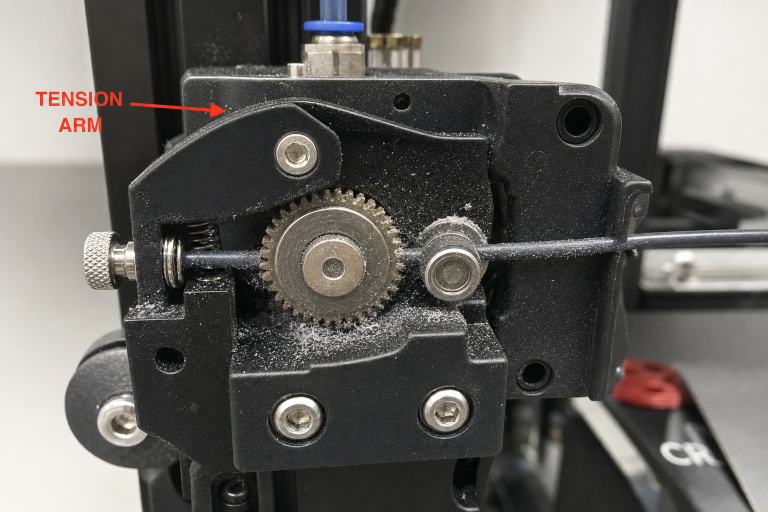
How to adjust: Start at the low end of the range for your setup. Increase by 5mm/s increments. Watch for filament grinding—if you see plastic dust around the extruder gear, you’re going too fast.
Print Temperature: Lower It Incrementally
Higher temperatures make filament less viscous, so it oozes more easily. Many stringing problems are simply a nozzle running 5–10°C too hot.
The counter-intuitive part: Most filament manufacturers list a wide temperature range on the spool, and many printers default to the middle or high end of that range. But the optimal temperature for minimal stringing is often at the low end of the range, not the middle.
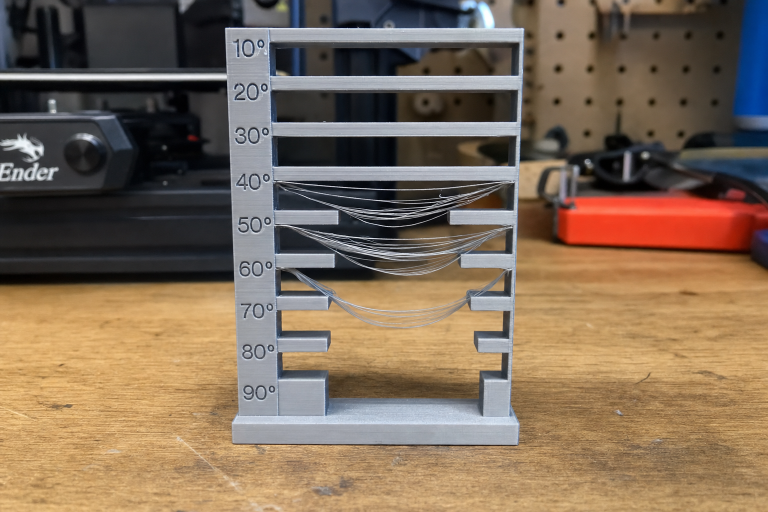
How to find the right temperature: Print a temperature tower. This is a single model that prints at progressively lower temperatures as it goes up, letting you see exactly where stringing disappears and where layer adhesion starts to suffer. Most slicers can generate one automatically with a post-processing script.
What to look for: Find the lowest temperature where stringing disappears but layer adhesion is still strong. You can test adhesion by breaking the tower at each temperature segment—it should snap with resistance, not crumble.
Typical ranges for common materials:
| Material | Typical Stringing-Free Range | Notes |
|---|---|---|
| PLA | 190–210°C | Start at 200°C and work down |
| PETG | 230–245°C | PETG strings more than PLA by nature |
| TPU | 220–235°C | Flexible filaments are string-prone; retraction matters more |
| ABS | 230–250°C | Enclosure helps; temperature alone rarely fixes ABS stringing |
Travel Speed: The Often-Overlooked Setting
Travel speed is how fast the print head moves when it’s not extruding. Faster travel means less time for plastic to ooze out during the move.
Starting point: 150 mm/s is a reasonable baseline for most printers. Increase to 200–250 mm/s if your printer’s frame and motion system can handle it without introducing ringing or ghosting.
How to test: Increase travel speed by 25 mm/s increments. If you see layer shifting or excessive vibration artifacts, back off. Most modern printers can handle 200 mm/s travel without issues.
Combing Mode: Keep Travel Inside the Print
Combing keeps travel moves within already-printed areas of the model rather than crossing open spaces. If the nozzle never travels across a gap, it can’t leave a string across that gap.
Setting location: In Cura, it’s called “Combing Mode.” In PrusaSlicer, it’s “Avoid crossing perimeters.” In both cases, set it to “Within Infill” or “Not in Skin” to keep travel moves inside the print body.
Trade-off: Combing increases print time slightly and can leave faint surface marks where the nozzle drags across printed areas. For functional parts, this is usually acceptable. For display pieces, test it first.
When It’s Not a Slicer Problem: Mechanical Causes
If you’ve adjusted retraction, temperature, travel speed, and combing—and dried your filament—but stringing persists, the problem is likely mechanical.
Worn or Poor-Quality Nozzle
A nozzle with an irregular orifice or internal wear creates uneven flow and unpredictable oozing. Brass nozzles wear over time, especially with abrasive filaments like glow-in-the-dark PLA, carbon-fiber-filled materials, or even some filled PETGs.
Check: Inspect the nozzle tip under magnification. If the orifice looks oval, rough-edged, or larger than it should be, replace the nozzle. Brass nozzles are consumable—expect to replace them every 3–6 months of regular printing, sooner with abrasive materials.
Upgrade path: A hardened steel or ruby-tipped nozzle resists wear and maintains a consistent orifice shape, which helps with stringing long-term.
Heat Creep
Heat creep happens when heat from the hotend travels upward into the cold zone of the heat break, softening filament before it reaches the melt zone. The softened filament creates inconsistent pressure and makes retraction ineffective.
Symptoms: Stringing that gets worse as the print progresses, combined with partial extrusion failures or clicking from the extruder. The problem often appears after 30–60 minutes of printing.
Check: After a failed print, immediately touch the heat sink above the hotend (carefully—it may be hot). If it’s too hot to touch, you have heat creep.
Fixes:
- Ensure the hotend cooling fan is running at 100% and isn’t clogged with dust
- Check that the fan is blowing toward the heat sink, not away from it
- Reduce retraction distance if it’s excessive (long retractions pull heat upward)
- In hot ambient environments (above 30°C), consider an enclosure fan or lower printing temperatures
Bowden Tube Gap (Bowden Printers Only)
On Bowden setups, a gap between the PTFE tube and the nozzle creates a pool of molten plastic that can’t be properly retracted.
Check: Heat the nozzle, remove the filament, then remove the Bowden tube from the hotend. Look for a ring of burnt or degraded plastic at the tube end. If present, the tube wasn’t seated flush against the nozzle.
Fix: Cut the last 2–3mm off the tube with a proper PTFE tube cutter (not scissors—you need a perfectly square cut). Re-insert the tube, loosen the nozzle a quarter turn, push the tube firmly against it, then re-tighten the nozzle. This creates a tight seal.
Material-Specific Stringing Notes
Different filaments string for different reasons. Here’s what matters most for each:
PLA: The most forgiving material. If PLA is stringing, check wet filament first, then lower temperature. PLA rarely needs aggressive retraction.
PETG: Naturally more stringy than PLA due to its higher viscosity and stickiness. You’ll rarely eliminate PETG stringing entirely—the goal is thin, easily-removed wisps, not thick branches. PETG also absorbs moisture faster than PLA; drying is critical.
TPU/TPE: Flexible filaments are the hardest to stop from stringing because they compress in the Bowden tube or extruder path, making retraction less effective. Use a direct drive extruder if possible, keep retraction distance short (1–2mm), and print slowly (20–30 mm/s).
Nylon: Extremely hygroscopic—it can absorb enough moisture to cause stringing in under 24 hours of exposure to ambient air. Dry immediately before printing and print from a dry box. Even with perfect settings, nylon will string if it’s even slightly wet.
How to Verify Your Fix Worked
After each adjustment, reprint the same stringing test model you used for your baseline. Compare side by side. You’re looking for:
- No strings at all: Ideal, but not always achievable with PETG or flexibles
- Only thin, wispy hairs that break with a finger swipe: Acceptable for most prints; these can be removed with a heat gun in seconds
- Thick strings or multiple attachment points: Keep adjusting
Success check: Print a model with actual geometry—something with gaps, pillars, or separated sections—not just the test towers. If stringing is gone or reduced to easily-removed wisps, your settings are dialed in.
The recurrence trap to watch for: A common failure pattern is fixing stringing on a test print, saving the profile, and then seeing stringing return on a different model weeks later. This often isn’t a settings regression—it’s filament that has absorbed moisture since the last print session. If stringing reappears on a profile that previously worked, dry the filament before touching any slicer settings. Chasing a moving target by adjusting retraction for wet filament creates a profile that will over-retract once the filament is dry again, leading to jams or heat creep on future prints.
When to Stop and Escalate
Stop self-troubleshooting and consider professional help or part replacement if:
- You’ve dried filament, adjusted retraction through the full recommended range, printed a temperature tower, and checked for clogs—and stringing hasn’t improved at all
- Stringing appears suddenly on a printer that was previously printing cleanly, with no filament or setting changes
- You hear grinding, clicking, or irregular motor sounds during retraction moves
- The extruder motor is skipping steps or the filament is visibly stripped
- You’ve replaced the nozzle and confirmed the hotend assembly is tight, but the problem persists
In these cases, the issue may be a failing extruder motor, a damaged driver on the control board, or a hotend assembly defect that requires manufacturer support.
Preventing Stringing from Coming Back
Once your settings are dialed in, a few habits keep stringing from returning:
- Store filament in sealed containers with desiccant, even PLA. A basic airtight storage bin with color-changing silica gel costs under $20 and prevents moisture-related stringing entirely.
- Re-dry filament before use if it’s been exposed to ambient air for more than a week (PLA) or a few days (PETG, nylon).
- Replace brass nozzles on a schedule, not just when they look worn. A nozzle that’s printed 500+ hours has a larger orifice than it started with, even if it looks fine.
- Keep a saved slicer profile for each filament brand and material you use. Different PLAs from different manufacturers often need slightly different temperatures and retraction settings.
- Run a stringing test print whenever you switch to a new filament brand or type. Ten minutes of calibration saves hours of post-processing.
Explore This Topic
- Back to General Buying Advice
- Back to 3D Printing Troubleshooting Master Guide
Related guides in this cluster:
- Over-Extrusion: Signs Causes & Calibration Fix Guide
- Layer Shift: Causes & Complete Fix Guide for 3D Printing
- How to Fix a Clogged 3D Printer Nozzle: Cold Pull & Complete Guide
Ryan has been operating FDM 3D printers since 2017. He runs a 12-machine print farm. His daily drivers include a Bambu Lab X1 Carbon, Prusa MK4s, and Creality Ender-3 V3s that have logged over 15000 print hours. He started 3D Printer Nerd to provide structured troubleshooting guides with diagnostic order, material-specific parameters, and clear stop points.