Extruder Clicking & Skipping: Complete Diagnosis Guide
The most likely cause of extruder clicking or skipping is a partial nozzle clog or the nozzle being too close to the bed on the first layer, creating back-pressure the extruder motor cannot overcome. That sharp clicking sound is the stepper motor missing steps—the gear tries to push filament forward, meets resistance, and snaps back. You will hear it before you see it in the print, and ignoring it will grind a divot into your filament until the extruder loses grip entirely.
This guide walks you through diagnosis in order of likelihood, from the fastest checks you can do mid-print to deeper mechanical causes that need the printer powered down.
Is the Clicking on the First Layer or Later in the Print?
Where the clicking starts tells you which half of this guide to follow first. Pause the print and note the current layer before you change anything.
Clicking only on the first layer
Your nozzle is too close to the bed. The extruder is trying to push filament into a gap smaller than the nozzle opening, and the back-pressure stalls the stepper.
Immediate fix: Babystep the Z-offset upward in 0.02 mm increments during the first layer until the clicking stops. Watch the extrusion line—it should flatten slightly against the bed but still have a visible rounded top. If it looks transparent or razor-thin, you are still too close.
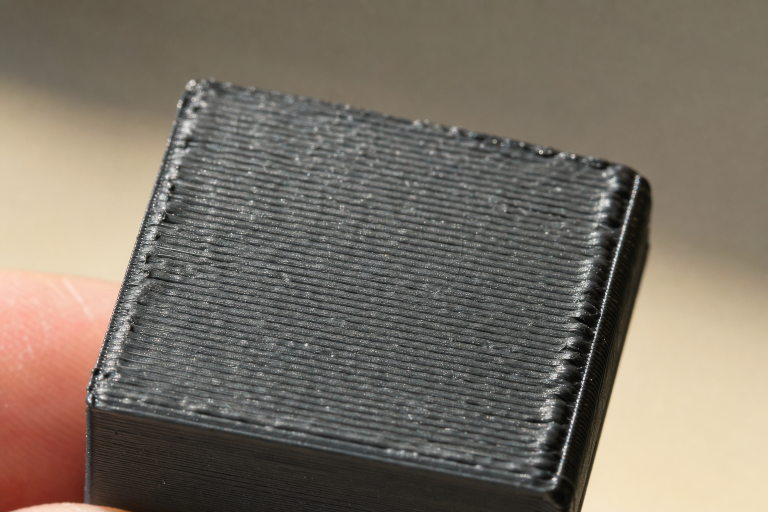
Verification: Print a single-layer 50×50 mm square and run your finger over it. The surface should feel smooth, not rough or ridged. Ridges mean the nozzle was dragging through extruded plastic—raise Z further.
If babystepping does not stop the clicking within 0.10 mm of adjustment, the problem is not Z-offset alone. Move to the next section.
Clicking on all layers or starting mid-print
The extruder is meeting resistance somewhere in the filament path. Work through these checks in order.
Quick Visual Checks Before You Disassemble Anything
Start with the filament path while the printer is still hot and loaded.
At the extruder gear area:
- Look for filament dust or shavings around the drive gear. A fine powder means the gear is grinding against the filament instead of gripping it. This confirms back-pressure upstream.
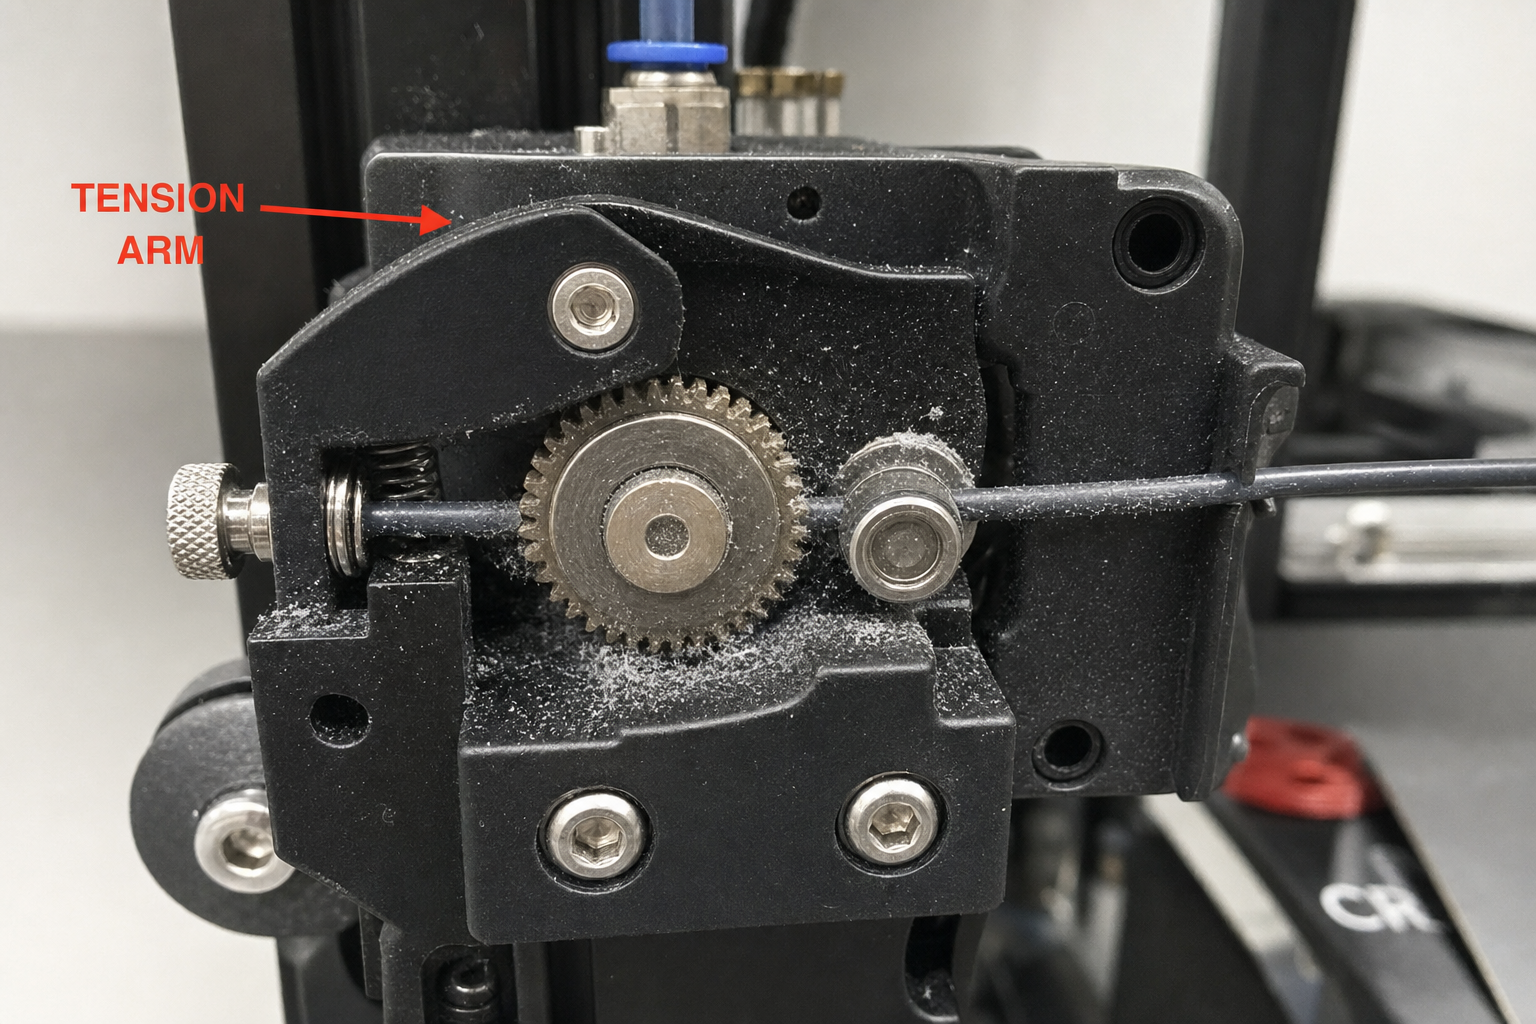
- Check whether the idler tension arm (the spring-loaded lever that presses filament against the drive gear) is cracked. This is a common failure on plastic extruder assemblies. A hairline crack near the pivot point lets the arm flex instead of maintaining grip, and the clicking is the gear slipping on filament it can no longer hold firmly.
At the hotend:
- Watch the nozzle during a commanded extrusion. Does filament curl sharply to one side as it exits, or does it drop straight down? Curling indicates a partial clog or debris in the nozzle orifice. Straight-down flow is normal.
- Is there any sign of melted filament oozing from above the heater block, around the heat break, or at the top of the nozzle threads? This is a hotend gap leak and will cause underextrusion and clicking as molten plastic fills cavities it should not occupy.
Temperature: The Most Overlooked Cause
An extruder clicking at 190°C with PLA that needs 210°C is not clogged—it is trying to push filament that is not fully melted. The extruder motor is strong enough to grind filament, but not strong enough to push cold plastic through a 0.4 mm hole.
What to do: Print a temperature tower for your specific filament. Most slicers have a built-in calibration tower script. Run it from the manufacturer’s maximum recommended temperature down to the minimum in 5°C increments.
What you are looking for: The best layer adhesion and surface finish without stringing. The clicking will stop at the temperature where the filament melts fast enough to match your print speed. If you are printing PLA at 60 mm/s and clicking at 200°C, try 215°C before you change anything mechanical.
Material-specific note: PETG typically needs 230–250°C. Printing PETG at PLA temperatures is a common cause of clicking in printers shared between materials. If you switched filament types recently, verify your slicer profile changed with it.
Partial Clogs: Diagnose and Clear Without Guessing
A partial clog creates enough back-pressure to cause clicking but still lets some filament through, so the print does not fail completely. The telltale sign is a print that looks under-extruded in a consistent pattern—thin walls, gaps between perimeters, or top layers that do not close—accompanied by clicking.
Cold pull (atomic pull) procedure:
1. Heat the hotend to the filament’s normal print temperature.
2. Push filament through by hand until it flows cleanly.
3. Let the hotend cool to about 90°C for PLA (140°C for PETG) while maintaining light hand pressure on the filament.
4. At the target temperature, yank the filament sharply upward and out of the hotend.
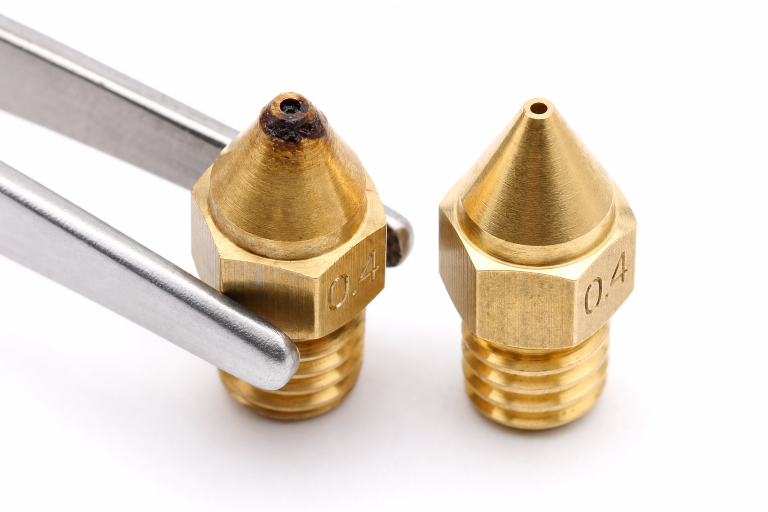
5. Examine the tip. A perfect cold pull shows a clean mold of the nozzle interior, including the orifice shape. Any dark specks, debris, or burnt plastic are what was causing the clog.
Repeat until the cold pull tip comes out clean. If three attempts do not improve the tip, or if you cannot push filament through by hand at print temperature, you have a full clog that needs the nozzle removed and cleaned or replaced.
When to replace the nozzle instead of cleaning: Brass nozzles are consumable. If you have printed abrasive filament (glow-in-the-dark, carbon-fiber-filled, wood-filled) or the nozzle has more than 200–300 print hours, replace it. A new brass nozzle costs less than the filament and time you will waste diagnosing an eroded orifice.
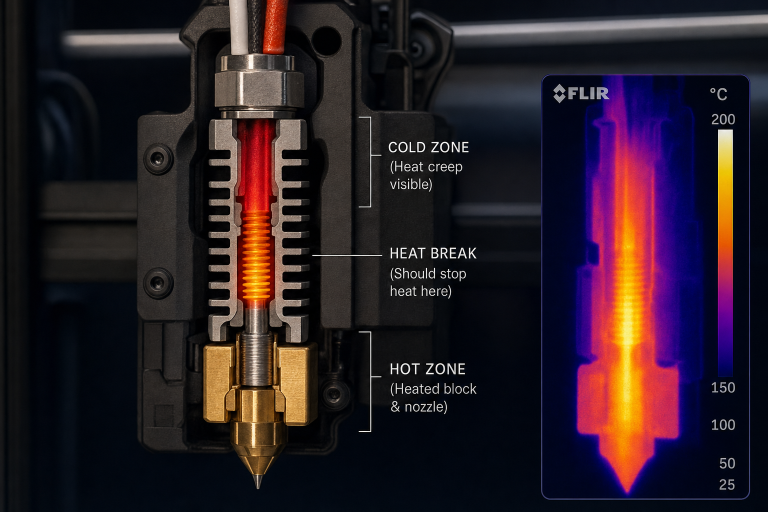
Heat Creep: When the Problem Gets Worse Over Time
Heat creep causes clicking that starts 20–30 minutes into a print and gets progressively worse. The hotend cooling fan cannot keep the heat break cold enough, and filament softens above the melt zone. The softened filament swells, jams against the heat break wall, and the extruder clicks as it tries to push through the restriction.
Confirming heat creep:
- The clicking starts well after the first layer and worsens as the print continues.
- You can print short objects (under ~30 minutes) without issues.
- The hotend cooling fan is spinning at full speed and is not obstructed by dust or stray filament strings.
- The heat sink above the heater block feels hot to the touch during printing. It should be warm at most.
Immediate fixes:
- Verify the hotend cooling fan is oriented correctly—it must blow air onto the heat sink fins, not pull air away. A reversed fan is a common assembly error.
- Check that the fan is running at 100% whenever the hotend is above 50°C. Some firmware or slicer settings can inadvertently tie the hotend fan to part-cooling fan speed.
- If you are printing in an enclosure with PLA, open the door or remove the top panel. PLA’s low glass-transition temperature makes it especially susceptible to heat creep in enclosed chambers above ~35°C ambient.
When heat creep is a design problem: Some all-metal hotends are more prone to heat creep with PLA than PTFE-lined hotends. If you recently upgraded to an all-metal hotend and clicking started immediately afterward, you may need a more powerful cooling fan or a thermal paste application between the heat break and heat sink.
Extruder Mechanical Issues: When It Is Not the Hotend
If temperature, clogs, and heat creep are ruled out, the extruder itself is the next suspect.
E-steps calibration check:
1. Mark the filament 120 mm above the extruder entry point.
2. Command the printer to extrude 100 mm of filament at a slow speed (1–2 mm/s).
3. Measure the remaining distance from the mark to the extruder entry.
4. If more than 100 mm was pulled in (your remaining mark is less than 20 mm from the entry), your e-steps are too high and the extruder is trying to push more filament than the hotend can melt. Recalculate and update e-steps in firmware or via M92 g-code.
Drive gear inspection:
Remove the filament and inspect the drive gear teeth under good light. Worn or filled-in teeth will slip on the filament instead of gripping it. Brass drive gears wear faster than hardened steel. If the teeth look rounded or have compacted filament packed into the grooves, clean them with a stiff brush or replace the gear.
Idler tension:
Too much tension deforms the filament and increases friction through the Bowden tube or hotend. Too little tension lets the gear slip. The correct setting leaves light tooth marks on the filament without flattening it. Adjust in quarter-turns of the tension screw and test with a 100 mm extrusion.
Filament Quality: The Variable That Changes Everything
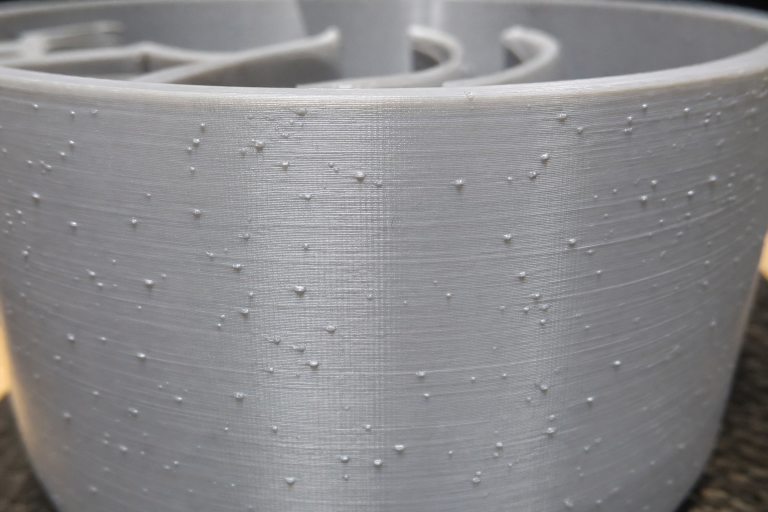
Wet filament can cause clicking even when every mechanical component is perfect. Moisture absorbed into the filament turns to steam in the hotend, creating erratic back-pressure spikes that the extruder cannot compensate for.
Signs of wet filament:
- You hear popping or hissing from the nozzle during extrusion.
- The extruded filament has a rough, bubbly surface texture.
- The clicking is intermittent and does not follow a consistent pattern.
- The problem appeared or worsened after the filament spool sat out for days or weeks.
Fix: Dry the filament in a filament dryer or a food dehydrator at the appropriate temperature (45–50°C for PLA, 55–65°C for PETG) for 4–6 hours. Test again. If the clicking disappears, the filament was the cause.
Diameter inconsistency: Cheap filament with wide diameter variation can cause clicking when a thick section hits the hotend. Measure the filament diameter at 5–10 points along a meter of filament. Variations greater than ±0.05 mm from nominal (1.75 mm or 2.85 mm) will cause problems. Switch to a filament with tighter tolerances.
Bowden Tube Degradation (Bowden-Style Printers Only)
On Bowden setups, the PTFE tube is part of the filament path and wears over time.
Check the tube ends: Remove the tube from both the extruder and hotend fittings. The ends should be cut perfectly square and show no signs of charring, deformation, or inner-diameter widening. A worn tube end creates a gap where molten filament can pool and solidify, increasing friction.
Check for internal wear: Slide a piece of filament through the tube by hand. It should move smoothly with consistent, light resistance. Any catching, scraping, or tight spots mean the tube’s inner wall is damaged or the tube is kinked.
Fix: Trim the last 10 mm off each end of the tube with a proper PTFE tube cutter (not scissors—the cut must be perfectly square). If the tube is discolored or brittle, replace it. Capricorn tubing with tighter inner-diameter tolerances can reduce friction in long Bowden paths.
When to Stop Diagnosing and Replace Parts
Some clicking causes are not worth chasing with calibration. Stop and replace when:
- The extruder tension arm is cracked. Plastic extruder arms fail eventually. Replace the entire extruder assembly with an aluminum upgrade or the manufacturer’s metal replacement.
- The nozzle has unknown hours or has printed abrasives. Replace it. A worn nozzle orifice is wider than spec and causes inconsistent back-pressure.
- The PTFE tube is discolored or the ends will not stay seated in the fittings. Worn fittings and tube ends cause intermittent gaps. Replace both the tube and the pneumatic fittings together.
- You have adjusted e-steps, temperature, Z-offset, and cleared clogs, and the clicking persists across multiple filaments. This points to a hotend assembly issue—a gap between the nozzle and heat break, a damaged heat break, or a failing thermistor that is reporting incorrect temperatures. Disassemble the hotend, clean all threaded surfaces, and reassemble with the nozzle tightened against the heat break at printing temperature (hot-tightening).
Decision Criterion: Print Speed vs. Hotend Capability
One diagnostic split changes your entire approach: Is your print speed exceeding your hotend’s volumetric flow limit?
Every hotend has a maximum volumetric flow rate—the volume of plastic it can melt per second, measured in mm³/s. A standard E3D V6-style hotend maxes out around 10–12 mm³/s with PLA. If your slicer settings demand more than this, the extruder will click no matter how well-calibrated everything else is.
Calculate your current volumetric flow: Layer height × extrusion width × print speed. For example, 0.2 mm layer height × 0.5 mm line width × 80 mm/s = 8 mm³/s. This is within range for most hotends. But 0.3 mm layers × 0.6 mm line width × 100 mm/s = 18 mm³/s—well beyond what a standard hotend can sustain.
The decision: If your calculated flow rate exceeds ~12 mm³/s on a standard hotend, either reduce print speed or upgrade to a high-flow hotend (Volcano, CHT nozzle, Rapido, etc.). No amount of temperature increase will compensate for a hotend that physically cannot melt plastic fast enough. If you need the speed, the hardware must match. If you need the printer to work now, drop the speed until the clicking stops, then back off another 10% for margin.
Verification: How to Know the Problem Is Solved
After any fix, run this sequence to confirm the clicking is gone:
1. Extrusion test: Heat the hotend and extrude 50 mm at your normal print speed. The filament should exit straight down with a consistent diameter. No clicking, no skipping.
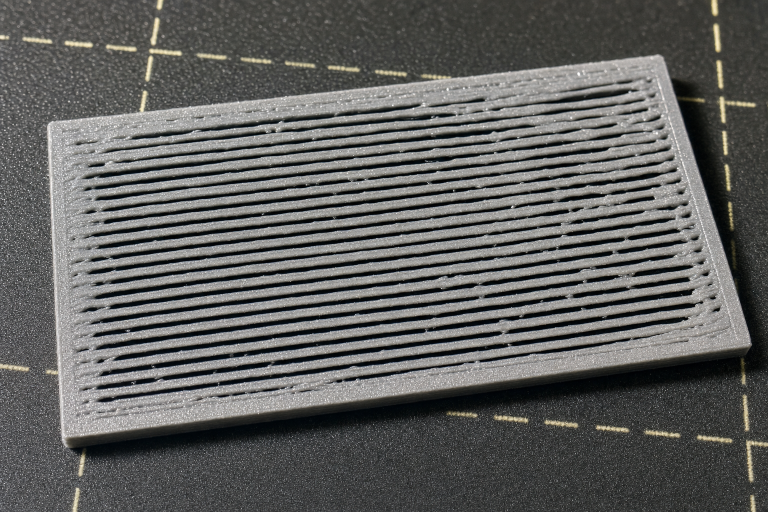
2. Single-wall cube: Print a 20 mm calibration cube in vase mode (spiralize outer contour). The wall should be smooth and consistent, with no gaps or thin spots.
3. Full print: Run a print that previously caused clicking. Listen during the first 10 minutes and again during heavy infill sections, where flow rates are highest.
If clicking returns only during fast infill, your flow rate is the bottleneck—reduce infill speed or increase temperature slightly for infill moves.
If clicking returns after all fixes and you have replaced the nozzle, verified e-steps, ruled out heat creep, and tested with dry filament, the problem is likely a hotend assembly gap or a failing extruder motor driver. At this point, contact your printer manufacturer’s support or consult a printer-specific community with your exact symptoms and what you have already ruled out.
Explore This Topic
- Back to Extrusion Problems
- Back to 3D Printing Troubleshooting Master Guide
Related guides in this cluster:
- Under-Extrusion: Symptom → Cause → Complete Fix Guide
- How to Fix 3D Print Warping: PLA PETG ABS Complete Guide
- How to Fix a Clogged 3D Printer Nozzle: Cold Pull & Complete Guide
Ryan has been operating FDM 3D printers since 2017. He runs a 12-machine print farm. His daily drivers include a Bambu Lab X1 Carbon, Prusa MK4s, and Creality Ender-3 V3s that have logged over 15000 print hours. He started 3D Printer Nerd to provide structured troubleshooting guides with diagnostic order, material-specific parameters, and clear stop points.