Poor Bridging & Overhangs: Settings That Actually Help
Poor bridging and sagging overhangs almost always trace back to three things: insufficient cooling, printing too hot for the material, or asking the printer to span a gap it physically cannot handle at your current speed. The fastest fix is usually a combination of part-cooling fan speed and temperature, not a single magic slicer checkbox. Before you change anything, look at the failed print and decide whether the plastic is drooping because it is still molten when it hits open air—a cooling problem—or because it is being laid onto nothing and snapping mid-span—a speed and support problem. That distinction determines which settings you touch first.
Quick Symptom Check: Cooling Failure vs. Span Failure
Match what you see on the print to the most likely root cause before adjusting settings.
Cooling failure looks like:
- Overhang undersides that sag or curl upward at the edges.
- Bridged strands that droop into a U-shape and look glossy or melted.
- PLA that prints fine on vertical walls but turns into a mess on anything past about 45 degrees.
- The problem gets worse on the side of the print facing away from the part-cooling fan.
Span failure looks like:
- Bridged lines that snap or never connect, leaving loose strands hanging.
- Gaps where the first bridging layer simply did not stick to the anchor points.
- The issue appears even on short bridges under 20 mm where cooling should be adequate.
- PETG or TPU that refuses to hold tension across any gap regardless of temperature.
If you see cooling-failure symptoms, start with temperature and fan settings. If you see span-failure symptoms, start with speed, extrusion width, and bridge flow multiplier before touching temperature.
Settings That Improve Bridging and Overhangs
Part-Cooling Fan: The Single Biggest Lever
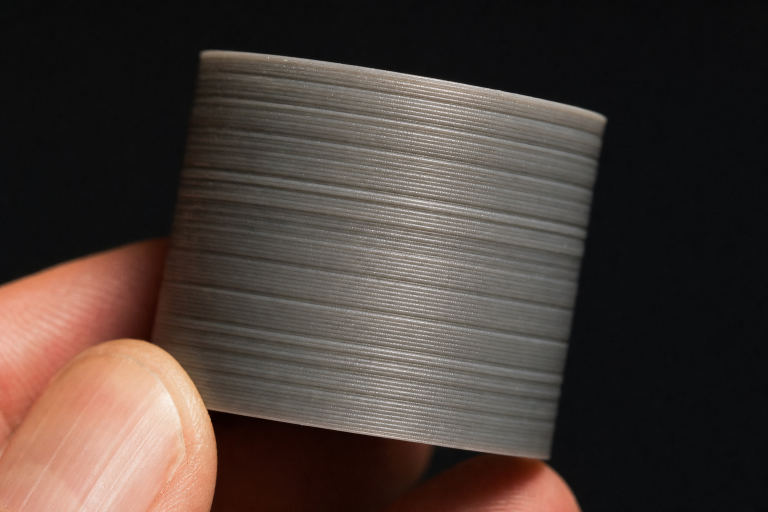
For PLA, the part-cooling fan should run at 100% on bridges and overhangs. Most slicers let you set a separate fan speed for bridging moves. If your slicer has a “Bridging fan speed” setting, set it to 100% even if your normal print fan runs lower.
For PETG, the rule flips: too much cooling weakens layer adhesion and causes brittleness. Start at 30–50% fan for bridges and increase only if drooping persists. PETG bridges will never look as clean as PLA bridges, and chasing perfection with high fan speeds usually backfires.
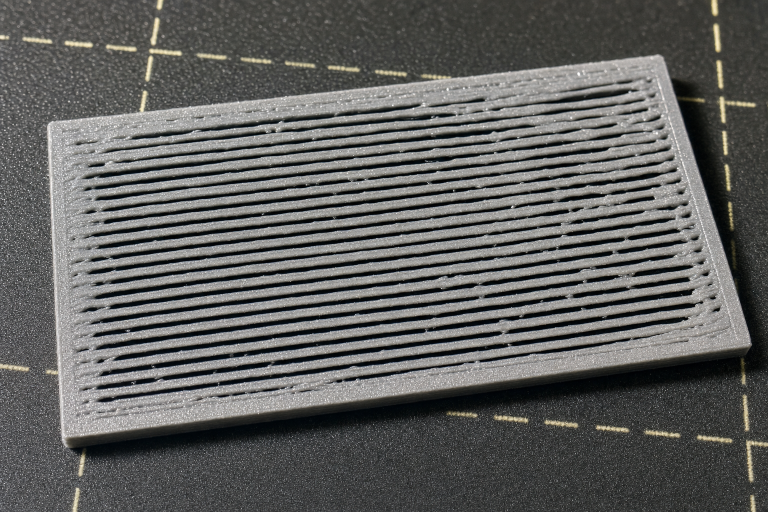
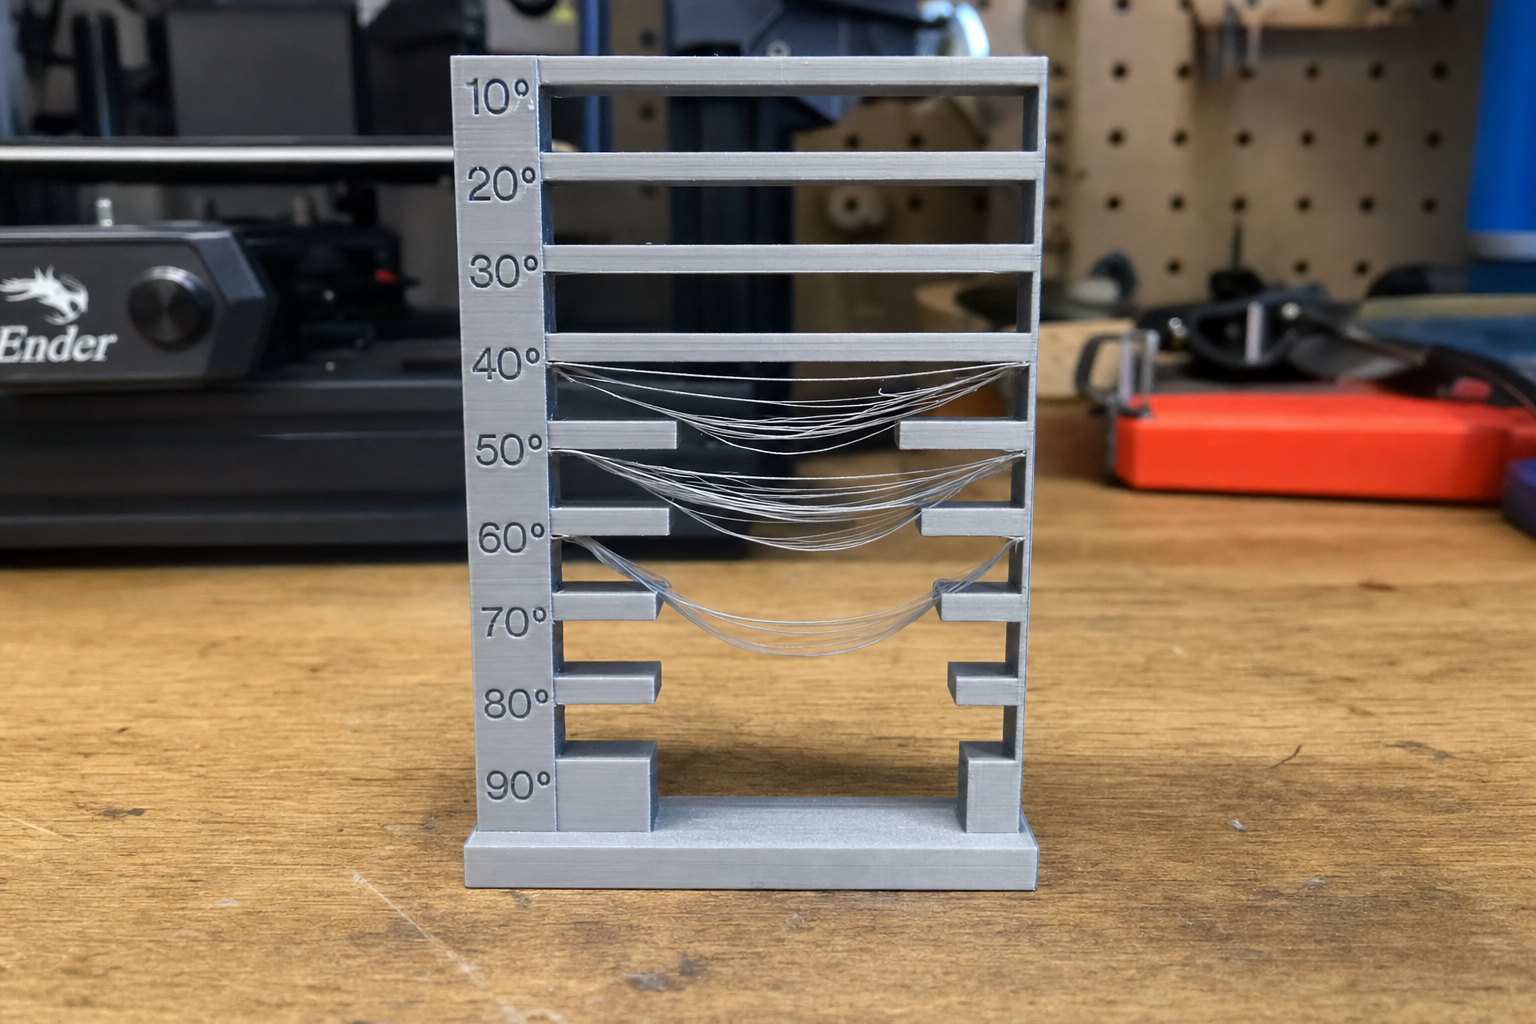
Verification: Print a bridging test model with five spans from 10 mm to 50 mm. If the 10 mm and 20 mm bridges are clean but longer ones droop, your cooling is adequate and the problem is span-related. If even the 10 mm bridge sags, cooling or temperature is the culprit.
What to do when the test splits the difference: You may see clean 10 mm bridges, slightly sagging 20 mm bridges, and completely failed 30 mm+ spans. This is the most common real-world result and means your cooling is borderline adequate. Instead of cranking the fan higher—which may already be at 100%—drop bridging temperature by 5°C and reduce bridge speed to 15 mm/s before touching anything else. Reprint only the 20 mm and 30 mm spans. If the 20 mm span cleans up, you have confirmed the problem was thermal, not mechanical. If the 30 mm span still fails, the gap likely exceeds what your printer’s cooling system can handle at any temperature, and you need to either add supports or reorient the part.
Bridging Temperature: Cooler Is Cleaner
Most filaments bridge better at the low end of their recommended temperature range. Dropping nozzle temperature by 5–10°C during bridging moves reduces the time the plastic stays molten in open air.
In PrusaSlicer, look for “Bridging fan speed” and the bridging extrusion multiplier. In Cura, enable bridge settings under Experimental and set a lower “Bridge Wall Temperature” and “Bridge Skin Temperature.” In OrcaSlicer, the bridging settings are under the Material tab with separate temperature controls.
Starting ranges by material:
- PLA: Bridge at 190–200°C even if you normally print at 210°C.
- PETG: Bridge at 225–235°C (normal printing is often 240–250°C).
- ABS/ASA: Bridge at 230–240°C with the part-cooling fan at 20–30% and an enclosure closed.
- TPU: Bridge temperature matters less than speed; start at the low end of the spool’s range and print slowly.
Decision criterion: If you need maximum overhang quality for a cosmetic print, prioritize lower bridging temperatures and accept slightly weaker layer bonding on the bridge layers. If the bridge is structural—a functional part under load—keep temperatures closer to normal and compensate with slower speed or denser bridge flow instead.
Bridge Speed and Flow: The Span-Specific Levers
Bridge speed: Print bridges slower than perimeters. A good starting point is 15–25 mm/s for bridges up to 30 mm, and 10–15 mm/s for longer spans. The slower speed gives the extruded strand time to cool and solidify before gravity pulls it down.
Bridge flow multiplier: Slight underextrusion helps bridges stay taut. Set bridge flow to 0.90–0.95 (90–95% of normal flow). The slightly thinner strand weighs less, cools faster, and is less likely to droop. Do not go below 0.85; you risk the strand snapping or failing to anchor.
Bridge skin and infill density: The first bridging layer is the hardest. Set bridge skin density to 100% (solid fill) so the first layer has maximum anchor contact. Subsequent bridge layers can use lower density.
Verification: Print a single-layer bridge test and measure the droop with calipers. A well-tuned PLA bridge should show less than 0.5 mm of sag across a 30 mm span. PETG will typically sag 1–2 mm on the same span even when well-tuned.
A common failure pattern that wastes time: An owner drops bridge flow to 0.85, sees the bridge snap, and assumes they went too low. They raise flow back to 1.0 and the bridge droops again, so they conclude the span is impossible. The real problem is often speed, not flow. A strand extruded at 0.85 flow but printed at 30 mm/s is being stretched thin while still molten, and it snaps because the extruder cannot maintain tension at that speed. The safer sequence is: reduce bridge speed to 15 mm/s first, keep flow at 0.95, and test. If the bridge holds but droops slightly, then reduce flow to 0.90. If it snaps at 15 mm/s and 0.95 flow, the anchor points or nozzle condition are suspect—not the flow multiplier.
Overhang-Specific Settings: Angle Thresholds and Wall Order
Most slicers let you define an overhang angle threshold where special settings kick in. The default is usually 45 degrees. If your printer handles overhangs well up to 55 degrees but fails beyond that, set the threshold to match your printer’s actual capability rather than the default.
Wall printing order: Print inner walls before outer walls on overhangs. This gives the outer wall something to anchor against instead of printing into empty air. In Cura, this is “Outer Before Inner Walls” set to off for overhang regions. In PrusaSlicer, enable “External perimeters first” set to off.
Overhang speed: Reduce speed on steep overhangs. A 60-degree overhang printed at 20 mm/s will look significantly cleaner than the same overhang at 50 mm/s, even with identical cooling.
Variable layer height: For prints with gradual curves and overhangs, variable layer height can reduce the step distance between layers, effectively making overhangs less steep. This is not a bridging fix, but it helps cosmetic overhang quality on organic shapes.
Material-Specific Notes That Prevent Recurrence
Wet filament makes bridging worse. Moisture in filament turns to steam in the hotend, causing inconsistent extrusion and oozing that ruins bridge tension. If your bridging was acceptable last week and suddenly fails with the same spool, dry the filament before chasing slicer settings.
Nozzle wear changes extrusion width. A worn 0.4 mm nozzle may actually be 0.5 mm or larger, extruding wider lines that sag more easily. If you have printed abrasive filament—glow-in-the-dark, carbon-fiber-filled, wood-filled—on the current nozzle, check for wear. A fresh nozzle often restores bridging quality without any slicer changes.
Different colors of the same material behave differently. White PLA typically requires slightly higher temperatures than black PLA from the same brand because of the titanium dioxide pigment. If you switch colors and bridging suddenly degrades, adjust temperature by 5°C before changing other settings.
When to Stop Adjusting Slicer Settings
Some bridging problems are not fixable in software. Stop troubleshooting and check hardware if:
- Bridging fails on a pre-sliced test print that you know worked before. If a previously successful gcode file now produces bad bridges, the problem is mechanical: a failing part-cooling fan, a partial nozzle clog, or a worn nozzle.
- The part-cooling fan is not spinning at the commanded speed. Manually set the fan to 100% from the printer’s control panel and verify it spins up fully. A fan that is slow, noisy, or intermittent needs replacement.
- Bridges fail only on one side of the print. This almost always indicates a directional cooling problem: a duct that blows from one side only, a partially blocked duct, or a fan shroud that has warped from heat. Print a new fan duct or upgrade to a symmetrical duct design.
- You have adjusted temperature, fan, speed, and flow across reasonable ranges and bridging is still unacceptable. The bridge span may exceed what your printer’s cooling system can handle. Either add supports under long bridges, reorient the part to shorten the span, or split the model so the bridge is printed separately and assembled later.
Bridging Settings Quick-Reference Table
| Setting | PLA Starting Value | PETG Starting Value | ABS/ASA Starting Value | TPU Starting Value |
|---|---|---|---|---|
| Bridge fan speed | 100% | 30–50% | 20–30% (enclosure closed) | 100% |
| Bridge temperature | 190–200°C | 225–235°C | 230–240°C | Low end of spool range |
| Bridge speed | 20–25 mm/s | 15–20 mm/s | 20–25 mm/s | 10–15 mm/s |
| Bridge flow multiplier | 0.90–0.95 | 0.95–1.00 | 0.95–1.00 | 1.00–1.05 |
| Overhang speed (60°+) | 20 mm/s | 15–20 mm/s | 20 mm/s | 10–15 mm/s |
Adjust one setting at a time and reprint a small bridging test. Changing temperature, fan, and speed simultaneously makes it impossible to know which adjustment actually helped. Start with fan and temperature, verify with a test print, then tune speed and flow if needed.
FAQ
Why do my bridges look fine on one side of the print but terrible on the other?
This is almost always caused by a directional part-cooling fan duct that only blows from one side. The side facing the fan gets adequate cooling while the far side does not. Upgrade to a symmetrical fan duct or rotate the print so the worst overhangs face the cooling airflow.
Can I fix bridging without changing any slicer settings?
You can improve bridging by drying your filament, replacing a worn nozzle, or reorienting the part on the build plate so bridges are shorter or aligned with the cooling fan airflow. If the hardware and material are in good condition, however, slicer settings are the most direct fix.
How do I know if my bridging problem is the slicer or the printer hardware?
Print a bridging test gcode file that you know produced good results in the past. If the same file now prints poorly, the problem is hardware: fan, nozzle, or filament. If a freshly sliced file prints poorly but old gcode prints fine, your slicer settings changed.
Does a dual-gear extruder improve bridging?
A dual-gear extruder provides more consistent filament grip and can reduce extrusion inconsistencies that cause uneven bridging strands. It helps, but it is not a substitute for correct cooling and temperature settings. Upgrade the extruder only if you have already optimized slicer settings and verified your part-cooling fan is working correctly.
Explore This Topic
- Back to Print Quality Defects
- Back to 3D Printing Troubleshooting Master Guide
Related guides in this cluster:
- Layer Shift: Causes & Complete Fix Guide for 3D Printing
- 3D Print Blobs & Zits: Retraction & Coasting Fix Guide
- Ghosting & Ringing: How to Eliminate Surface Artifacts
Ryan has been operating FDM 3D printers since 2017. He runs a 12-machine print farm. His daily drivers include a Bambu Lab X1 Carbon, Prusa MK4s, and Creality Ender-3 V3s that have logged over 15000 print hours. He started 3D Printer Nerd to provide structured troubleshooting guides with diagnostic order, material-specific parameters, and clear stop points.