Under-Extrusion: Symptom → Cause → Complete Fix Guide
Under-extrusion usually starts with a partial nozzle clog. That single cause accounts for more sudden-onset cases than every slicer setting combined, and it is also the fastest thing to check. The print looks starved: thin walls, gaps between perimeter lines, layers that don’t bond, and top surfaces with holes instead of a solid skin. If you are looking at a print right now that matches that description, start with the nozzle before you touch a single slicer setting.
This guide walks through the checks in the order that solves the most cases fastest—visual inspection first, then material issues, then slicer settings, then mechanical causes. At each stage you will know exactly what to look for, what to adjust, and how to confirm the fix worked.
Is This Actually Under-Extrusion? Confirm the Symptoms First
Before you start changing settings, confirm you are chasing the right problem. Under-extrusion has a specific visual signature that is easy to confuse with other print failures.
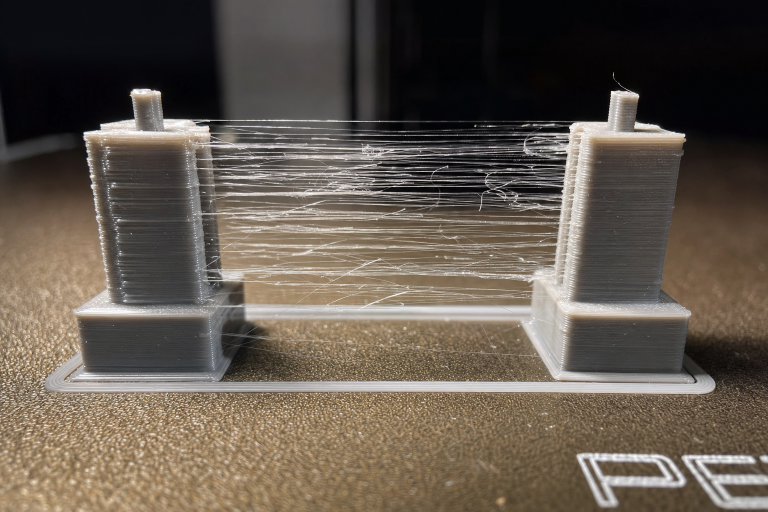
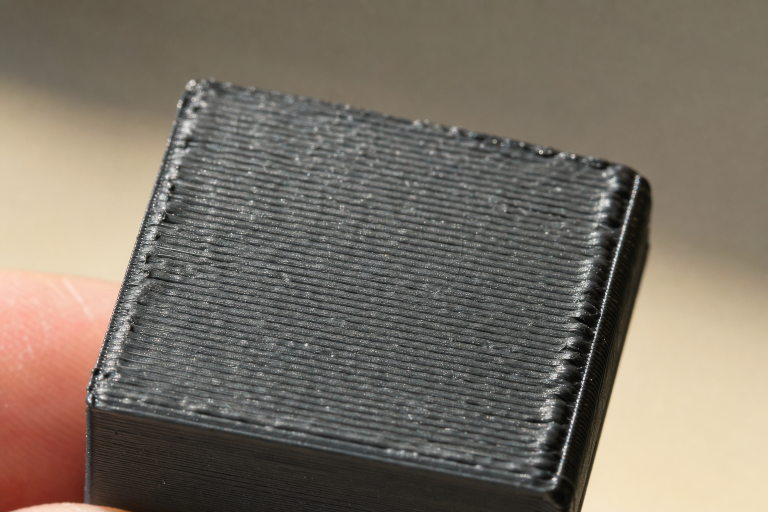
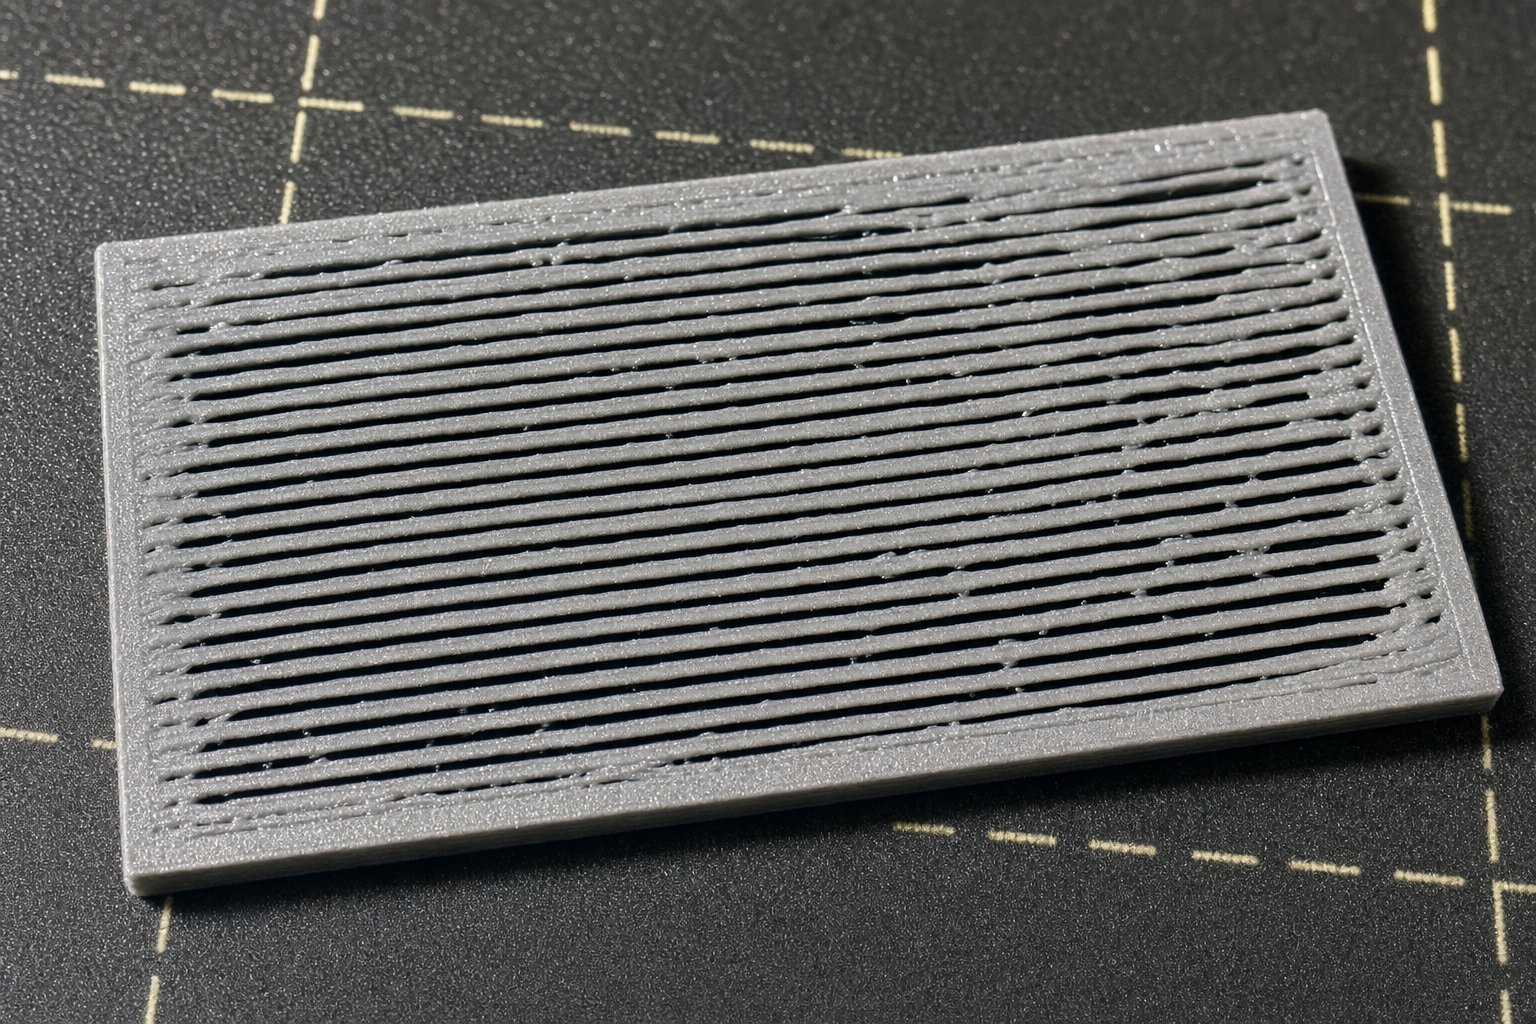
Classic under-extrusion signs include gaps between perimeter lines on flat top or bottom surfaces, where infill or adjacent walls should be touching but aren’t. Walls come out thin and fragile, separating when you flex the part. Top layers look like a sparse grid instead of a solid sheet. Layers peel apart with minimal force, especially on tall thin sections. Consistent under-extrusion shows the same gap pattern on every layer, while intermittent under-extrusion comes and goes, often tied to retractions or specific regions of the print.
What under-extrusion is not: a single missing layer line is more likely a partial clog that cleared itself or a Z-axis bind. Gaps that only appear on overhangs or steep angles are usually a cooling or perimeter-order issue, not global under-extrusion. Pillowing—bumpy, puffed top surfaces—looks like gaps but comes from insufficient top layers over low-density infill, not from the extruder pushing too little plastic.
If your print matches the classic signs above, proceed through the checks in order.
Start Here: The 60-Second Nozzle Check
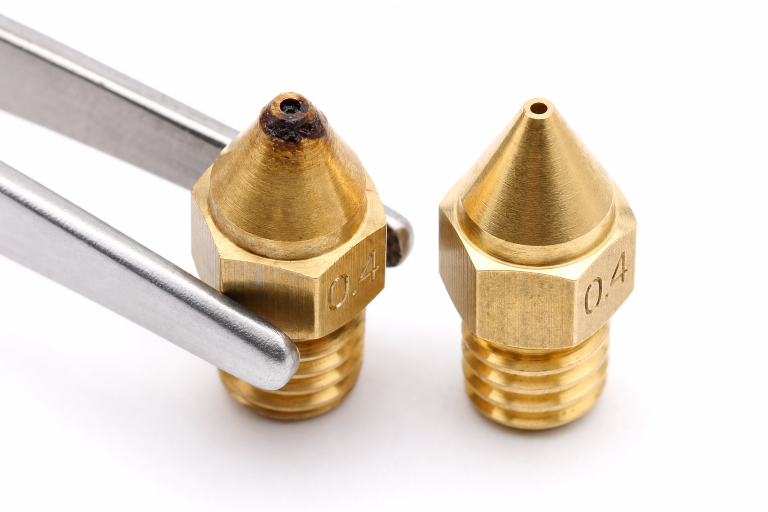
Most under-extrusion that appears suddenly is a partial nozzle clog. Filament can carbonize inside the nozzle over time, dust and debris can enter with the filament, or a cold pull can leave residue behind. A partial clog restricts flow without stopping it completely, which produces exactly the starved-extrusion pattern.
To check quickly, heat the nozzle to your filament’s normal printing temperature and manually extrude 50–100mm of filament through the printer’s control interface. Watch the extruded strand as it leaves the nozzle.
A straight, smooth, consistent-diameter strand falling directly down means the nozzle is clear—move on to the material and slicer checks. A strand that curls sharply to one side, comes out thinner than expected, or exits at an angle signals a partial clog or damaged nozzle orifice. A strand that comes out in pulses or with visible bumps indicates a partial clog with intermittent flow restriction. A very thin strand even at normal extrusion speed, or an extruder motor that clicks or skips, points to a severe restriction—likely a full or near-full clog.
If the strand curls or pulses, perform a cold pull with nylon or the filament you are using. Heat to printing temperature, let it cool to roughly 90–100°C for PLA or 110–130°C for PETG, then pull firmly and steadily. Inspect the pulled tip—carbonized black specks or debris confirm the clog. If a cold pull does not clear it, use an acupuncture needle or nozzle cleaning needle at printing temperature, working it gently through the orifice from below. If the nozzle is old, visibly worn, or has been through abrasive filament, replace it. Brass nozzles are consumable and cost under a dollar each in bulk—do not spend an hour fighting a nozzle you can replace in two minutes.
Stop and verify: after cleaning or replacing the nozzle, repeat the manual extrusion test. A straight, smooth strand means you have solved the most likely cause. If the strand still curls or pulses, the restriction may be higher in the hotend—check the PTFE tube seating on PTFE-lined hotends or the heat break for debris before continuing.
Material Checks: Wet Filament and Wrong Temperature
If the nozzle is clear and you are still seeing under-extrusion, the next most common cause is the filament itself or the temperature you are printing it at.
Wet Filament Produces a Specific Pattern
Moisture-absorbed filament does not just cause stringing and popping—it can also produce under-extrusion because the water boiling inside the hotend disrupts the melt flow. The key tell: you hear faint popping or sizzling sounds during printing, and the under-extrusion is inconsistent rather than uniform.
PLA absorbs moisture slowly but will eventually cause problems in humid environments. PETG, TPU, nylon, and PVA absorb moisture aggressively and can become unprintable within 24–48 hours of exposure.
If you hear popping and see irregular gaps rather than a consistent pattern, dry the filament. A dedicated filament dryer at the manufacturer’s recommended temperature for 4–6 hours is the most reliable method. A food dehydrator works for spools that fit. An oven is riskier—most home ovens have poor temperature control at the low ranges needed and can melt spools or fuse filament.
After drying, print the same file again. If the popping stops and extrusion improves, wet filament was at least part of the problem.
Temperature Too Low for the Material
Every filament has a minimum extrusion temperature below which the melt viscosity is too high for consistent flow. Printing at the bottom of the recommended range can cause under-extrusion that looks mechanical but is purely thermal.
Look at the filament manufacturer’s recommended temperature range. If you are printing at the low end, try increasing by 5°C increments. Print a temperature tower to find the sweet spot for your specific spool—two spools of the same material from different manufacturers can want temperatures 10–15°C apart. A temperature tower print will show you exactly where extrusion quality peaks and where it degrades. Look for the hottest temperature that still produces clean bridging and sharp corners without stringing, then back down 5°C from there as a starting point.
Slicer Settings: The Specific Parameters to Check
If the nozzle is clear and the filament is dry and at the right temperature, the problem is likely in your slicer settings. Do not go hunting through every setting—check these three in order.
1. Flow Rate (Extrusion Multiplier)
The flow rate setting tells the printer how much filament to push relative to the theoretical amount needed. A flow rate set too low produces uniform under-extrusion across the entire print. The default is 100% or 1.0 in most slicers, though some filament profiles ship with lower values like 0.95–0.98 for specific materials.
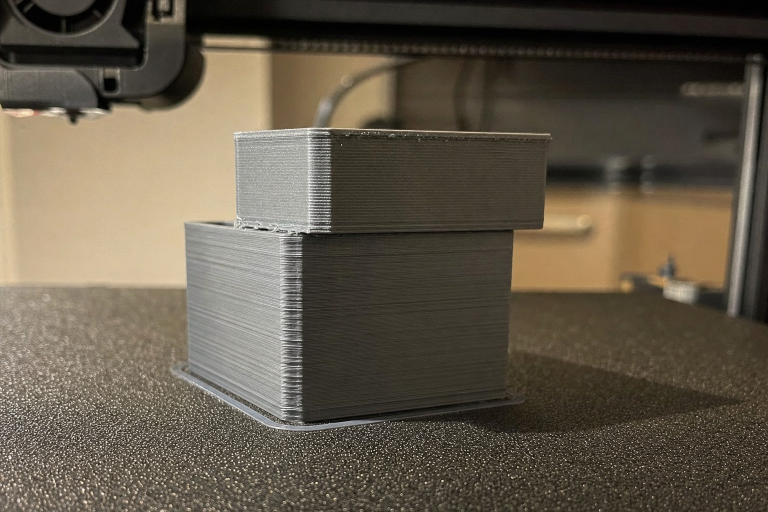
If you have changed this value or are using a community profile, reset it to 100% and print a single-wall calibration cube with no infill and no top layers. Measure the wall thickness with calipers. If your nozzle is 0.4mm and your extrusion width is set to 0.45mm, the measured wall should be approximately 0.45mm. If it is thinner, increase flow rate in 2% increments until the measured wall matches the set extrusion width. Reprint the calibration cube—wall thickness within 0.02mm of the set extrusion width is acceptable.
2. Filament Diameter Setting
This setting tells the slicer what diameter filament to calculate volumes for. Most filament is nominally 1.75mm, and that is what most slicer profiles default to. If your profile is set to 2.85mm—common for older Ultimaker-style filament—and you are using 1.75mm filament, the printer will extrude roughly 60% less plastic than needed, producing severe, uniform under-extrusion.
In your slicer’s printer or filament settings, confirm the filament diameter is set to 1.75mm or whatever your filament actually measures. Measure your filament in several places with calipers—quality filament should be within ±0.05mm of nominal. If your spool consistently measures 1.72mm, set that as the diameter for more accurate extrusion. This is a binary check: if it was wrong, fixing it will immediately resolve the under-extrusion on the next print.
3. Retraction Settings for Intermittent Under-Extrusion
If your under-extrusion appears only after travel moves or at the start of new perimeters, retraction is pulling too much filament back or doing it too aggressively.
Here is the counter-intuitive angle most guides skip: excessive retraction distance does not just cause stringing problems—it can pull molten filament up into the cold zone of the hotend, where it briefly solidifies and creates a micro-clog that clears after a few millimeters of extrusion. This produces a pattern where every perimeter starts thin and gradually fills in.
If you see under-extrusion specifically at seam points or perimeter starts, reduce retraction distance by 0.5mm and test. For direct-drive extruders, retraction distances above 2mm are rarely needed. For Bowden setups, distances above 6–7mm are worth questioning.
Additional retraction parameters to check include retraction speed—25–45mm/s is typical for most setups, and speeds above 60mm/s can cause the extruder gear to slip or grind filament. If you have a positive value for extra restart distance, sometimes called “extra prime amount,” try reducing it to zero; a negative value can cause under-extrusion at restarts. If retract on layer change is enabled and combined with long retraction distances, this can cause under-extrusion at the start of every layer.
Print a retraction test model to verify. The under-extrusion pattern at seam points should diminish or disappear as you dial in the retraction distance.
Mechanical Checks: When the Hardware Is the Problem
If you have cleared the nozzle, dried the filament, and verified your slicer settings without solving the problem, the cause is mechanical. These checks take more time but are systematic.
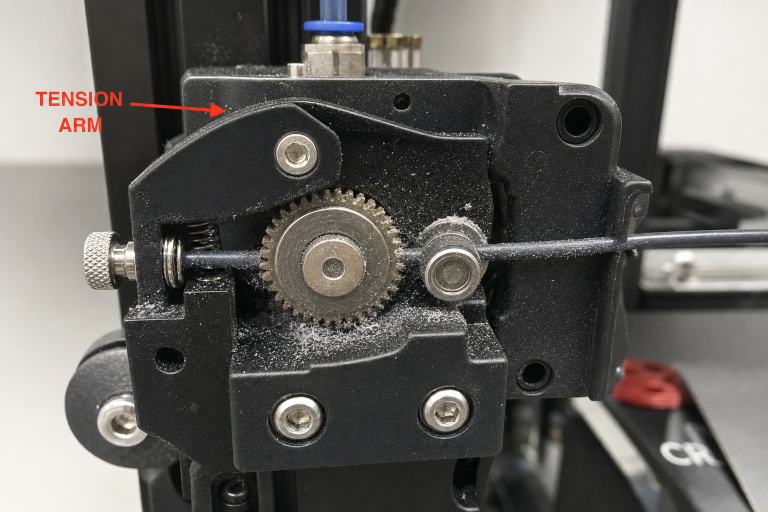
Extruder Tension and Gear Condition
The extruder gear must grip the filament firmly enough to push it through the hotend against resistance. If the tension is too low, the gear slips and under-extrudes. If the gear teeth are packed with filament dust, grip is reduced.
To check, mark the filament with a sharpie about 30mm above the extruder inlet, command a 50mm extrusion, and measure how much filament actually moved past your mark. If less than 50mm moved and the extruder motor was not skipping, the gear is slipping on the filament.
Clean the extruder gear teeth with a small brush—filament dust packs into the teeth and reduces grip over time. Increase extruder tension if your extruder has an adjustment screw, in small increments until the gear grips without grinding. Inspect the gear teeth for wear: brass gears wear visibly over time, especially with abrasive filaments, and steel gears last longer but still wear. If the teeth look rounded or the gripping edges are dull, replace the gear. Check that the idler bearing spins freely—a seized idler bearing prevents the filament from being pressed against the drive gear.
Repeat the marked-filament test to verify. The filament should advance exactly the commanded distance within ±1mm.
E-Steps Calibration
E-steps tell the printer’s firmware how many motor steps correspond to 1mm of filament movement. If this value is wrong, every extrusion command will push the wrong amount of filament. Check this if you have never calibrated E-steps, if you changed extruder hardware, or if the printer is new to you.
Heat the hotend to printing temperature so you measure under normal printing resistance. Mark the filament 120mm above a fixed reference point on the extruder body. Command a 100mm extrusion through the printer interface. Measure the remaining distance from your mark to the reference point. If the mark is 20mm away, 100mm was extruded correctly. If it is 25mm away, only 95mm was extruded—your E-steps are too low.
Calculate the new E-steps value using the formula: (commanded distance ÷ actual distance) × current E-steps = new E-steps. Update the value in your printer’s firmware or save it with an M92 command followed by M500 to store. Repeat the test to verify—the mark should be at the reference point after 100mm of commanded extrusion.
PTFE Tube and Hotend Path
On PTFE-lined hotends, the PTFE tube seats directly against the nozzle inside the heat break. If there is a gap, molten filament fills the space and creates a flow restriction. If the PTFE tube is degraded from heat, the inner diameter can constrict.
Remove the nozzle while the hotend is hot. Push the PTFE tube through the hotend—it should exit cleanly where the nozzle was. Inspect the end of the PTFE tube: it should be cut perfectly square and show no signs of charring, melting, or deformation. If the tube end is darkened, swollen, or misshapen, trim it back to clean material with a PTFE tube cutter. A square cut is essential—do not use scissors. Reassemble by seating the nozzle loosely, pushing the PTFE tube down firmly against it, then heat-tightening the nozzle the final quarter-turn. This ensures a tight seal with no gap.
After reassembly, run the manual extrusion test from the first section. A straight, smooth strand confirms the hotend path is clear.
Heat Creep
Heat creep happens when heat from the hotend travels up the heat break and softens filament too early, before it reaches the melt zone. The softened filament expands, creates friction, and the extruder cannot push it through. This often appears as a print that starts fine and gradually under-extrudes over the first 10–30 minutes.
Check whether the under-extrusion gets worse as the print progresses, whether the extruder motor starts clicking or skipping after the printer has been running for a while, and whether the hotend cooling fan is running at full speed and the heatsink is clean.
Ensure the hotend cooling fan is always running at 100% when the hotend is hot. This fan cools the heat sink, not the part—it should never be off during printing. Clean dust and filament wisps from the hotend heatsink fins. If the problem persists in a warm enclosure, try printing with the enclosure door open or lid off to lower the ambient temperature around the hotend. For all-metal hotends, reducing retraction distance as covered above also reduces the risk of pulling heat up into the cold zone.
Print a test file that takes at least 30 minutes to verify. If the under-extrusion no longer appears mid-print, heat creep was the cause.
When to Stop and Escalate
Some under-extrusion problems are not fixable with cleaning, settings, or routine maintenance. Stop troubleshooting and seek replacement or support if any of the following apply.
The extruder motor itself is failing. If the motor skips steps even with no filament loaded—command an extrusion with the idler released—the motor or driver is faulty.
The hotend heat break is damaged or poorly machined. Internal burrs or rough surfaces inside the heat break create constant flow resistance that no amount of cleaning will fix. Replacing the heat break or hotend is the solution.
The printer’s mainboard or stepper driver is failing intermittently. If extrusion stops completely at random intervals and resumes, and you have ruled out every mechanical cause, the electronics may be at fault. This is rare but worth considering on older machines.
You have replaced the nozzle, PTFE tube, extruder gear, and recalibrated E-steps, and the problem persists across multiple filaments. At this point the issue is beyond home troubleshooting—contact the printer manufacturer’s support or a qualified repair service.
Prevention: Settings and Maintenance That Stop Recurrence
Once you have solved the immediate under-extrusion, a few habits prevent it from coming back.
Clean or replace nozzles on a schedule. Brass nozzles printing standard PLA or PETG last roughly 300–500 print hours before the orifice starts to wear. Abrasive filaments—glow-in-the-dark, carbon-fiber-filled, metal-filled—can wear a brass nozzle in under 50 hours. If you print abrasives, use a hardened steel or ruby-tipped nozzle.
Store filament dry. Even PLA benefits from dry storage. Use sealed containers with desiccant, and dry filament before printing if it has been exposed to ambient humidity for more than a few days.
Calibrate E-steps and flow rate for each new filament type. A profile that works for one PLA may under-extrude slightly with another brand. Running a single-wall calibration print when switching to a new spool catches this before it ruins a real print.
Check extruder tension and gear cleanliness every 100 print hours. Filament dust accumulation is gradual and easy to miss until it causes problems.
Replace PTFE tubes preventively on PTFE-lined hotends every 6–12 months if you print regularly, especially with PETG or higher-temperature materials that accelerate PTFE degradation.
Frequently Asked Questions
How do I tell the difference between under-extrusion and a partial clog?
A partial clog is one cause of under-extrusion, not a separate problem. If the under-extrusion appeared suddenly on a printer that was printing fine before, and the manual extrusion test shows a curling or thin strand, the cause is a partial clog. If the manual extrusion test looks normal but prints still show under-extrusion, the cause is elsewhere—settings, material, or mechanical.
Can under-extrusion damage my printer?
Under-extrusion itself does not damage the printer, but the underlying cause can. A constantly skipping extruder motor can wear the driver or gear over time. A severe clog left unaddressed can lead to filament grinding that fills the extruder with debris. Address the root cause promptly.
Why does my print start fine and then under-extrude halfway through?
This pattern strongly points to heat creep. As the hotend runs, heat gradually travels up the heat break and softens filament too early, increasing friction until the extruder cannot push through. Check the hotend cooling fan, clean the heatsink, and consider reducing retraction distance.
Is under-extrusion always a hardware problem?
No. While the most common sudden-onset cause is a partial nozzle clog—a hardware issue—slicer settings like incorrect filament diameter, low flow rate, or excessive retraction can produce identical symptoms. Always check the nozzle first because it is fastest, but do not assume hardware is the only possibility.
Explore This Topic
- Back to Extrusion Problems
- Back to 3D Printing Troubleshooting Master Guide
Related guides in this cluster:
- Over-Extrusion: Signs Causes & Calibration Fix Guide
- How to Fix 3D Print Warping: PLA PETG ABS Complete Guide
- How to Fix a Clogged 3D Printer Nozzle: Cold Pull & Complete Guide
Ryan has been operating FDM 3D printers since 2017. He runs a 12-machine print farm. His daily drivers include a Bambu Lab X1 Carbon, Prusa MK4s, and Creality Ender-3 V3s that have logged over 15000 print hours. He started 3D Printer Nerd to provide structured troubleshooting guides with diagnostic order, material-specific parameters, and clear stop points.