Ghosting & Ringing: How to Eliminate Surface Artifacts
Ghosting and ringing are surface artifacts caused by printer vibrations that haven’t settled before the nozzle changes direction. The most likely culprit is excessive acceleration or jerk settings combined with a mechanical resonance somewhere in your motion system. You’ll see ghosting as a faint echo of a feature repeated across a surface, while ringing appears as ripples or waves near sharp corners. Most cases are fixable with slicer adjustments, and the ones that aren’t point to specific mechanical issues you can check systematically.
Quick Visual Check: Are You Seeing Ghosting or Something Else?
Before adjusting settings, confirm you’re actually dealing with ghosting or ringing. The symptoms are distinct from other surface defects, and misdiagnosis wastes time.
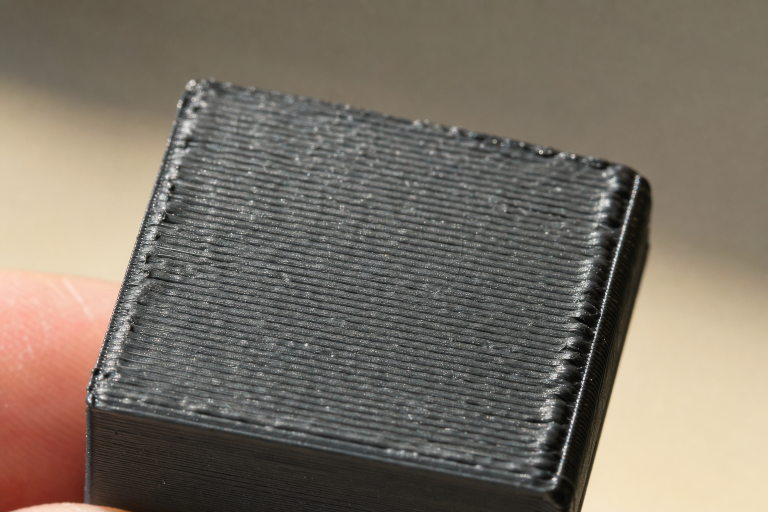
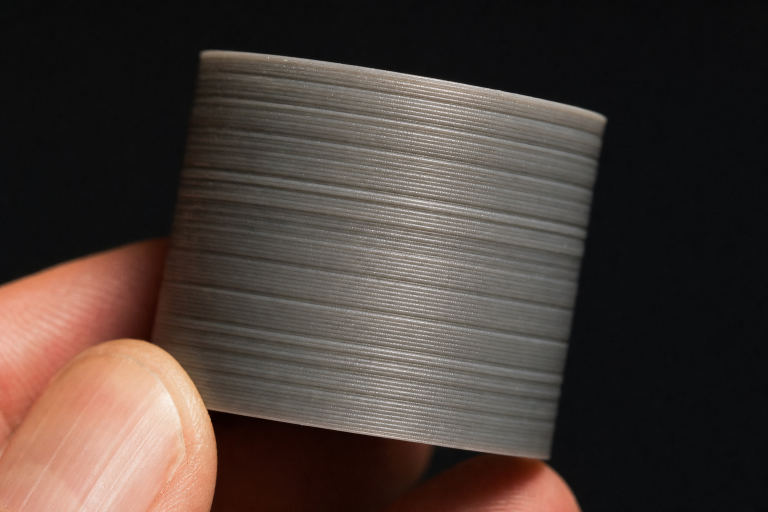
Ghosting looks like a faint copy of a hole, letter, or edge repeated 2–5 mm away from the original feature. The echo appears in the direction of print head travel and fades with distance from the source feature. It’s most visible on flat vertical surfaces.
Ringing looks like ripples or waves radiating outward from sharp corners, creating a washboard-like texture near direction changes. The spacing between ripples is consistent, and the effect is often worse on one axis than the other.
These defects are not ghosting or ringing:
- Z-banding: Horizontal lines at regular layer-height intervals. This is a Z-axis lead screw or temperature fluctuation issue.
- Salmon skin or moiré patterns: Fine diagonal texture, usually caused by stepper driver or microstepping artifacts.
- VFA (vertical fine artifacts): A uniform grid-like pattern tied to stepper motor steps, not direction changes.
If your defect matches the ghosting or ringing description, proceed with the checks below.
The Counter-Intuitive Fix Most Articles Skip
Slowing down your outer wall speed can actually make ghosting worse if you don’t also adjust acceleration.
Ghosting amplitude depends on how much residual vibration exists when the nozzle reaches the next feature. If you reduce outer wall speed but leave acceleration high, the print head still slams into position with the same force — it just spends more time vibrating at the lower speed. The vibration decays at roughly the same rate, but because the nozzle is moving slower, the ghosted echo gets compressed into a shorter distance, making it more visible, not less.
The fix that actually works: reduce acceleration first, then adjust speed. A printer running 500 mm/s² acceleration with 60 mm/s outer walls will almost always produce cleaner surfaces than one running 1000 mm/s² with 30 mm/s walls. Lower acceleration means lower jerk forces, which means less energy to excite resonances in the first place.
What You Need Before Starting
Gather these before you begin adjusting anything. You won’t need every item, but having them ready prevents mid-diagnosis stops.
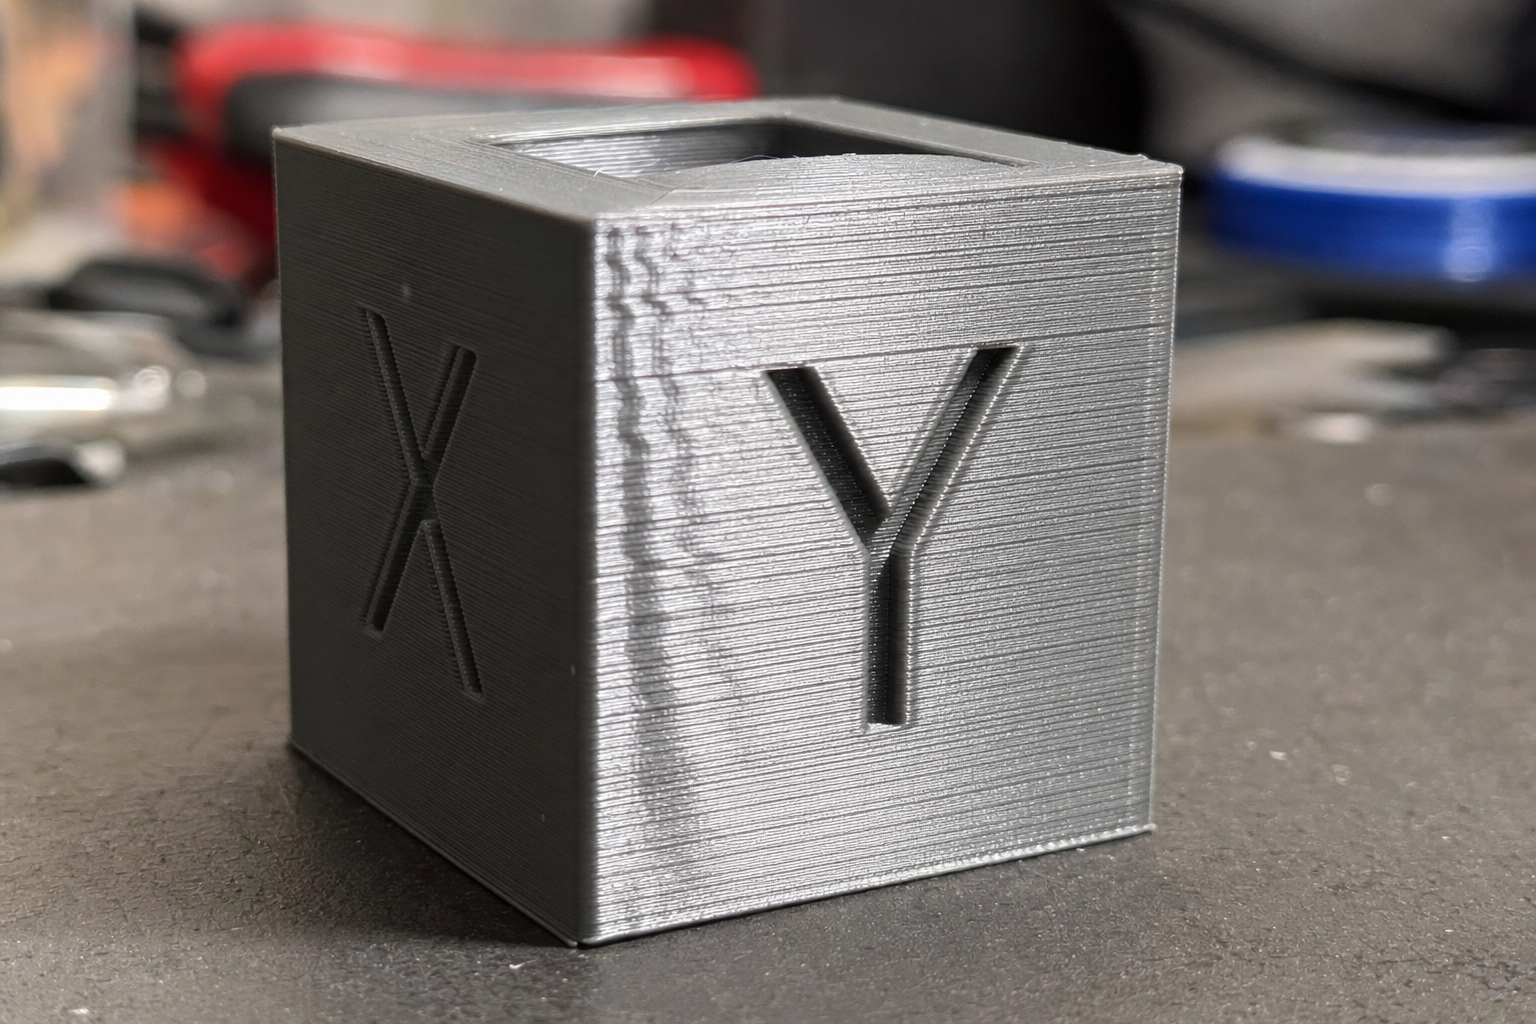
- A calibration print with sharp corners and flat surfaces. A 20 mm XYZ cube works. A dedicated ringing test model with repeated holes or slots along one axis is better because it isolates X and Y artifacts clearly.
- Your slicer’s speed and acceleration settings page open. You’ll change acceleration, jerk, and outer wall speed.
- A way to check belt tension. Your finger and ear are enough. A guitar tuner app on your phone can give you a frequency readout if you want precision.
- The hex keys that came with your printer. You’ll need them for belt tensioning and frame bolt checks.
- Optional: a concrete paver or solid floor space for the isolation test in step 3.
Ordered Fixes: From Fastest to Most Involved
Work through these in order. Test after each change using your calibration print. Don’t change multiple variables at once — you won’t know which one worked.
1. Reduce Acceleration and Jerk in Your Slicer
This is the highest-impact, lowest-effort fix. Start here.
For acceleration, reduce from the typical default of 500–1000 mm/s² down to 300–500 mm/s² for outer walls. Keep inner walls and infill higher if you want to preserve speed. Test in 100 mm/s² increments downward until ghosting disappears.
For jerk, or junction deviation in Klipper, reduce from the typical default of 8–10 mm/s down to 5–7 mm/s. On Klipper, reduce square corner velocity to 3–5 mm/s. Don’t drop below 3 mm/s or you’ll get blobby corners.
Print a calibration cube to verify. Ghosting should visibly reduce or disappear. If it’s unchanged, move to step 2.
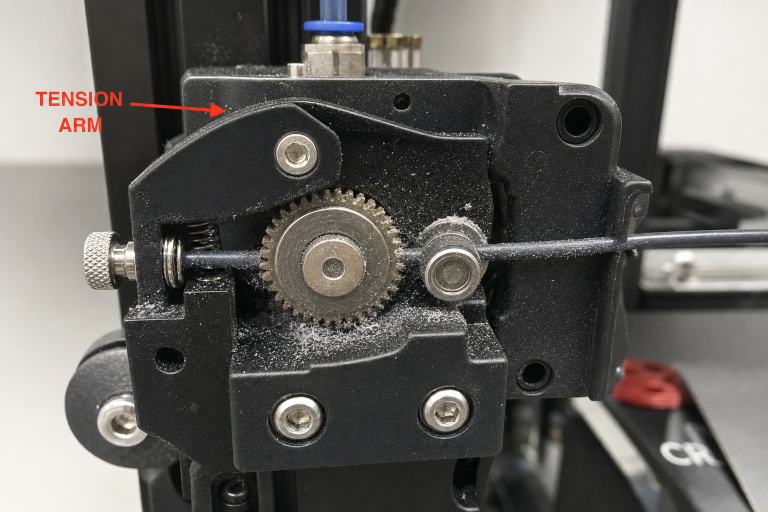
2. Tighten Belts and Check Belt Tension
Loose belts are the second most common cause. A belt that’s even slightly slack acts like a spring, storing and releasing energy as the print head changes direction.
To check tension, pluck the belt like a guitar string. It should produce a low, clear tone around 50–60 Hz, roughly the G string on a bass guitar. If it thuds or rattles, it’s too loose. If it’s piano-wire tight, back off slightly — over-tensioning wears bearings and stepper motors.
Follow this tightening sequence:
1. Loosen the tensioner or motor mount screws.
2. Pull the belt taut by hand.
3. Tighten while maintaining tension.
4. Re-check by plucking.
5. Move the axis by hand. It should feel smooth with no binding.
Re-print your test model. If ghosting improved on one axis but not the other, you’ve found the loose belt. If both axes improved, you had multiple loose belts.
3. Check Frame Rigidity and Surface Stability
Your printer’s frame is the foundation of every motion. Any flex or wobble translates directly into print artifacts.
Check these points:
- Place the printer on a solid surface. A wobbly desk or lightweight table amplifies vibrations. Move the printer to the floor temporarily as a test — if ghosting disappears, your table is the problem. Add a concrete paver under the printer as a cheap, effective fix.
- Check every bolt on the gantry and frame. Even slightly loose bolts on a Prusa-style frame create resonance paths.
- On Cartesian printers, grab the top of the Z uprights and try to wiggle them. Any movement means the frame needs tightening or bracing.
- Inspect V-slot wheels or linear rails. Worn or loose wheels create play. Adjust eccentric nuts until the carriage moves without wobble but doesn’t bind.
The floor test is definitive. If ghosting improves dramatically with the printer on concrete, invest in a paver and foam isolation pad.
4. Reduce Moving Mass Where Practical
Heavier print heads and beds carry more momentum, which means more vibration energy at direction changes.
Direct drive extruders are heavier than Bowden setups. If you’re running direct drive and seeing ghosting, you may need lower acceleration than Bowden users. Glass beds are heavy — if your Y-axis shows worse ghosting than X, the bed mass is a likely contributor. Consider a PEI spring steel sheet instead. Avoid adding weight to the print head with heavy fan ducts, large ABL sensors, or camera mounts unless necessary.
This isn’t a quick fix, but it explains why identical settings produce different results on different printer configurations.
5. Adjust Print Speed Strategically
Speed adjustments work after acceleration is dialed in, not before.
Set outer wall speed to 30–50 mm/s as a safe range for most printers. Inner walls and infill can run faster at 60–100 mm/s since artifacts there don’t affect surface quality. Keep speed changes gradual — large speed differences between features can cause extrusion inconsistencies that look like ringing.
If reducing outer wall speed below 30 mm/s doesn’t help, the problem isn’t speed — it’s mechanical. Return to steps 2 and 3.
When to Use Input Shaping
Input shaping is a firmware-level solution that cancels vibrations by predicting resonance frequencies and applying counter-movements. It’s available in Klipper and recent Marlin builds.
Input shaping helps when you’ve tightened everything and reduced acceleration but still see faint ghosting, when you want to run higher accelerations for speed without sacrificing surface quality, or when your printer has a known resonance frequency you can measure.
To use it, run a resonance test first — Klipper’s accelerometer-based test or a manual ringing tower. Identify the dominant frequency on X and Y axes, typically 30–60 Hz on bed-slingers. Apply the recommended shaper type: MZV or ZV for most printers, EI for smoother motion at a slight speed cost. Re-test and fine-tune.
Input shaping can’t fix loose belts or a wobbly frame. It’s a compensation technique, not a repair. Apply it only after mechanical issues are ruled out.
Material-Specific Considerations
Filament properties affect how visible ghosting appears, even with identical mechanical conditions.
PLA is the most forgiving. It’s stiff and low-shrinkage, so ghosting is usually mechanical, not material-driven. If PLA shows ghosting, your settings or mechanics need work.
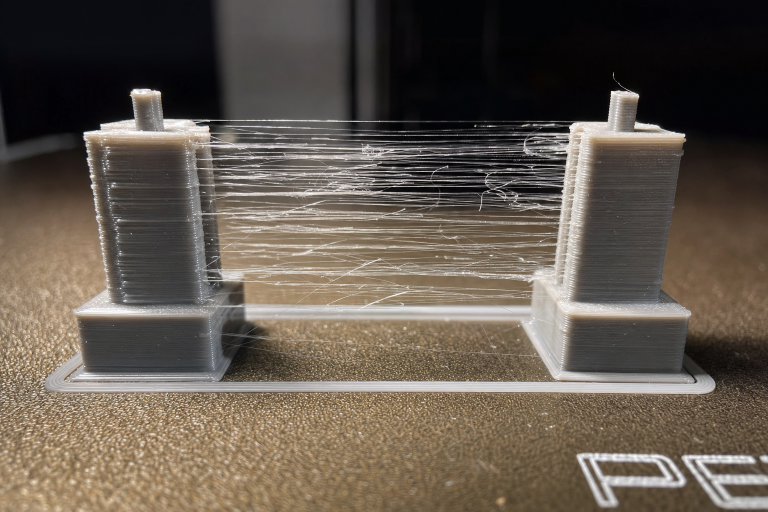
PETG is slightly more flexible than PLA, which can dampen vibrations but also makes surface defects more visible due to its glossier finish. Run 5–10°C cooler than your usual PETG temperature to reduce oozing that can compound with ringing. Thin, hair-like stringing from oozing is a separate defect from ringing, but the two can overlap visually on glossy PETG surfaces. Fix stringing first with a retraction tuning print so you can isolate the ringing component.
ABS and ASA experience thermal contraction during cooling that can amplify the visual impact of ghosting. An enclosure helps by reducing warping forces that interact with vibration artifacts. Reduce part cooling fan to minimum or off.
Flexibles like TPU rarely show ghosting because the material absorbs vibrations. If you see it, your acceleration is far too high for flexible filament. Reduce to 200–300 mm/s².
When to Stop and Check Hardware
Some ghosting problems aren’t fixable through settings. Stop adjusting slicer parameters and inspect hardware if any of these conditions apply.
Ghosting is asymmetric: one axis shows severe ghosting while the other is clean, and belt tension didn’t fix it. Suspect a bent lead screw, damaged linear bearing, or flat spot on a V-slot wheel.
The ghosting pattern changes with print height. If artifacts appear only at certain Z heights, your Z-axis lead screw may be bent or binding. Mark the lead screw with tape and watch for wobble as it rotates.
You hear new noises. Grinding, clicking, or rhythmic thumping during direction changes suggests bearing failure or stepper motor issues.
All slicer adjustments produce zero change. This strongly indicates a mechanical root cause. Re-check every bolt, belt, and bearing before continuing to tweak settings.
Stop DIY troubleshooting and seek support in these situations:
- You’ve completed all five steps above and ghosting is completely unchanged. The printer may have a design-level resonance problem such as thin frame extrusions, undersized motors, or a poor motion system design. Contact the manufacturer or consult model-specific forums with clear photos of your test prints.
- Ghosting appeared suddenly after a long period of clean prints and you’ve already ruled out a slipped belt or loose bolt. A stepper driver or motor may be failing intermittently. Continuing to print without diagnosis can damage other components.
- You notice the ghosting pattern shifts or pulses in a way that correlates with extruder movements rather than axis direction changes. This can indicate a partial clog causing inconsistent extrusion pressure that mimics ringing. Stop and perform a cold pull before continuing mechanical diagnosis.
Success Check: What a Good Print Looks Like
After applying fixes, your calibration print should show sharp corners with no visible ripples extending more than 0.5 mm from the edge, flat surfaces without echo patterns from nearby features, and a consistent surface finish regardless of feature density on the same layer.
A small amount of ringing directly at corners within 0.5 mm is normal on most consumer printers and may not be worth chasing further. The goal is elimination of visible artifacts that degrade the part’s appearance, not laboratory-grade perfection.
Prevention: Settings and Maintenance That Stop Recurrence
Once you’ve eliminated ghosting, lock in these habits to prevent it from returning.
Save a quality slicer profile with your tuned acceleration and jerk values. Use it for cosmetic prints, and keep a faster profile for functional parts where surface finish doesn’t matter.
Check belt tension monthly. Belts stretch slightly over their first 50–100 hours of use, then stabilize.
Re-tighten frame bolts after the first month of printer use. Thermal cycling and vibration loosen factory assembly.
Run a ringing test after any mechanical change: nozzle swap, hotend replacement, bed surface change, or printer relocation. Even small mass changes can shift resonance behavior.
Ghosting and ringing are solvable problems. The path is methodical: reduce acceleration, tighten the mechanical system, verify with test prints, and only then explore firmware compensation. Most printers can produce clean surfaces with the right settings, and now you know exactly which settings to change first.
Explore This Topic
- Back to Print Quality Defects
- Back to 3D Printing Troubleshooting Master Guide
Related guides in this cluster:
- Layer Shift: Causes & Complete Fix Guide for 3D Printing
- 3D Print Blobs & Zits: Retraction & Coasting Fix Guide
- Z-Banding: Diagnose & Fix Inconsistent Layers
Ryan has been operating FDM 3D printers since 2017. He runs a 12-machine print farm. His daily drivers include a Bambu Lab X1 Carbon, Prusa MK4s, and Creality Ender-3 V3s that have logged over 15000 print hours. He started 3D Printer Nerd to provide structured troubleshooting guides with diagnostic order, material-specific parameters, and clear stop points.