Heat Creep: Symptoms Causes & Prevention Guide
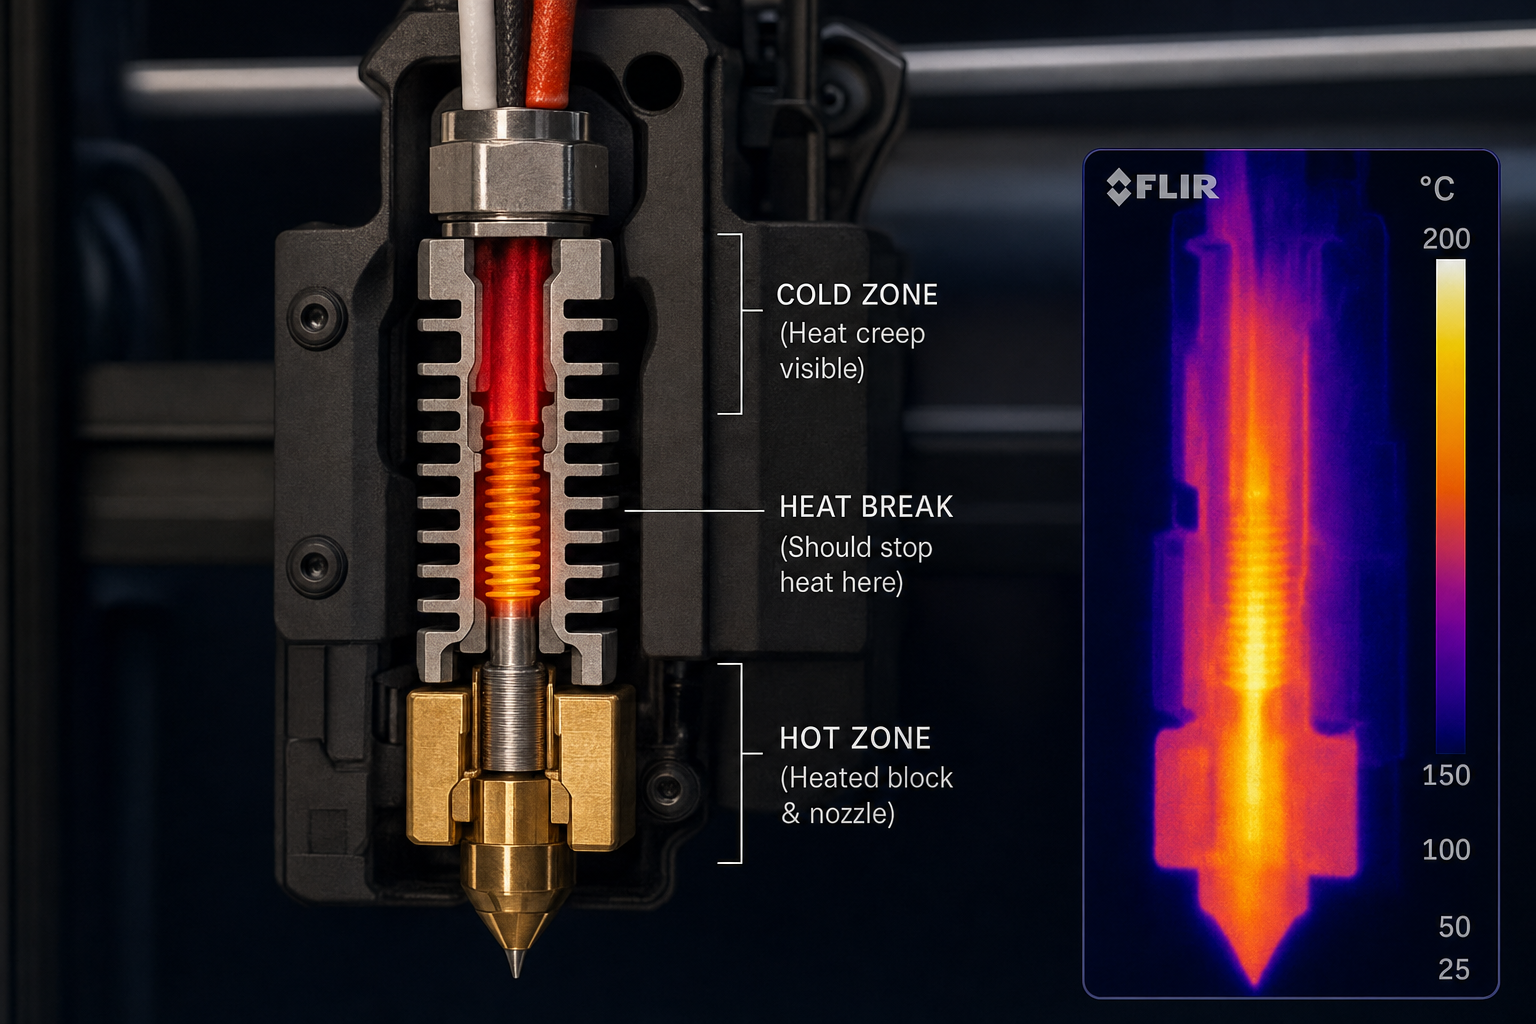
Heat creep is most often caused by insufficient hotend cooling, where heat slowly travels upward from the heater block into the cold zone of the hotend, softening filament before it reaches the melt chamber. The softened filament swells, grips the inner walls of the heatbreak or PTFE liner, and creates a partial or full clog that worsens as the print continues. You can confirm heat creep by checking whether the extruder motor clicks, skips, or grinds filament while the nozzle remains at temperature—and whether the problem only appears 20–40 minutes into a print, not during the first few layers.
Before you change any slicer settings, rule out the fastest mechanical checks first, because heat creep is a thermal path problem, not a retraction problem in its root cause.
Quickest Checks Before Changing Settings
1. Hotend Cooling Fan Operation
The hotend heatsink fan must spin at full speed from the moment the hotend reaches roughly 50°C and must never stop during a print. If the fan hesitates, spins slowly, or makes bearing noise, the cooling boundary that keeps the heatbreak cold is already compromised. Check whether the fan is wired to a constant 12V or 24V terminal (not a part-cooling fan port that ramps up and down). A fan wired to the wrong output will only run when the part-cooling fan is active, leaving the heatsink uncooled during the first layers and causing delayed clogs.
2. Airflow Direction and Shroud Integrity
The fan must blow air onto the heatsink fins, not pull air away. A reversed fan orientation or a cracked shroud that leaks air away from the fins reduces cooling enough to let heat travel upward. With the hotend at printing temperature, hold a small strip of paper near the heatsink—it should be pulled toward the fan, confirming intake airflow through the heatsink. If the paper flutters away or barely moves, the cooling path is wrong.
3. Thermal Paste and Heatbreak Seating
On all-metal hotends, the heatbreak threads that screw into the heatsink benefit from a thin layer of boron nitride thermal paste. Without it, the thermal transfer from the heatbreak to the heatsink is poor, and heat accumulates in the cold zone. If you recently reassembled the hotend, check that the heatbreak is fully seated and that the thermal paste hasn’t dried out or been omitted.
| Check | What to Look For | Quick Fix |
|---|---|---|
| Heatsink fan | Spins at full speed, never stops during print | Rewire to constant voltage terminal if needed |
| Fan orientation | Air blows onto fins, not away | Flip fan or verify sticker side faces heatsink |
| Shroud condition | No cracks, air directed through fins | Replace or tape-seal cracked shroud |
| Thermal paste | Thin layer on heatbreak threads | Apply boron nitride paste, re-seat heatbreak |
| Heatbreak seating | Fully threaded into heatsink, no gap | Tighten while hot (final torque at 220°C+) |
How Heat Creep Differs from Other Clogs
Heat creep clogs follow a predictable pattern that distinguishes them from nozzle clogs, cold-end jams, or retraction problems:
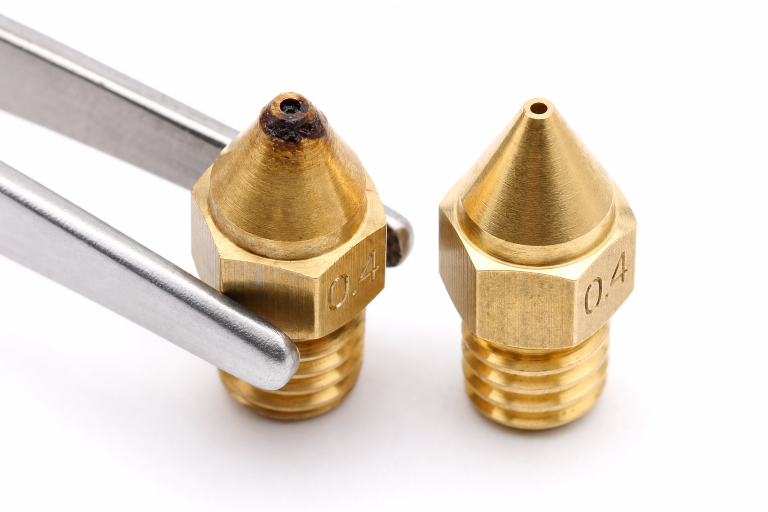
Timing: Heat creep clogs almost never appear in the first 10–15 minutes. The hotend needs time to saturate with heat before the cold zone warms enough to soften filament. If your print fails reliably at layer 30–50 or after 30–45 minutes, heat creep is the prime suspect. A nozzle clog from debris or burnt filament typically appears immediately or randomly, not on a timer.
Recovery behavior: When heat creep clogs the hotend, you can often resume printing by letting the hotend cool completely, then reheating and manually pushing filament through. The softened plug re-melts and clears. A true nozzle clog from carbonized material or a foreign particle won’t clear this way—it requires a cold pull or nozzle replacement.
Extruder symptoms: The extruder motor clicks or skips because it cannot push softened, swollen filament through the heatbreak. You may also see filament dust or shavings around the extruder gear from grinding. This grinding happens because the filament is soft well above the melt zone, not because of excessive tension or a nozzle blockage.
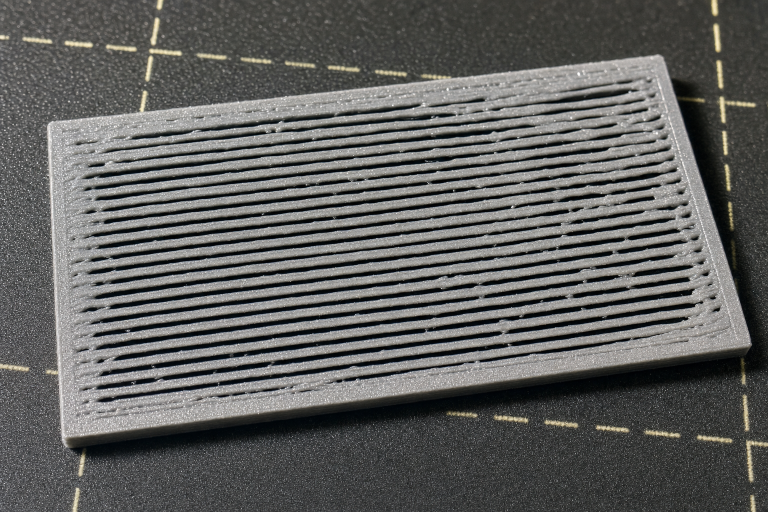
Visual evidence on the filament: If you stop a print mid-clog and quickly withdraw the filament, the end will appear swollen or mushroomed, often with a diameter larger than the filament’s nominal 1.75mm. The swollen section may extend 10–20mm above the heatbreak, showing exactly where the cold zone failed.
Likely Causes Ordered by Frequency
1. Insufficient Heatsink Cooling (Most Common)
The heatsink fan isn’t moving enough air, or the air isn’t reaching the fins. This accounts for the majority of heat creep cases, especially on printers where the stock hotend fan is a low-quality sleeve-bearing unit that degrades over months of use. A fan that still spins may have lost 30–40% of its airflow due to bearing wear or dust buildup on the blades and fins.
2. Excessive Retraction Distance
Retraction pulls hot filament up into the cold zone. If retraction distance exceeds roughly 4–5mm on a direct-drive setup or 6–7mm on a Bowden setup (with an all-metal hotend), each retraction deposits a small amount of heat higher in the heatbreak. Over dozens of retractions, this cumulative heat softens filament where it shouldn’t. This is why heat creep often correlates with retraction-heavy sections of a print—many small features, supports, or frequent travels.
3. High Ambient Temperature or Enclosure Heat
Printing PLA in a fully enclosed chamber with no ventilation can raise the ambient temperature around the hotend to 40–50°C. The heatsink fan is now blowing warm air onto the fins, reducing the temperature gradient that keeps the cold zone cold. This is especially problematic on printers with the electronics and hotend inside the same enclosed volume, where the bed heater and electronics both contribute to chamber temperature.
4. Printing Too Hot for the Material
Every filament has a temperature ceiling above which the hotend struggles to maintain a sharp thermal transition. Printing PLA at 220–230°C when the manufacturer recommends 190–210°C pushes more heat into the system. Combined with a marginal cooling setup, this extra 10–20°C can be the difference between a clean print and a mid-print clog. The hotter the heater block, the harder the heatsink must work to contain that heat.
5. Worn or Low-Quality PTFE Liner (Lined Hotends)
On hotends with a PTFE liner that extends through the heatbreak to the nozzle, the liner degrades over time. PTFE begins to break down above 240°C, but even at lower temperatures, repeated thermal cycling causes the liner to shrink, deform, or develop internal roughness. A degraded liner increases friction and reduces the inner diameter, making the hotend more susceptible to heat creep clogs even when cooling is adequate.
Ordered Fixes: Start Here and Work Down
Fix 1: Verify and Restore Cooling Performance
Action: Inspect the heatsink fan, shroud, and airflow path. Replace any fan that doesn’t spin at full speed or makes bearing noise. A 40mm axial fan with a minimum airflow rating of 5–7 CFM is adequate for most hotends; a 40x20mm thick fan provides more pressure through dense heatsink fins than a 40x10mm slim fan. Clean dust from the heatsink fins with compressed air or a small brush.
Verification: Print a test cube or benchy and monitor the fan continuously. The print must complete without extruder clicking. If the problem persists, move to Fix 2.
Decision branch after this fix: If the heatsink fan spins at full speed and airflow direction is correct, but the heatsink fins still become too hot to touch after 15–20 minutes of printing, the issue is not the fan itself—it’s likely a thermal transfer problem between the heatbreak and the heatsink. In that case, skip Fix 2 and Fix 3 temporarily and go directly to inspecting the heatbreak seating and thermal paste condition described in Fix 5. A heatbreak that isn’t making solid thermal contact with the heatsink will stay hot regardless of how much air you blow across the fins, and no amount of retraction or temperature tuning will compensate for that missing thermal bridge.
Fix 2: Reduce Retraction Distance
Action: Lower retraction distance by 0.5–1mm from your current setting. For a direct-drive all-metal hotend, start at 0.5–1.5mm. For a Bowden all-metal hotend, start at 3–4mm. Lined hotends can typically handle 1–2mm more retraction than all-metal equivalents, but the principle is the same: use the shortest retraction that prevents stringing.
Verification: Print a stringing test model (two thin towers 20–30mm apart). Adjust retraction distance downward in 0.5mm increments until stringing is just controlled. Do not chase zero stringing at the cost of retraction distance—a few wispy strings are safer than a clogged hotend. If you need more than 4mm retraction on an all-metal direct-drive setup to control stringing, the root cause is likely temperature or cooling, not retraction.
Fix 3: Lower Print Temperature
Action: Print a temperature tower for your specific filament. Start at the low end of the manufacturer’s recommended range and increase in 5°C increments. Choose the lowest temperature that produces strong layer adhesion and acceptable surface finish. For PLA, this is often 190–200°C rather than the 210–220°C that many default profiles use.
Verification: Break the temperature tower at each temperature segment. The lowest temperature that doesn’t snap cleanly along layer lines is your minimum viable temperature. Print at this temperature plus 5°C for a safety margin. If you can print 10–15°C cooler than your previous setting, heat creep margin improves significantly.
Fix 4: Improve Enclosure Ventilation (If Applicable)
Action: If printing PLA in an enclosure, open the door or remove the top panel. PLA does not require an enclosure and prints better with active cooling and low ambient temperatures. For materials that do require an enclosure (ABS, ASA, nylon), ensure the electronics and hotend cooling fan are not recirculating only hot chamber air. Some printers benefit from a dedicated fresh-air duct to the hotend fan intake.
Verification: Monitor chamber temperature with a thermometer. For PLA, keep the chamber below 35°C. If the chamber exceeds 40°C, heat creep risk increases sharply regardless of other fixes.
Fix 5: Replace PTFE Liner or Upgrade to All-Metal
Action: On a lined hotend, disassemble the hotend and inspect the PTFE liner. If the end that contacts the nozzle shows discoloration, deformation, or a reduced inner diameter, cut a fresh piece of high-quality PTFE tubing (Capricorn XS or equivalent) with a perfectly square end using a dedicated cutting jig. Seat it firmly against the nozzle by tightening the nozzle against the liner at printing temperature.
Verification: After reassembly, the filament should slide through the cold hotend with minimal resistance. If you feel a catch or rough spot where the liner meets the nozzle, the liner isn’t seated correctly and will cause a new clog point.
When a Fix Appears to Work but the Problem Returns
A common failure pattern with heat creep is the “one-print fix”—you adjust retraction or clean the fan, the next print completes perfectly, and you assume the problem is solved. Then the clog returns two or three prints later. This happens because partial fixes lower the thermal load just enough to survive a shorter or less retraction-heavy print, but the underlying cooling deficit remains. The hotend is still running right at the edge of its thermal limit, and any variable that tips it over—a slightly warmer room, a model with more retractions, a few extra degrees of nozzle temperature—triggers the clog again.
To avoid this cycle, test any fix with a print that is at least as long and retraction-heavy as the print that originally failed. A 30-minute calibration cube won’t expose a heat creep problem that only appears at the 45-minute mark. Use the same model that failed, or slice a tall, thin tower with frequent travels between two columns to stress-test the hotend’s thermal stability. If the fix survives that stress test, it’s a genuine solution rather than a temporary reprieve.
When to Stop and Escalate
Stop self-troubleshooting and consider professional support or part replacement if:
- You’ve completed all five fixes and clogs still occur at the 30–45 minute mark. This suggests a hotend design limitation rather than a settings or maintenance issue. Some budget hotends have heatsinks that are simply too small to handle extended prints at normal speeds.
- The heatsink becomes too hot to touch during printing. A properly cooled heatsink should remain warm but not painfully hot. If you cannot hold a finger on the heatsink fins after 20 minutes of printing, the cooling system is fundamentally inadequate. This is your clearest stop threshold: a heatsink that burns to the touch means the cold zone has failed as a thermal barrier, and no slicer adjustment will restore it. At this point, you need a hardware upgrade—a larger heatsink, a higher-CFM fan, or a hotend replacement—not more tuning.
- The hotend fan is running correctly, but the heatsink still overheats. This may indicate a partial blockage inside the heatbreak (burned filament residue) that insulates the cold zone and prevents proper thermal transfer to the heatsink. Disassembly and thorough cleaning or heatbreak replacement is required.
- You’re using a printer model known for heat creep issues even after community-recommended fixes. Some hotend designs have inherent thermal path problems that aftermarket heatbreaks, better fans, or hotend swaps are the only lasting solutions for. Check your printer’s community forums for model-specific upgrade paths.
Prevention: Settings and Maintenance That Stop Recurrence
Set a retraction distance ceiling for each material. Write down the maximum retraction distance that works without clogs for PLA, PETG, and TPU on your specific printer. Never exceed these values even if a different filament brand strings more—fix stringing with temperature and travel speed first.
Replace the heatsink fan annually or at the first sign of bearing noise. Sleeve-bearing fans have a finite lifespan, and the slow degradation of airflow is easy to miss until prints start failing. A dual-ball-bearing fan lasts longer and provides more consistent airflow over its life.
Clean heatsink fins every 200–300 print hours. Dust and micro-filament particles accumulate between fins and reduce cooling efficiency gradually. A clean heatsink can be the difference between marginal and reliable cooling.
Avoid leaving the hotend at printing temperature while idle. If a print is paused or you’re adjusting settings between prints, drop the hotend temperature to 150–160°C or lower. Soaking at full printing temperature with no filament moving through the hotend accelerates heat creep into the cold zone and can degrade PTFE liners faster.
Print a temperature tower for every new filament brand and material combination. Even two PLAs from different manufacturers can have optimal temperature ranges that differ by 10–15°C. The tower gives you a hard number to set in your profile rather than guessing from the spool label.
Heat creep is a thermal management problem with a finite set of causes. The fix path is systematic: confirm cooling, reduce retraction, lower temperature, check the environment, and inspect the hotend internals. If you work through these in order, you’ll either solve the problem or identify that your hardware needs an upgrade—and you’ll know which upgrade is actually required.
Explore This Topic
- Back to Extrusion Problems
- Back to 3D Printing Troubleshooting Master Guide
Related guides in this cluster:
- Over-Extrusion: Signs Causes & Calibration Fix Guide
- Under-Extrusion: Symptom → Cause → Complete Fix Guide
- Extruder Clicking & Skipping: Complete Diagnosis Guide
Ryan has been operating FDM 3D printers since 2017. He runs a 12-machine print farm. His daily drivers include a Bambu Lab X1 Carbon, Prusa MK4s, and Creality Ender-3 V3s that have logged over 15000 print hours. He started 3D Printer Nerd to provide structured troubleshooting guides with diagnostic order, material-specific parameters, and clear stop points.