PLA Filament Guide: Everything Beginners Need to Know
PLA is the filament every beginner should start with because it prints easily at low temperatures, doesn’t require an enclosure, and sticks reliably to most build surfaces without fuss. If you’ve just unboxed your first printer, PLA gives you successful prints while you learn bed leveling, first-layer squish, and slicer settings—without the warping, toxic fumes, or adhesion battles that come with PETG, ABS, or TPU.
What makes PLA genuinely beginner-friendly isn’t just the low nozzle temperature. It’s the combination of wide print-temperature tolerance, near-zero warping tendency, and compatibility with virtually every budget printer on the market. You can print PLA on a stock Ender 3, a Prusa Mini, a Bambu A1, or any sub-$300 machine without modifications. That’s not true for any other common filament.
What You Need Before Your First PLA Print
Before you load that first spool, make sure you have three things ready. Skipping any of these turns a simple first print into unnecessary frustration.
A clean build plate. Whether it’s PEI, glass, or the stock surface that came with your printer, wash it with warm water and dish soap, then dry it with a lint-free cloth. Finger oils are the number one adhesion killer for PLA, and a brand-new build plate often ships with manufacturing residue that prevents sticking. Don’t trust the “pre-cleaned” claim on the packaging.
A calibrated first layer. PLA is forgiving, but it won’t compensate for a nozzle that’s too high or too low. If you haven’t set your Z-offset yet, do it now with the paper method: home the printer, place a sheet of standard printer paper under the nozzle, and lower the Z-offset until the paper drags with noticeable resistance but still moves. The nozzle should lightly grip the paper, not pin it down. If your printer has automatic bed leveling, run the mesh calibration before your first print.
A slicer profile set for PLA. Most slicers ship with a generic PLA profile. Use it, but verify three settings before slicing: nozzle temperature at 200°C, bed temperature at 55°C, and part cooling fan at 100% from layer 2 onward. The default profiles in PrusaSlicer, Cura, and Bambu Studio are solid starting points—don’t chase custom profiles until you’ve run at least one successful print on defaults.
Dialing In Your PLA Settings: A Step-by-Step Sequence
Start with these numbers, then adjust based on what you see in the print. The goal is to get a clean first layer and strong layer bonding without stringing or overheating artifacts.
Step 1: Set Your Baseline Temperatures
Load PLA and set the nozzle to 200°C and the bed to 55°C. These numbers work for standard PLA from eSun, Overture, Hatchbox, Polymaker, and most other reputable brands. The full usable range for PLA is 190°C–220°C, but 200°C–210°C covers 90% of spools.
If you’re using PLA+ or a “tough” PLA variant, start at 210°C. Silk PLA needs 210°C–220°C and slower speeds because the elastomeric additives reduce layer adhesion at standard PLA temperatures.
Step 2: Print a Temperature Tower
Slice a temperature tower that steps down from 220°C to 190°C in 5°C increments. Most slicers have a built-in temperature tower calibration in their add-on or script menus. Print it with your baseline settings and inspect each section:
- Too cold (usually 190°C–195°C): The surface looks matte and rough, layer lines are pronounced, and the tower sections snap easily when you try to break them.
- Too hot (usually 215°C–220°C): The surface looks glossy or blistered, fine details sag, and you see stringing between tower segments.
- Just right (usually 200°C–210°C): The surface is smooth with a slight satin finish, details are sharp, and the tower sections resist breaking when you bend them by hand.
Pick the lowest temperature that still gives strong layer adhesion. Running hotter than necessary increases stringing and risks heat creep in long prints.
Step 3: Tune Retraction for Clean Prints
If your temperature tower shows stringing even at the optimal temperature, adjust retraction. PLA typically needs 0.8–1.2mm of retraction distance on a direct-drive extruder and 4–6mm on a Bowden setup. Retraction speed should be 25–45mm/s.
Print a retraction test (two small towers spaced 20mm apart) and increase retraction distance in 0.5mm increments until stringing disappears. If you reach 2mm on direct drive or 7mm on Bowden and still have stringing, the problem is likely wet filament or excessive nozzle temperature, not retraction settings.
Step 4: Verify First-Layer Adhesion with a Live Test
Slice a single-layer 50mm square and watch it print. The lines should squish together with no gaps between them, and the surface should feel smooth when you run a fingernail across it. If you see ridges between lines, the nozzle is too close. If you see gaps or the lines don’t connect, the nozzle is too high. Adjust Z-offset in 0.02mm increments while the square prints until the surface is uniform.
Step 5: Confirm Your Settings with a Calibration Cube
Print a standard 20mm calibration cube. When it finishes, check three things:
1. Dimensional accuracy: Measure the cube with calipers. It should be within ±0.2mm of 20mm on all axes. If it’s off by more than that, check belt tension and steps-per-mm calibration—not the filament settings.
2. Layer adhesion: Squeeze the cube hard between your fingers along the layer lines. If it cracks or splits, raise nozzle temperature by 5°C and reprint.
3. Top surface: The top layer should be smooth with no gaps between lines and no ridges from over-extrusion. If the top is rough, adjust flow rate in 2% increments.
If the cube measures accurately, feels solid, and has a clean top surface, your PLA profile is ready for real prints.
What to Do When the First Layer Won’t Stick
PLA adhesion problems almost always trace back to one of four causes. Work through these in order before changing filament or slicer settings.
Clean the bed first. Even if it looks clean, wash it with dish soap and warm water. Isopropyl alcohol removes surface dust but doesn’t break down finger oils the way soap does. If you’ve been handling the build plate, assume it’s contaminated.
Check Z-offset with a first-layer test print. The paper method gets you close, but a live first-layer square tells you the truth. If the filament isn’t squishing into the bed surface, lower the Z-offset in 0.02mm steps until adjacent lines merge without creating ridges.
Verify actual bed temperature. Some printers report 55°C at the thermistor but deliver 10°C less at the build surface, especially on glass beds. If you have an IR thermometer, check the bed surface temperature. If it’s below 45°C, increase the set temperature until the surface reads 50°C–55°C.
Slow down the first layer. Set first-layer speed to 20–25mm/s in your slicer. Faster first layers give the filament less time to bond to the surface, and PLA’s low viscosity at printing temperature means it needs that dwell time.
Branch point—what you see determines the next move:
- If the filament curls up behind the nozzle as it prints, the bed is too cold or the nozzle is too high. Raise bed temperature by 5°C and lower Z-offset by 0.04mm, then reprint the first-layer test.
- If the filament lays flat but peels up at the edges during the print, you have a draft or an uneven bed temperature. Shield the printer from air currents (a cardboard box around the printer works as a temporary draft shield) and add a 5mm brim in your slicer. If peeling continues, apply a thin layer of glue stick to the bed—PLA on clean PEI should not need it, but a worn PEI surface or a cold room can change that.
- If the filament sticks in some areas but not others, your bed isn’t level or the surface is uneven. Re-run bed leveling, and if your printer has a mesh bed leveling system, increase the mesh probe points to 5×5 or 7×7 for better compensation.
Stop and check your hardware if you’ve cleaned the bed, verified Z-offset, confirmed bed temperature, slowed the first layer, and added an adhesion aid—and PLA still won’t stick. A warped build plate, a worn-out PEI sheet, or a partially clogged nozzle can all cause persistent adhesion failure that no slicer setting will fix. Replace the build surface or clear the nozzle before continuing.
Bed Surface Compatibility: What PLA Sticks To
PLA’s low thermal expansion means it doesn’t fight the build plate as it cools. Adhesion problems are rare compared to ABS or nylon, but surface choice still matters for first-layer reliability and bottom-surface finish.
| Surface | Adhesion with PLA | Release After Cooling | Best For |
|---|---|---|---|
| Smooth PEI (heated) | Excellent | Self-releases | General use, smooth bottom finish |
| Textured PEI (heated) | Excellent | Self-releases | Hiding first-layer lines |
| Glass with glue stick | Good | Requires scraper | Large flat parts |
| Blue painter’s tape | Good | Peels off with tape | Unheated beds, emergency backup |
| Garolite/G10 | Good | Self-releases | Smooth finish without consumables |
| BuildTak or similar | Excellent | Moderate force needed | Stock printer surfaces |
The practical recommendation: If your printer came with a PEI-coated spring steel sheet, use it at 55°C and don’t add glue stick or tape. PLA sticks well to clean PEI and releases on its own once the bed cools below 30°C. For glass beds, a thin layer of glue stick or a light mist of hairspray prevents both adhesion failures and the opposite problem—PLA bonding too aggressively to bare glass and taking chips out of the surface during removal.
Storage Requirements: How PLA Reacts to Moisture
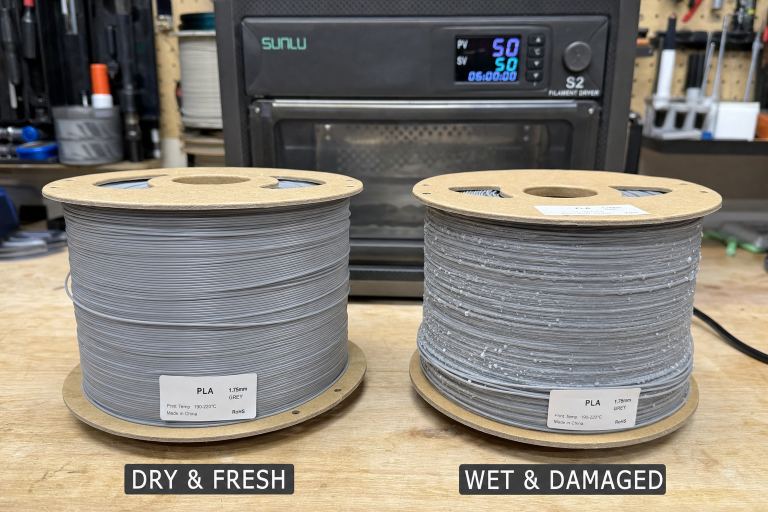
PLA is less hygroscopic than PETG, TPU, or nylon, but it’s not immune to moisture. The common belief that PLA doesn’t absorb water is wrong—it does, just more slowly.
What moisture-damaged PLA looks like in a print: You’ll hear popping or hissing from the nozzle during extrusion, see small pits or gaps in the printed walls, and notice inconsistent extrusion width. Severely wet PLA also becomes brittle on the spool, snapping during handling or mid-print.
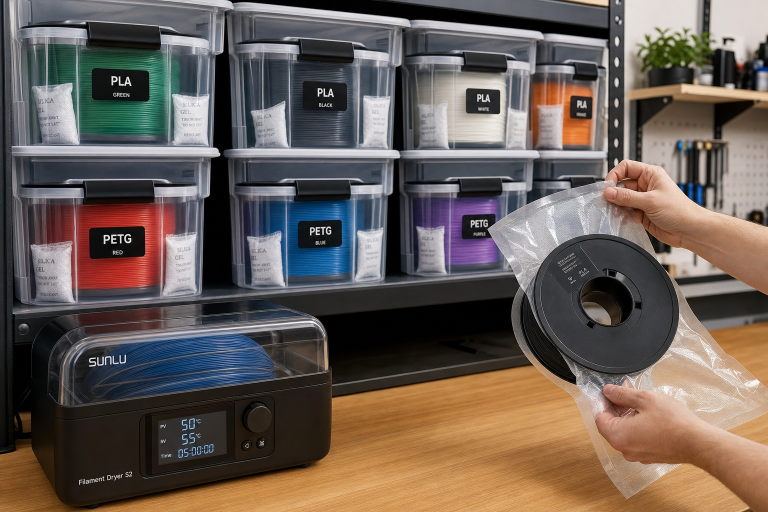
Storage threshold: PLA stored in ambient humidity above 40–50% RH for weeks will eventually show moisture effects. If you live in a humid climate or print infrequently, store spools in a sealed container with desiccant.
Drying PLA: 45°C–50°C in a filament dryer or food dehydrator for 4–6 hours restores print quality. Do not dry PLA above 55°C—you risk softening the filament on the spool and causing deformation that leads to inconsistent diameter and feed problems. Most dedicated filament dryers have a PLA preset that hits the right range.
The beginner’s rule of thumb: If you’re printing through a spool within a month and live in a moderate climate, you can leave PLA on the printer without a dry box. If spools sit for months or you’re in a coastal or humid region, invest in a $30–$50 filament dryer and use it before printing, not just for storage.
PLA’s Real-World Limitations: When It’s the Wrong Material
PLA’s ease of printing comes with trade-offs that matter once you move beyond decorative prints and prototypes. Knowing these limits before you start a project saves you from discovering them the hard way.
Low heat resistance. PLA begins to soften around 50°C–60°C. A PLA part left in a hot car on a summer day, placed near a heat source, or used in direct sunlight will deform. If your print needs to survive boiling water, a dishwasher cycle, or a hot engine bay, PLA is the wrong choice—use PETG (70°C–80°C softening) or ABS/ASA (90°C+).
Brittleness under load. PLA is stiff and strong in compression, but it fractures rather than bending under impact or sustained load. Functional parts that need to flex, absorb shock, or survive drops should be printed in PETG or TPU. PLA hooks, clips, and snap-fit joints will eventually crack, especially if printed with low wall counts or minimal infill.
Poor outdoor durability. PLA degrades slowly under UV exposure and moisture, losing mechanical strength over months of outdoor use. It’s not suitable for garden fixtures, automotive exterior parts, or anything that lives outside. ASA or PETG are the correct outdoor materials.
Not food-safe in practice. While PLA itself is made from cornstarch and is technically food-grade as a raw material, FDM-printed PLA parts have microscopic layer lines that trap bacteria and cannot be effectively cleaned. The brass nozzles most printers use also introduce trace lead into the print. Do not use PLA prints for food contact, even if the filament spool says “food-safe.”
When PLA Is the Right Choice vs. When to Switch
This is the single most important judgment call for a beginner moving beyond decorative prints. Use this rule:
- Choose PLA if your part lives indoors at room temperature, doesn’t bear sustained load or impact, and won’t touch food or liquid. This covers figurines, cosplay props, desk organizers, prototype fit-checks, and most hobby prints.
- Switch to PETG if your part needs any one of the following: heat resistance above 60°C, impact toughness, outdoor exposure, or contact with water. PETG prints on most stock printers without an enclosure and is the natural next step after PLA.
- Skip PLA entirely if the part is structural, load-bearing, or safety-critical. PLA’s brittleness makes it a poor choice for anything that could fail and cause damage or injury.
Brand Recommendations: Quality Tiers That Actually Matter
PLA filament quality varies meaningfully between brands, and the price difference between budget and premium PLA is small enough that beginners should avoid the cheapest options.
Top-tier, consistent, worth the price ($20–$30/kg): Polymaker PolyTerra and Polylite PLA, Hatchbox PLA, Prusament PLA, Overture PLA Professional. These brands deliver consistent diameter (±0.03mm or better), reliable color matching spool-to-spool, and minimal clogging issues. Prusament is the gold standard for dimensional accuracy but costs more and ships from Europe. Polymaker PolyTerra prints at slightly lower temperatures (190°C–210°C) and has a matte finish that hides layer lines well.
Good budget options ($15–$20/kg): eSun PLA+, Overture standard PLA, Sunlu PLA, IIIDMAX PLA+. eSun PLA+ is the standout here—it prints reliably at 205°C–215°C, has slightly better impact resistance than standard PLA, and is widely available. Overture’s cardboard spools are a plus if you want to avoid plastic waste, but the filament itself is unremarkable beyond being consistent.
Avoid: No-name PLA from Amazon or AliExpress sold at $8–$12/kg with no brand reputation. These spools frequently have diameter inconsistency (±0.1mm or worse), contamination that causes clogs, and color variation mid-spool. The $5–$10 saved isn’t worth the failed prints and troubleshooting time when you’re learning.
Silk, marble, and specialty PLAs: These look great but print differently. Silk PLA (often branded as “silk gold” or “silk silver”) contains elastomeric additives that reduce layer adhesion—print it hotter (210°C–220°C) and slower (40–50mm/s) than standard PLA, and don’t use it for structural parts. Marble and glitter-filled PLAs are abrasive and will wear out a standard brass nozzle within a single spool; use a hardened steel nozzle if you plan to print these regularly.
Print Difficulty and What Beginners Should Tackle First
PLA is the only material rated beginner across the board. The difficulty gap between PLA and the next easiest material (PETG) is real—PETG requires precise first-layer Z-offset adjustment to avoid nozzle buildup, is more hygroscopic, and strings more aggressively.
Your first 5–10 prints should all be PLA. Learn bed leveling, first-layer squish, retraction tuning, and support settings on PLA before attempting PETG, TPU, or ABS. The skills transfer, but the frustration level doesn’t.
Once you’re comfortable with PLA, the natural progression is:
1. PLA+ (same settings, slightly better toughness)
2. PETG (higher temperatures, more adhesion challenges, better durability)
3. TPU (flexible, slow print speeds, direct-drive extruder strongly recommended)
4. ABS/ASA (enclosure required, fumes require ventilation, high warping tendency)
Safety Notes Specific to PLA
PLA is the safest common filament for indoor printing without ventilation. It emits primarily lactide, a compound with low acute toxicity, and does not produce the styrene fumes associated with ABS or ASA. The smell during printing is faint and often described as slightly sweet.
That said, PLA printing still generates ultrafine particles (UFPs) and volatile organic compounds (VOCs) at levels that warrant basic precautions. Print in a room with some airflow, don’t hover your face directly over the printer for hours, and if you’re running multiple printers in a small space, add a HEPA air purifier or vent the room. The risk is low compared to ABS, but it’s not zero.
Frequently Asked Questions
Can PLA be glued or painted?
Yes. Cyanoacrylate (super glue) bonds PLA well for joining parts. For painting, PLA takes acrylic paints and spray primers without issue. Light sanding with 120–220 grit improves paint adhesion, and a filler primer hides layer lines before painting.
Does PLA need a heated enclosure?
No. PLA prints best in an open frame with the part cooling fan at full speed. An enclosure can cause heat creep and clogs with PLA because the ambient temperature rises and softens the filament before it reaches the melt zone.
How long does a PLA print last?
Indoors, away from heat and UV, PLA prints last years without meaningful degradation. Outdoors or in hot environments, expect deformation or embrittlement within weeks to months.
Can I anneal PLA for better heat resistance?
Yes, but it’s unreliable. Annealing PLA at 80°C–100°C for 30–60 minutes can raise its heat deflection temperature, but the part will shrink non-uniformly, often warping in the process. If you need heat resistance, switching to PETG or ABS is more reliable than trying to anneal PLA.
Is PLA biodegradable in a home compost?
No. PLA requires industrial composting conditions with sustained 60°C+ temperatures and specific microbial environments to break down. It will not degrade meaningfully in a backyard compost pile or landfill.
Explore This Topic
- Back to General Filament Guide
- Back to Complete 3D Printer Filament & Material Guide
Related guides in this cluster:
- PLA vs PETG vs ABS vs TPU: Complete Filament Comparison
- PETG Filament Guide: The Sweet Spot Material for 3D Printing
- How to Fix 3D Print Warping: PLA PETG ABS Complete Guide
Ryan has been operating FDM 3D printers since 2017. He runs a 12-machine print farm. His daily drivers include a Bambu Lab X1 Carbon, Prusa MK4s, and Creality Ender-3 V3s that have logged over 15000 print hours. He started 3D Printer Nerd to provide structured troubleshooting guides with diagnostic order, material-specific parameters, and clear stop points.